For those of you following along with the Bee-Jeweled Pincushion project, today we’re going to chat about fabric and set up. It’s a long, detailed article, so grab a cup of something before you delve in!
Normally, I figure if you’re taking on a project like this, you have some notion of basic embroidery and how to set up a project. Still, I don’t like to assume, and so, as a preliminary, I’m going to go over my method of setting up this project to get it ready for stitching.
We’ll also chat about using a hoop or a frame while embroidering the pincushion, I’ll give you some tips, and I’ll show you my preferred set up for this type of project. I’ll also mention alternatives.
If you’re not following with the Bee-Jeweled Pincushion, never fear! The tips below can be applied to practically any similar embroidery project.
Ready?
Linen
If you purchased the materials kit for the Bee-Jeweled Pincushion, and you’ve received it (I know many of you have! Yay!), you’ll notice that there’s a folded piece of beautiful linen in the kit.
The linen is called “Manuscript Vellum” here in the States. It is manufactured in Italy by Graziano, so if you’re in Europe or the UK, or in a country that imports the range of Graziano linens, look for it under their label.
In the kit, the linen – which is about 9″ x 15″ – is ready to go. If you want to give it an iron before setting up the project, that’s fine. Use the linen setting on your iron and smooth it out a bit if there are any hard creases from folding.
Substitutions
If you don’t have access to this linen or you prefer to work out of your stash, you’ll want a higher thread count fabric that’s suitable for hand embroidery. Linen that has too open of a weave (ie., even-weaves used for cross stitch, low thread count linens or other fabrics) won’t work as well. You really want a full weave on a relatively fine fabric.
I personally wouldn’t use cotton for this type of pincushion, because cotton is not as forgiving a fabric as linen is when it comes to making holes in it. But – that’s just my preference. If you want to use cotton, go for it. A natural or white muslin (calico in the UK), or even a cotton twill will work. The heavier the fabric, though, the more difficult it may be to finish, and the more difficult it will definitely be to transfer the design.
Other Tools
Other tools that come in handy for setting up the project:
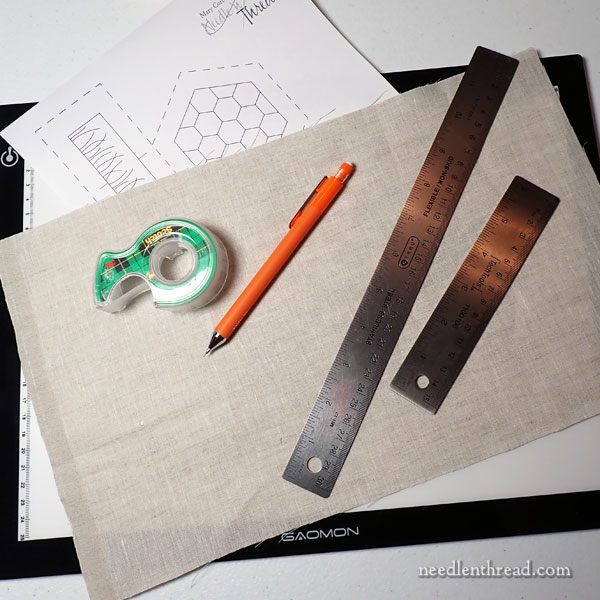
A light pad or light box for tracing
Ruler – I like metal ones with cork backing, because they don’t slip and they’re accurate.
Pencil – I use a .05 mechanical pencil.
Tape – I just use whatever’s on hand that’s easily removable, like Scotch tape or masking tape. Don’t use packing tape, duct tape, or anything strong and sticky.
The Design – It’s available here as a PDF.
Tracing the Design
I transferred the design by tracing it, using a light pad.
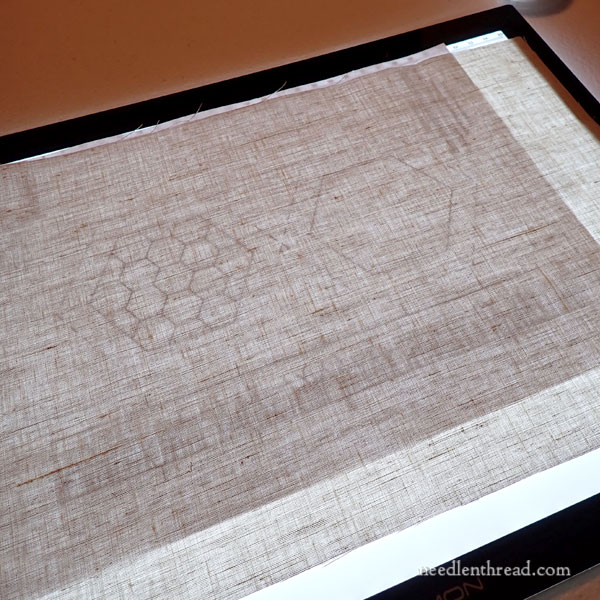
A light pad or a light box is a device that is flat, with a smooth surface, with lights inside it, that you can use for easily tracing on medium-to-light fabrics and on paper and other semi-translucent stuff.
The one that I used is available on Amazon. You’ll find a link to it under “Embroidery Tools & Accessories” on my Amazon Recommendation Page.
If you don’t have a light box or a light pad, other options include taping the design and fabric to a sunny window that’s easy to reach; putting a light underneath a glass covered coffee table; making your own “light box” by clamping a piece of clear plexiglass on the edge of a table and shining a light up underneath it.
It’s so much easier to trace a design, if you can put light behind it. A light pad is so convenient and really worth having.

Before you start to trace, tape the pattern to the light pad (or whatever device or substitution you are using), and then either pin or tape your fabric over the pattern securely on all sides. As much as possible, you want to keep your fabric from shifting during the tracing process.
I tape everything down. I prefer tape because pin heads can get in the way of rulers and such.
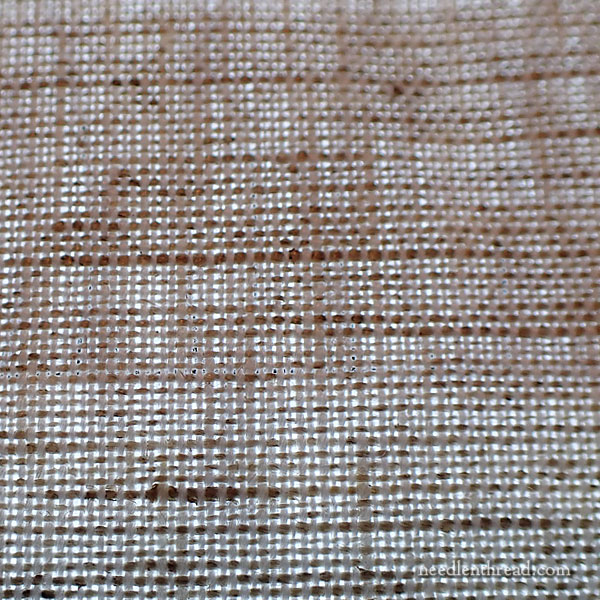
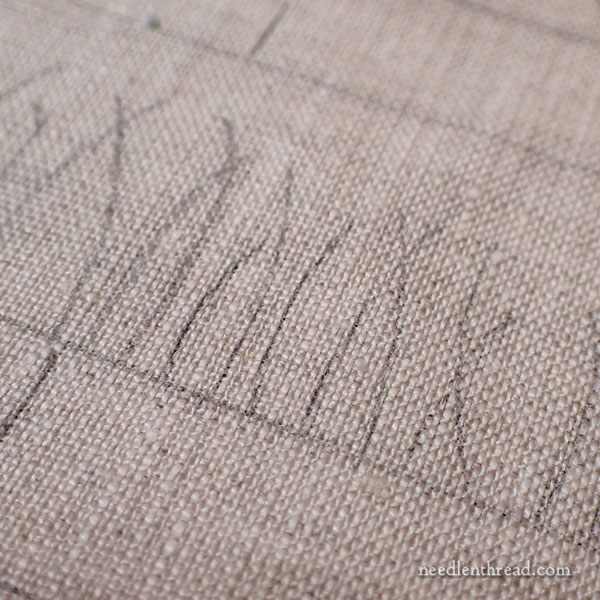
In the strange photo above – which is taken Very Close Up so that you can see the weave of the fabric – the light pad is on behind the fabric.
See how you can see the weave of the fabric? Even though it isn’t this huge in real life, you can still see the weave of most fabrics with the naked eye (even when they aren’t backlit).
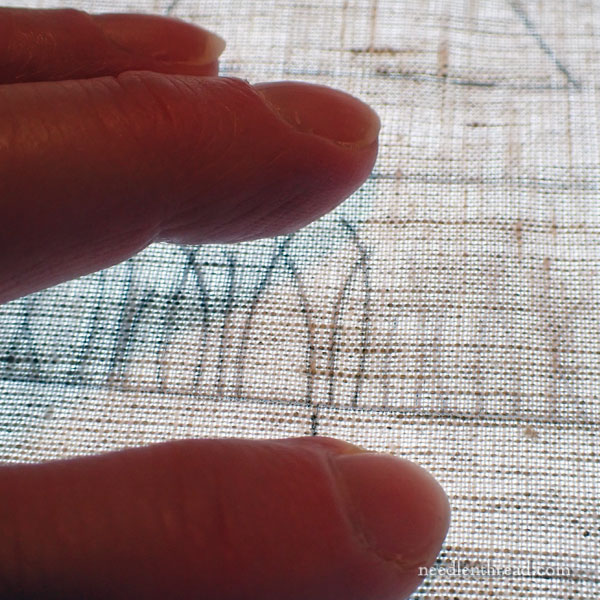
The point of paying attention to the weave is that you want to make sure the fabric weave is more or less lined up right with the horizontal design lines. You can see the lines best, if you put your hand on your fabric to hold it down onto the paper behind it.
See how the horizontal line at the base of the grassy part runs pretty much right along the line formed by the weave of the fabric? That’s what you want.
I’m emphasizing this, because you don’t want your fabric crooked on your design when you get ready to trace. Otherwise, you’ll be stitching a little on the bias (the diagonal) of the fabric, and this will lead to a warped finish when you assemble the pin cushion.
Don’t rely on the cut edge of the fabric to determine the straight of the grain (the straight of the weave lines in the fabric). Rely instead on seeing the grain over the design lines, and lining up the long horizontal lines with the grain.
Then tape the fabric in place, and you’re ready to trace.
I used a ruler to trace all the longer straight lines. I traced the seam allowances (dashed lines) as well as the solid lines.
Use a light touch. With the light pad on underneath, you might not see how heavy your pencil line is. It’s a good idea to turn your light off and double check it. It’ll be darker than you realize. You don’t need to make super-dark lines.
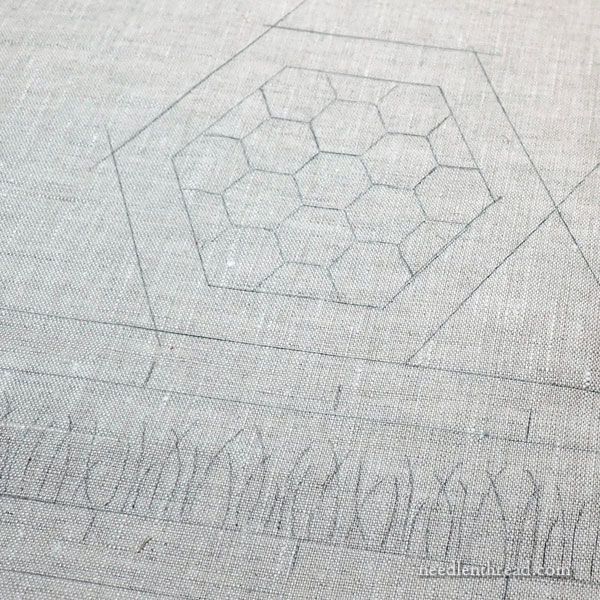
For the small hexagon pattern, I didn’t bother with a ruler. It’s very easy just to quickly sketch those small, straight lines lightly in.
Before you un-tape your fabric, turn your light source off to make sure you’ve traced all the necessary lines.
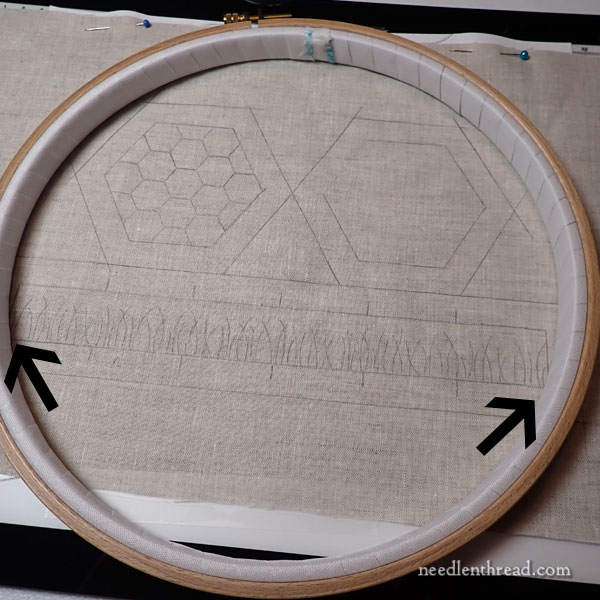
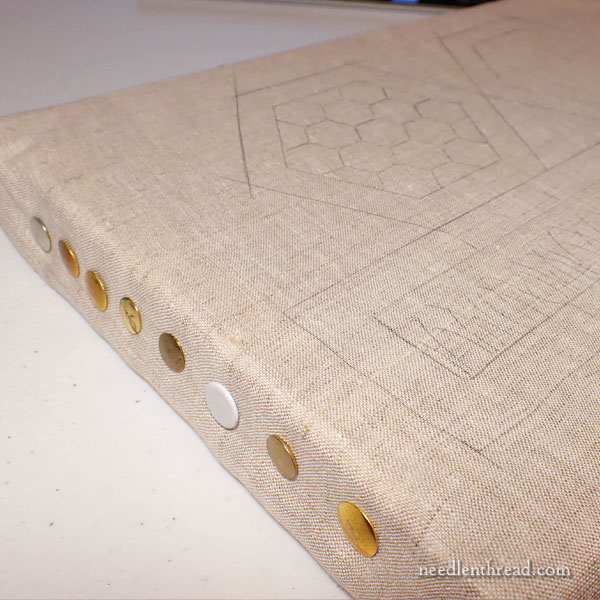
Once your design is traced, it’s time to put your fabric in a hoop or a frame.
The fabric design will barely fit in a 10″ hoop. It will fit better in a 12″ hoop, if you’re going to use a hoop. I don’t own a 12″ hoop, so I can’t show you. But in the photo above, you can see how the edge of the strip runs into the edge of the 10″ hoop. You could still fiddle this, when you get to that point of the embroidery. You could even embroider that part off the hoop, if you had to.
What you can’t do is use a smaller hoop that you have to move around on the embroidery. The embroidery will be embellished with a good amount of beads, and you really shouldn’t hoop over beads.
You’ll notice that the whole piece of fabric won’t fit in a hoop this size. In order to extend the fabric, you can sew strips of scrap fabric – muslin, calico, whatever you have – on the sides. This method of extending fabric to fit a hoop is explained in this article, here.
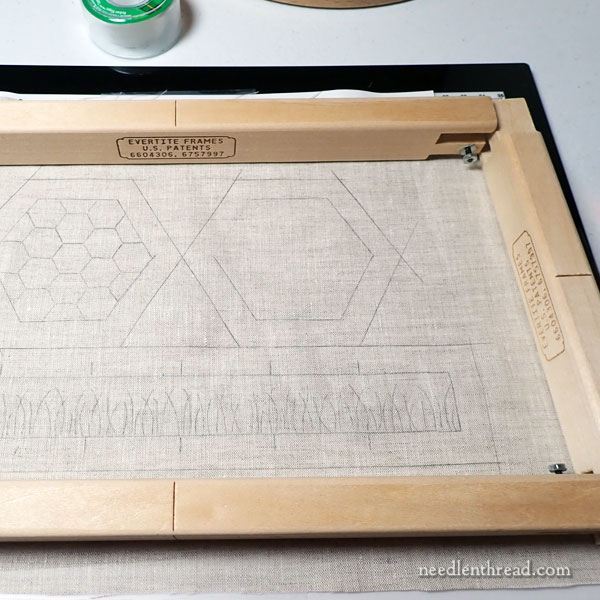
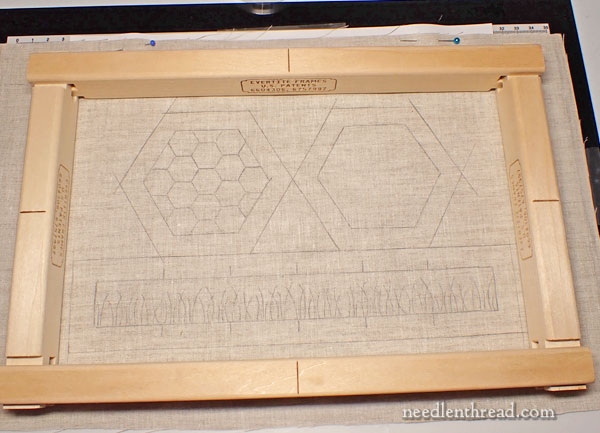
For this type of smaller embroidery project where the whole project needs to fit within the hoop or frame, I prefer to use stretcher bars.
I use Evertite stretcher bars. If you’re not familiar with them, you can read about them and see how they work here.
For this project, 8″ x 12″ stretcher bars work great.
Here are some points to be aware of when you invest in stretcher bars:
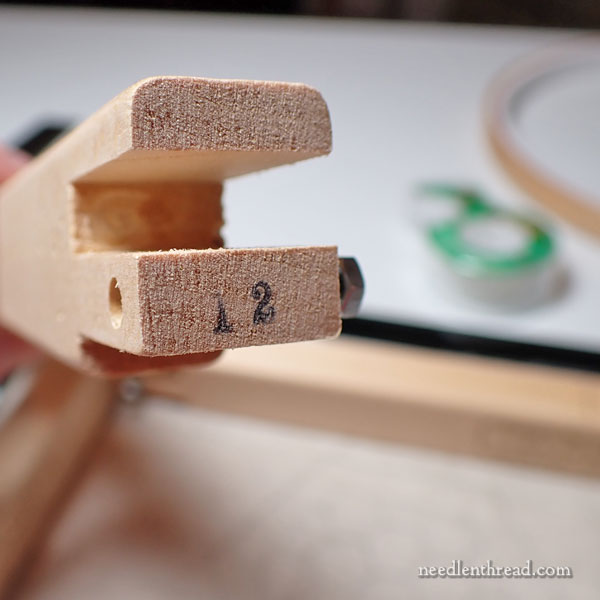
They’re sized by the length of the bar…
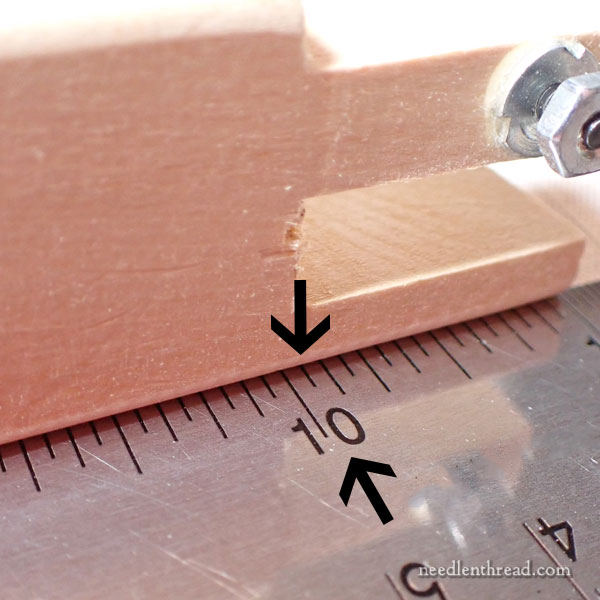
…not by the length you need for the exposed fabric.
So, a 12″ stretcher bar is 12″ long – but it will only give you 10″ of exposed fabric.
Keep that in mind when you purchase stretcher bars!
Another few points:
An EZ tack kit (available where stretcher bars are sold) makes setting up stretcher bars much easier!
You can use regular thumbtacks from the hardware store (they’re much more affordable) with Evertites, because the wood they are made of is fairly soft. Other brands of stretcher bars may be made from much harder wood, so regular thumbtacks might not be quite strong enough.
If you invest in Evertites, they last a Really Really Really long time. I’ve been using the same stretcher bars for at least 18 years.
And don’t forget the T-Tool for tightening them.
You can find Evertite Stretcher bars, and other stretcher bars that are less expensive, available online through Needle in a Haystack and other locally owned needlework shops, including needlepoint and cross stitch shops. There is a supply issue with Evertites, so just be aware of that!
Alternatives for Hoops and Frames
Many of you have your own framing / hooping preferences. Use what you prefer, of course!
Slate frames and scroll frames will also work just fine with this project.
Your only concern is that the whole design should be visible and stitchable when framed up.
Ok! so that part is taken care of.
I’m sorry this post is so long, but I really wanted to cover thoroughly the set-up for the project.
You can ask any questions about fabric and preparation in the comment section below.
Next time we meet on this project, we will talk about stitching materials and other supplies. And then we’ll get into the fun part – the actual stitching!
For members on Patreon, I’ll be putting all of this information in the same PDF as the materials and supplies list, which you can expect next week.
We’re making more kits now, just waiting for a few more parts!
