Continuing with the series of long and short stitch shading lessons, here's Lesson 2: Inside the Box. In this lesson, we'll be stitching element one on the sampler, the two boxes in the top left corner.
If you're just joining us for the long and short stitch shading lessons, be sure to check out the previous posts in this series: Supplies and Lesson One: Setting up.
At the end of this post, you'll see a series of three videos on the basic long and short stitch. (I couldn't quite cram it all into one 10-minute video!)
Materials:
1. Project in hoop or frame, with Element One: Boxes centered in hoop (top left corner of the whole sampler)
2. #9 or #10 crewel (embroidery) needles (I use a #10)
3. Small, sharp embroidery scissors
4. DMC stranded cotton in the following colors: 814, 347, 349, 351, 353, 3855, 745, Ecru
NOTE: There is a difference between the step-by-step photos and the video tutorial for this lesson. In the step-by-step photos, I began the top of the box with bright red (349). In the video tutorial, I began the top row in dark red, (347) and worked six rows of color. The directions, however, are written with the bright red (349) as the first color, with five rows working to the lightest yellow (745). You can work the box either way, with five or six rows. If you work five rows, start with bright red (349). If you work six, start with dark red (347).
All stitching is worked with one strand of floss.
To Begin
1. Begin with the smallest box.
2. Anchor your thread according to your favorite method, or use the method demonstrated in the video tutorial, part 1.
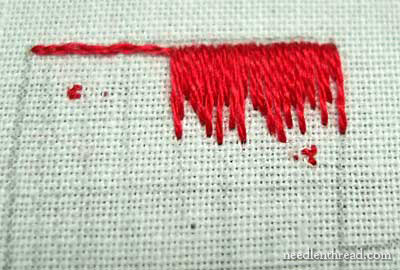
3. Work a split stitch line across the top of the small box in bright red (349).
Draw vertical lines, from the center to each side of the box, to mark your stitch direction. Use a regular pencil for this. The vertical lines will help keep your stitches straight up and down. (This is demonstrated in the video, part 1).
First Row
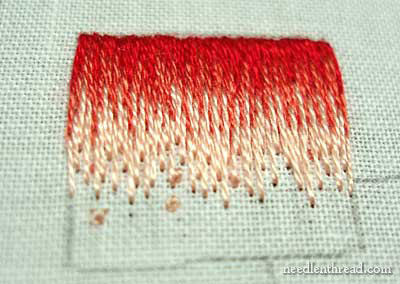
1. Bring your needle up through the fabric, about 3/8" below the split stitch line, in the top center of the box. Take your first stitch over the split stitch line and back into the fabric. Now, working down the row to the right, space about six directional stitches more or less the same length all the way to the right edge of the box. This is illustrated in the video, part 1. after placing your directional lines (which are "long" stitches), go back to the center and work to the right, filling in "short" stitches of varying lengths, moving down the row.
2. You want your stitches to lie right next to each other, as they would in satin stitch, so make sure that you space them correctly - not too close that they bunch up, but not too far apart that you can see any fabric between them.
3. Continue working across the fabric to the right side of the box, alternating the size of your stitches between long and short. Vary their lengths. For a natural-looking long and short stitch (less formal and rigid-looking), stagger the length of your stitches between several lengths - some long, some a little shorter, then a bit longer, then shorter again, then shorter yet, then a little longer, then long, then short, then slightly longer, etc......! You want the bottom edge of your stitched row to be jagged, but you want ot keep an overall consistent length across the longest points of the stitches.
4. When you reach the right edge of the box, end with a long stitch on the pencil line. This is approximately what your progress should look like so far:
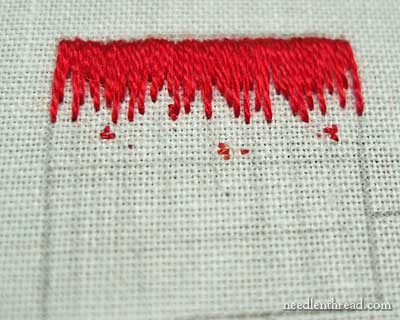
5. Now, move back to the middle of the box and work from the center to the left side of the box, doing the same thing.
6. If you're like me, one side will look better than the other. I don't know why this is! For me, the second half that I stitch always looks better than the first, even if I switch directions and stitch from the center to the left first.
Refer to the Long and Short Stitch Video, part 1, below, to see this technique worked out.
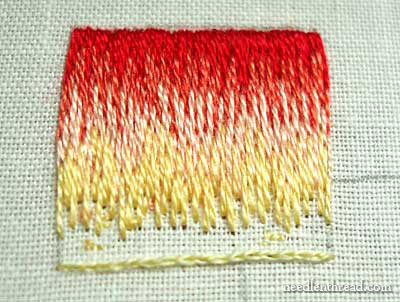
Subsequent Rows - up to, but not including, the last row
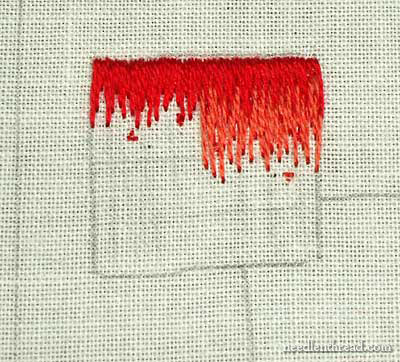
1. After the first row, each row is worked in the following sequence of colors: ---- Row 2: 351 ---- Row 3: 353 ---- Row 4: 3855
2. For subsequent rows, after the first row, bring your needle up from the back of your fabric into the first row of stitches, in the center:
3. Stitch some longer directional stitches from the center towards the right edge, dividing up the stitching area as you did with the first row (demonstrated in the video, part 2).
4. Stagger the entry point at the top of the stitches, so that some begin higher and some lower than the others. Work into the long stitches of the first row, about one-third the length up into the long stitches.
5. Work the short stitches of the second row high up into the first row of stitches, bringing the needle back down into the fabric to make a "short" stitch in the second row. Again, stagger your stitches, varying their length by varying where the stitches emerge in the previous row and where they go down into the fabric.
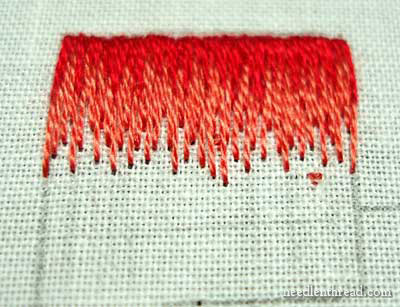
6. Continue from the center to the right edge, and then work from the center to the left edge of the box. You can find this technique demonstrated in the Long & Short Stitch Video, part 2, below.
You'll work each row in this manner, filling in the square, until you get to the last row.
Make sure that you're taking your stitches deep into the previous row, so that the colors blend well. Again, the video will help with this!
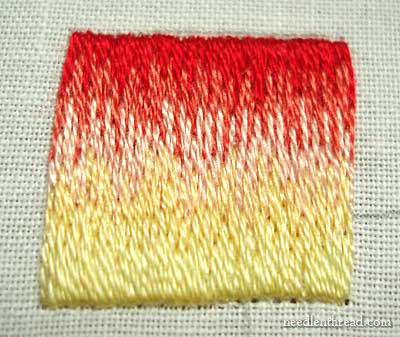
The Last Row
1. Split stitch the base line of the square in light yellow, 745.
2. Finish the last row in the same manner of the previous rows, but working the base of the stitches over the split stitch line, as you did with the beginning of the first row.
To help reduce "information overload" in one post, tomorrow I'll post the rest of Lesson Two, which is the second box, worked on the diagonal!
You may print, if you wish, a PDF of the entire lesson (including the second box):
Long & Short Stitch Shading Video Tutorial - Part 1
Long & Short Stitch Shading Video Tutorial - Part 2
Long & Short Stitch Shading Video Tutorial - Part 3
If you have any questions or comments, need clarification on anything, or have any suggestions that I'm able to implement concerning the lessons, don't hesitate to leave a comment below. Additionally, you can subscribe to the e-mail newsletter (right hand column) or my RSS feed to ensure you don't miss the next lesson! Advantages of the newsletter include that it's in a better format for printing (compared to the webpage) and you can reply directly to it to send me an e-mail (and attach pictures, if you wish).
Long and Short Stitch Shading Lessons - Related Posts