Here beginneth the promised long and short stitch shading lessons. These will appear as regular posts on Needle 'n Thread over the next several weeks. Even if you aren't inclined to learn long and short stitch, I still hope you find these little tutorials interesting, informative, and helpful for whatever hand embroidery technique you prefer. Of course, I'll still be adding regular content to Needle 'n Thread between the lessons. The lessons will be spaced out, with at least one a week, and not more than two. Here we go, then, with Lesson 1.
You already know that, before you launch into most embroidery projects, you have to do some preliminary work. Today's lesson covers the preliminaries.
Lesson 1: Getting Started
Objectives
1. to gather & organize materials
2. to transfer the design
3. to frame (or hoop) up the fabric for stitching.
Materials
1. Fabric: high count cotton (muslin, calico) in solid color (white, natural) – 12” x 12” square
2. Transfer tool (your choice): #2 pencil, water-soluble fabric marker, micron art pen (.005), iron-on pencil, or dressmaker’s carbon – whichever method of transfer you prefer. I'm using a #2 mechanical pencil. I use mechanical pencils because they're consistently sharp.
3. Scotch tape
4. Pair of 10” stretcher bars OR a decent embroidery hoop (4” or 6” will work well)
5. Iron and ironing board
6. Pattern (below)
7. #9 or #10 crewel needles (I will use size 10)
8. Small, sharp scissors
9. Embroidery threads – DMC stranded cotton in the following colors, arranged numerically below for easy shopping. You’ll find them grouped by design element further along in the lesson.
158, 159, 160, 161, 223, 225, 347, 349, 351, 353, 469, 471, 472, 613, 754, 814, 3011, 3012, 3013, 3052, 3855, Ecru
10. Pencil for marking stitch direction as you progress (if you don't use a regular pencil for transferring your design)
11. Good lighting! If you don't have a light specifically for your needlework or crafts, I suggest a very sunny window or porch, or as bright a light inside as you can manage.
Procedure
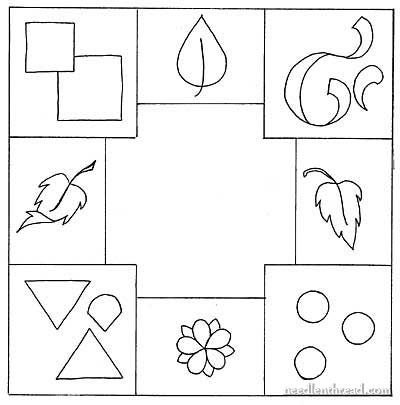
1. Print this PDF of the Long and Short Stitch Lessons Pattern. It should print as approximately a 7" square. The pattern is designed so that you can work the whole piece or you can work each individual element separately on scrap fabric. If you are stitching each element individually on scrap fabric, you can skip the next step.
2. Cut a 12" square of fabric and stitch the edges with a zig-zag stitch on your sewing machine to keep the edges from fraying. Alternately, you can hand stitch around the edges with a whip stitch. (This is a normal step in setting up a project, but on this project, I admit that I skipped stitching the edges!)
3. Iron your fabric well. You can use starch if you wish. It doesn't make any difference in the stitching (as long as there's no flaking on the fabric), and it will rinse out at the end. You want your fabric smooth and wrinkle-free.
4. Choose your favorite method for transferring a design onto fabric. You will find several methods discussed under Tips and Tricks for Hand Embroidery here on Needle 'n Thread. For this type of embroidery, I'm using a light box and a pencil.
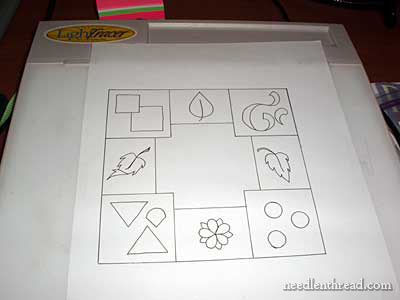
First, tape your pattern to your light box. A sunny window will give you the same results as a light box, if you don't have one.
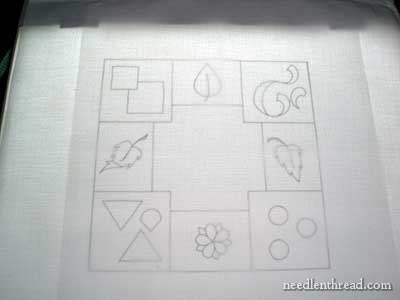
Center your fabric over the pattern and align the lines (as much as possible) with the grain of the fabric. You don't want to be stitching on the bias! Tape your fabric to the light box, too. I eye-balled the center of the fabric, but if you want to be more precise, you can finger-fold the fabric in half lightly, horizontally and vertically, so you can see where the center of the fabric is.

Using a #2 pencil, trace the design. Use a straight-edge (ruler or what-have-you) for the lines. Don't "stroke" as you trace. Try to trace with one smooth, constant line.
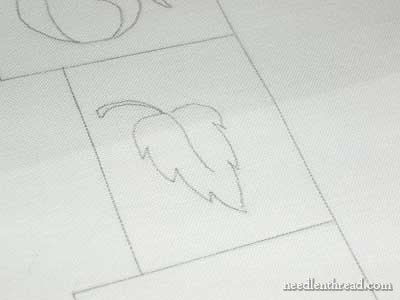
Notice that the lines aren't hairy or sketchy.
5. Now you're ready to frame up your fabric, if you're using stretcher bars. If you're using a hoop, you don't need to hoop the fabric up until you're ready to start stitching.
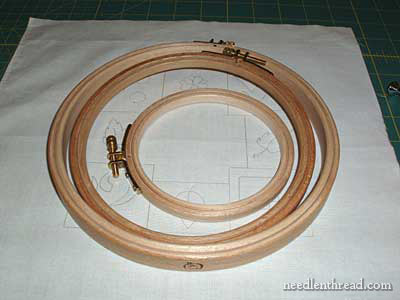
A 4" hoop will fit individual design elements. You can use anywhere from a 4" - 6" hoop. If you can't find a Really Good Hoop, that's ok. Use a plastic Susan Bates-type hoop - it will work fine for this project. Just be sure to tighten the hoop and your fabric often.
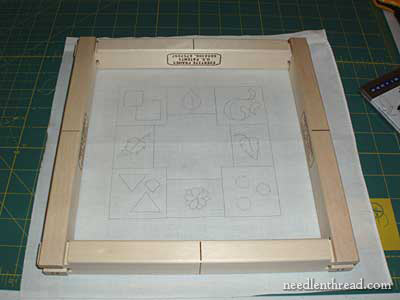
I'll be using stretcher bar frames - specifically, Evertite stretcher bars. If you're using stretcher bars, a 10" square will work. But, if you're not familiar with all these tools and gadgets, just use a simple hoop - you'll be fine!
6. Gather your threads and organize them according to your favorite method. You can separate them for each element, so that you only have to have the necessary threads out at one time.
Element 1 (Boxes) and Element 3 (Circles): 814, 347, 349, 351, 353, 3855, 745, & Ecru
Element 2 (Triangles) and Element 4 (Ribbon Swirly): 158, 159, 160, 161
Leaves: 469, 471, 472, 613, 3011, 3012, 3013, 3052
Little Flower: Ecru, 223, 225
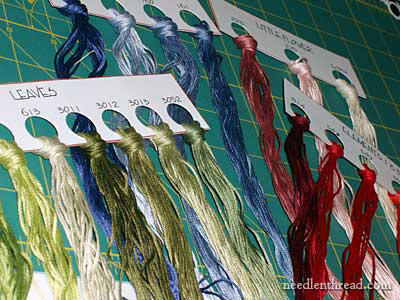
If you want to use thread cards for organization, you can print the threads cards, already numbered. The directions for using the cards have already been discussed here on Needle 'n Thread, and the link is provided below, too.
Long and Short Stitch Thread Cards (PDF)
Directions for Organizing Threads using Thread Cards
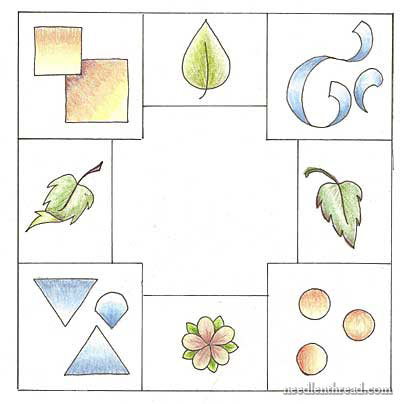
7. Take a look at the colored design, below. I colored it with prismacolors. The color isn't 100% accurate - I've made some adjustments while stitching - but at least it gave me a sense of what colors I wanted to use, and the general direction of the shading. To get a sense of shading, try coloring your pattern yourself, if you have colored pencils on hand. You don't have to do this, of course, but it will help familiarize you with the direction we're going in. I think it's always a good idea to at least try to color a shaded design yourself, if possible, to get the feel for the shading.
Order of Stitching the Project
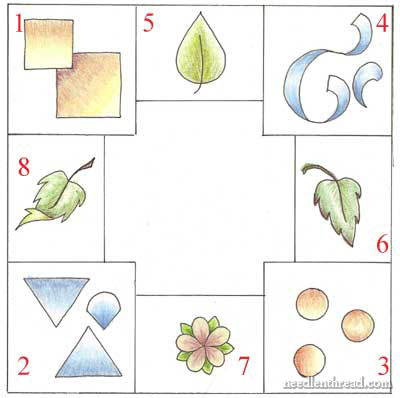
The elements of the project will be stitched in a specific sequence, as indicated in the picture below.
Summary of Print Materials
Here's a summary of all the printed material for Lesson One. They're all PDF documents. The lesson itself is available as well. There are no pictures included in it - just straight text - but if you want to print it and read through it at your convenience, you may.
L&S Project Pattern
L&S Colored Pattern
Thread Cards
L&S Lesson One: Getting Started (including materials list) (a luxury - this may not always happen, but I'll definitely try!)
Conclusion
I'm not covering any stitching in Lesson One, in order to give those of you following these tutorials the weekend to gather supplies and set up your project.
If you have any questions, don't hesitate to leave a comment below. Any questions directly related to the lessons can be left in the comment section on Needle 'n Thread, below this article, so that others will learn from any ensuing discussion or clarifications, too.
If you're on board for these lessons and want to make sure you don't miss any, feel free to sign up for my daily newsletter. You'll find the sign-up box near the top of the page, in the right-hand column. You'll receive each day's post in your inbox, on the day that it's posted. Also, it'll give you a more printer-friendly version, if you intend to print out the tutorials.
Don't hesitate to let me know if you have any questions, suggestions, difficulties, etc.!


|
