To keep this series of embroidery tutorials a bit organized, I'm going to stash all my tutorials for hand embroidered lettering and text on this page, and then I'm going to list this page in the top right column under "Editor's Floss" while the tutorial series is on-going. I'll also have a link on the Tips and Tricks for Hand Embroidery page (which you can also find listed under "Editor's Floss" in the top right corner.
Hand embroidery is an excellent way to personalize gifts, household objects, momentos and so forth. Text and lettering is an excellent way to personalize, but sometimes, writing with a needle and thread can be kind of difficult.
I've put together a series of tutorials to help stitchers improve their embroidered lettering. As the tutorials progress, I'll index each one here so that you can have easy access to it.
I hope you find these tutorials useful and fun!
Hand Embroidery: Lettering and Text 1 - This tutorial covers setting up the lettering sampler. In this particular article, you won't learn much about stitching your letters, but there are a few tips and tricks for design transfer discussed, if you want to take a look! You can also get a good look at the text sample that I'll be using in this series.
Hand Embroidery: Lettering and Text 2 - This tutorial features lettering in backstitch, but it focuses mostly on how to "travel" your threads in order to achieve a clean, finished look from the front. I discuss the path of the embroidery, noting that the path you would follow for hand writing is not necessarily the same path you would follow for hand embroidery.
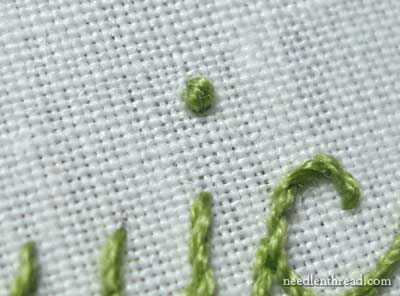
Hand Embroidery: Lettering and Text 3: Dot Your I's. In this tutorial, I focus on one method of dotting I's. You know how the dot floats so far away from the text? Well, how can you dot, without carrying your threads? I'll show you how, and then the technique can apply for a variety of different dotting stitches.
Hand Embroidery: Lettering and Text 4: In this tutorial, the focus is on stem stitch, especially how to travel in the right direction to keep the stem stitch looking like stem stitch, and to keep the working thread in the right place in relation to the needle. This sample is in cursive, so we will also look at how to travel the threads to achieve a nice cursive text, without bulky double lines. Finally, this tutorial also addresses the question of crossing over previously stitched lines.
Hand Embroidery: Lettering and Text 4: This tutorial will focus on a suitable stitch for very small text - whipped backstitch - and how to keep the whipped backstitch smooth and consistent in its twist. We'll look at the difference between whipping the stitch while traveling in different directions, and discuss how to avoid changing the direction of the stitching.
Hand Embroidery: Lettering and Text 5: Did you know that you can combine your stitches on the same lettering for very nice results? Well, you can, and this tutorial is going to look at using a combination of stitches on the same lettering.
I'll be adding links to the individual tutorials as the tutorials are posted. The series will cover more than five tutorials, but so far, I only have samples embroidered for these!


|
