If you've been following along with my recent crewel embroidery project, you'll be happy to know that he is finished. After my wishy-washy-what-to-do post on Saturday, I figured I didn't like having a rooster hanging over my head. Besides, the majority of you encouraged me to do the right thing and finish it! So I got to it, and finished the thing off. I'm satisfied with the finish, more or less. What am I talking about?!?!?! I'm downright elated with the finish! Simply because he's Finished!
When I started this crewel embroidery project, my purpose was to test out a variety of crewel threads that I had in my stash. I hadn't really stitched anything significant with any of them - I had no idea which threads I would like better when stitching extensively with them. The rooster taught me several good lessons about crewel embroidery. I'm going to share those with you once I stitch up some small (very small - I'm wooled out!) samples of each thread.
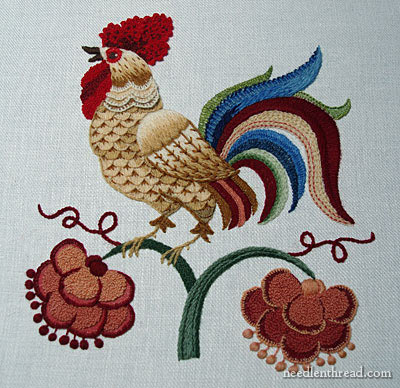
In the meantime, here's the Rooster Guy in all his glory:
There are (there always are!) plenty of things I wish I had done differently. But I can truly say that, on this project, for the majority of it, I re-stitched the areas I didn't like, until I arrived at something I liked at least a bit better!
One point that will probably haunt me: I wish I had stitched the flowers the same, following the color layout of the flower on the left. But too much stitching went into the flowers to pick them out this last time! I picked out the flowers 6 times before settling on a stitch combination. It's not necessarily my favorite combination, either - I just ran out of patience on those things.
The feathers just below the wing were the last things I embroidered, after picking them out. I chose the colors in the flowers - the darkest red and the medium coral. I like it better than the pinks that were originally there.
My favorite part of the rooster: his comb!
Tomorrow, I'll show you what I plan to do with the fellow. I've got an idea, but I have to forage through some shelves in the studio to dig it out. I can't wait to show you!
Thanks heaps for following along with me on this project, and for your encouragement, advice, and suggestions along the way. I hope I didn't bore you too much with the stitching and re-stitching (and sometimes re-stitching) of the various parts! It was an interesting journey, and as usual, it's always great to have your company along the way!
For further posts on this crewel embroidery project, you may wish to visit the following links:
Free Hand Embroidery Pattern for The Crewel Rooster
Setting up The Crewel Rooster Project
Choosing Threads for The Crewel Rooster - and the first flower
Crewel Design Books
Stem Stitch Filling on Flower Stems
Scalloped Feathers on the Rooster's Body
The Beginnings of the Rooster's Tail
French Knots on the Wattle
Adding the First Blue Feather using a Raised Backstitch
The Rooster Tail, Finished for Now
The Wing - Three Attempts
Adjusting the Tail Feathers One More Time
The Rooster's Head, Neck, and Comb
The First Flower Attempt Comes Out
New Colors for the Flowers
Lots of Knots
Rethinking the Flowers Again
More knots on the Flowers and a Color Change
|
