Back to the goldwork embroidery project I'm currently working on - now it's time to add some gold! The first real metal threads added to the design are passing threads, and in particular, I'll be using gilt smooth passing thread, in size #4, which is fairly small thread - about .35 mm wide.
For goldwork, I order my supplies from two different places, depending on what I'm after. For smooth passing thread (gilt and 2%) I go to Tanja Berlin in Canada. Shipping is a bit more expensive, and the shipping time is a bit longer, so I always try to think ahead if I have a large goldwork project coming up. For some reason, I really like the passing threads that Tanja carries. I'm not sure who the manufacturer is, but they are different from other passing threads that I've ordered from other places. Another thread I order from Tanja is check thread, but I'll talk more about that later, since I will be using it later on in this project.
Another good source for real metal threads is Hedgehog Handworks. In my stash, I have a good selection of frieze (or check purl) and smooth purl from Hedgehog, as well as Jaceron (pearl purl).
So, I'm beginning the goldwork on this project with #4 gilt smooth passing.
For tools and other supplies (besides the smooth passing thread), this is what I'm using:
1. Beeswax - this is for coating the couching thread, to strengthen it against the metal thread
2. Gold-colored couching thread - for this project, I'm actually using YLI #100 gold (color #215). It is tiny, strong, and less visible than other threads that I often use (including Kreinik, 50 wt Tire Silk, and Soie 100/3). In fact, while working this project, it has become my Most Favorite gold-colored couching thread ever. (I have no idea where I got it...)
3. #11 Crewel (embroidery) needle - you can get away with a #10, which is easier to find
4. Chenille needle for plunging
5. Tweezers - essential for pinching threads and pulling things and all around usefulness
6. Small, sharp embroidery scissors used solely for cutting metal threads
7. Melore - for prodding metal threads around
(The melore is not 100% essential - it's a nice tool to have, and since I have one, I feel obliged to use it!)
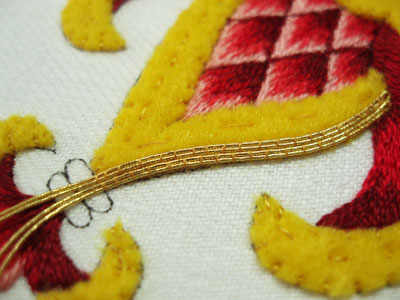
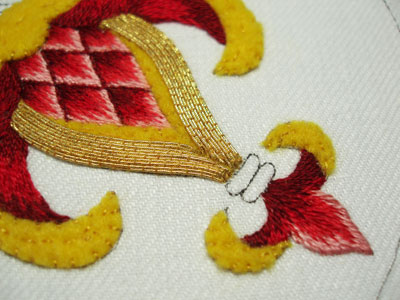
The outside of the body of the "fruit" will be covered with the smooth passing thread, which is couched in pairs.

I started with double the length of one side of the fruit, plus about 1.5" for plunging. To create a pair of threads, I folded this length in half.
Using tweezers, I pinched the fold so that it was a sharp fold.
I started at the outside base of the side of the fruit, next to the petals, arms, peelings, bracts, or whatever you want to call them - those long curly things that I already embroidered. I ran my couching thread through the beeswax about three or four times to coat it well, and then ran it slowly between my finger and thumb to work the wax in and get rid of any extra wax clumps. I anchored the stitch in the yellow felt, taking a few little tiny anchoring stitches. Then, I brought my needle up in the middle of the pinch of the gold thread, taking it back over the thread and into the fabric and creating the first stitch at the base of the gold thread, in the middle of the pinch. You can see the first stitch in the photo above - it is perpendicular to the other couching stitches.
The next couching stitch is just above the pinch, across the pair of threads, and pulled tight to hole the pinch together (but not too tight, as to distort the pair of threads). The pair of threads should lie parallel to each other, but not overlap, nor should one jump up and sit higher than the other.
I worked two rows (two pairs each) on each side of the fruit, leaving a long bit of passing thread hanging over the tip, for plunging to the back.
As I couched each row, I tried to space my stitches between the stitches in the previous row, in a "brick" fashion.
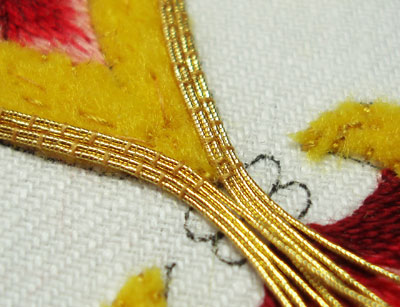
You can see here at the tip that there's not enough room for another two pairs of passing threads, which would keep the side even, so I will stagger the placement of the threads, so that they miter into each other when I plunge them.
I should have gone ahead and plunged these threads at this point - but I didn't. It's always easier, in my mind, to plunge as you go, rather than leaving everything to plunge at the end. However, I don't always practice what I preach!
So I worked one more pair up each side of the fruit, and ended up with LOTS of ends to plunge.
Plunging is not my favorite part.
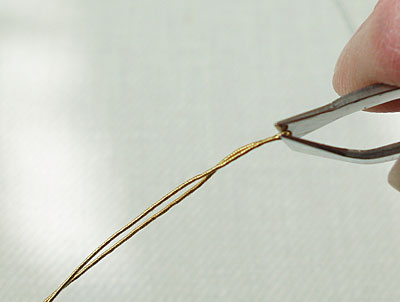
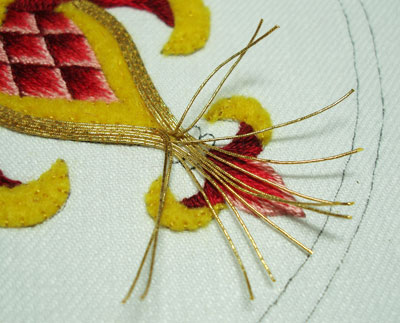
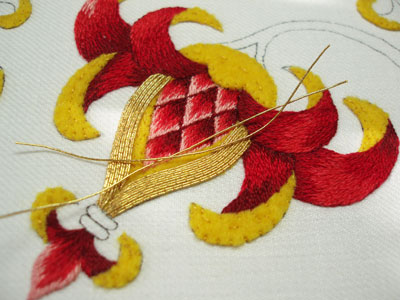
There are a couple ways to plunge goldwork threads. You can use a lasso formed of string and pull the passing thread through, or, if you're using a fairly fine passing thread as I am here, you can use a chenille needle with a large enough eye to accommodate the passing thread. I used a chenille needle and worked from the outside threads towards the middle on each side. Basically, to plunge the passing thread, you stick your plunging needle into your work where you want the thread to pass to the back, then I pinch the tip of the passing thread with tweezers to flatten it so it slides right into the eye of the plunging needle, and then you pull the plunging needle to the back. Now, the plunging needle doesn't necessarily pass easily to the back of the work. Sometimes, you have to wiggle it back and forth a bit. Eventually, it will pop through. (In fact, it sounds like a pretty good "pop" as it passes through the fabric to the back of the work.)

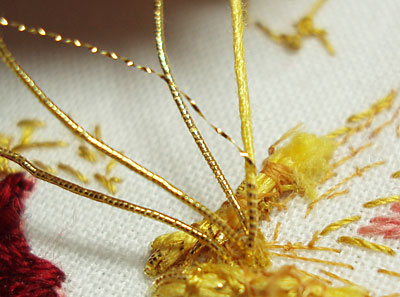
Concerning the middle area, if you look at the diagram below, even though the spacing is all wrong, this is how I staggered the placement of the threads for sinking them. On the third pairs up each side, one thread from each pair filled the gap left at the top edge of the flower, and then the other two were staggered and plunged to the back.

The rest of the threads filling the area were staggered the same way and plunged to the back.
In the photo above, you can see the passing thread pulled aside to make room for plunging each thread down the center.
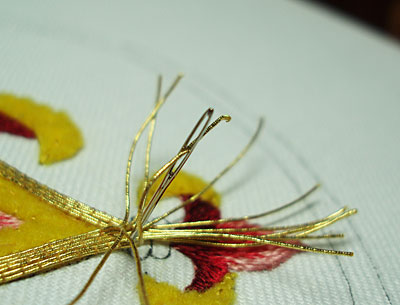
Where the threads were plunged, a line forms down to the tip of the embroidered center of the fruit.
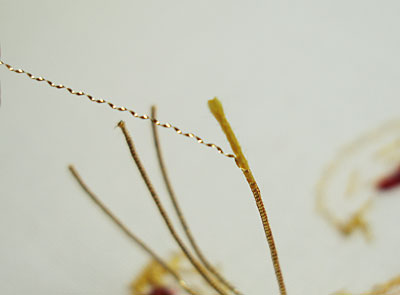
After the passing thread is pulled to the back, I strip the gold off, leaving the yellow core thread. To do this, you just grab the tip of the gold, and pull gently.
I strip the thread down to about a quarter inch from the fabric and snip the gold off. It's easier (I think) to secure the "naked" yellow thread than to secure the gold-covered thread. It's not a necessary step, but this is generally how I like to secure my threads on the back.
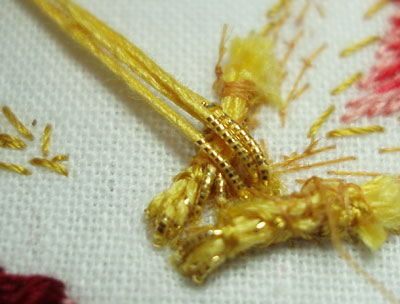
You can see that there's still some gold left on the thread - you don't want to strip it to the fabric, because you don't want to risk pulling gold off the thread that's on the front of the fabric.
And you can see that my secured threads on the back are rather clumpy and in a general mess. This really is my least-favorite aspect of goldwork - finishing off the threads on the back!
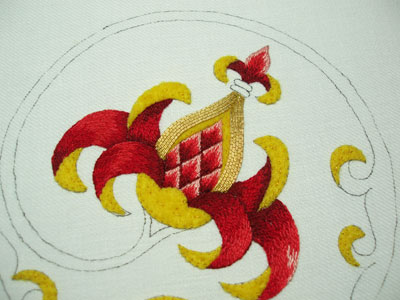
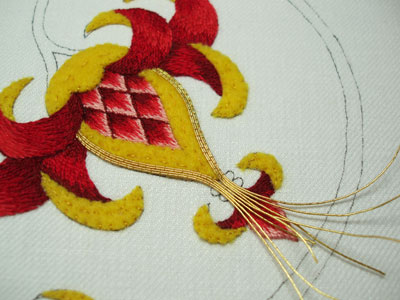
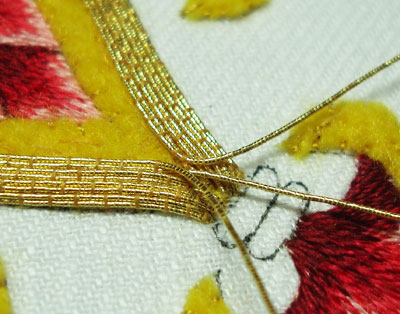
So there you have the first five pairs of smooth passing thread on each side of the fruit. At this point, I started staggering the base of the threads, too, in order to fill the rest of the felted area.
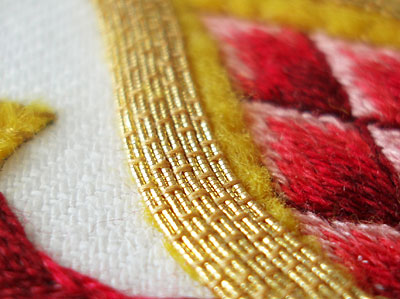
I love the look of smooth passing thread! It's so rich and solid!
To fill the rest of the space, I cut two separate pieces of passing thread to form each pair. I left "plunging room" on both ends of the thread, so that I could stagger where they were plunged in order to fill up the uneven space remaining on the outside edge of the fruit.
The threads are couched exactly the same way as before, without the fold in the thread.

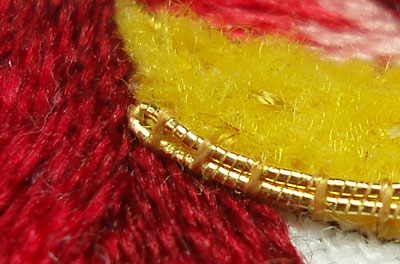
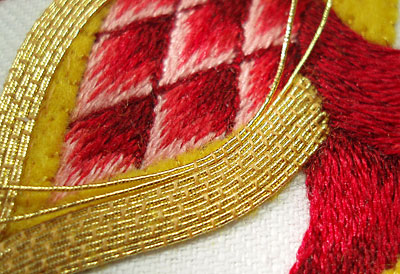
After filling up the whole area, I used gilt pearl purl, size #F1 (from Hedgehog Handworks) to line the inside of the fruit. I've already written a little bit about pearl purl and how it is used, so you may read that article if you are interested. To get the pearl purl to fit in the tip of the inside of the goldwork area there, I pinched it with tweezers so that it bent sharply.
And that's the first foray into the goldwork on this project! Next up, I'll show you what check thread is and where I'm going to use it on this part of the design!
For previous posts on this goldwork embroidery project, please visit the following links:
Stylized Pomegranate Pattern used for this project
Setting up the Project on a Frame
Preparing the Ground Fabric with Felt Padding
Selecting Colors of Silk for the Project
The Stitching Begins - SIlk Shading
Continuing the silk shading - the left side
Finishing the silk shading
|
