Here's a little more progress on my current goldwork embroidery project! After outlining the turn-overs on the top petals with pearl purl, I turned my attention to the "bowl" underneath the body of the fruit, which I planned to fill with smooth passing thread. Since I've already covered stitching with smooth passing thread in a previous post, I'll not go into deep detail here on couching, but instead, I'll just show you how I went about filling the shape.
If you haven't read my earlier article on using smooth passing thread in goldwork projects, you may want to read that post before delving into this one. The techniques for couching and plunging threads are discussed in the earlier post.

To measure out the passing threads, I just took a good length of smooth passing thread and doubled it, knowing that I had plenty to cover the space. I should have measured it, but I didn't think of that until it was too late! The "bowl" at the base of the fruit is going to be filled from the outside in with the smooth passing thread, so I started on the left tip of the bowl, leaving a one-inch tail on my pair of threads. I began with my first couching stitch right inside where I would plunge the tails, and then...
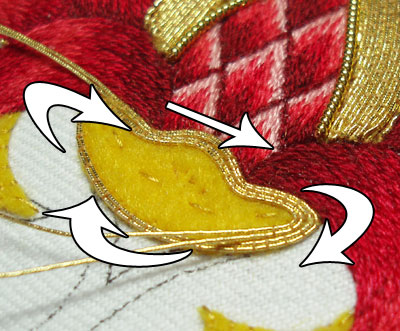
... I couched the pair all the way around the bowl, following the contour of the shape. When I got back around to the start point, I moved inside the first pair of threads, to continue around the shape, filling it in.
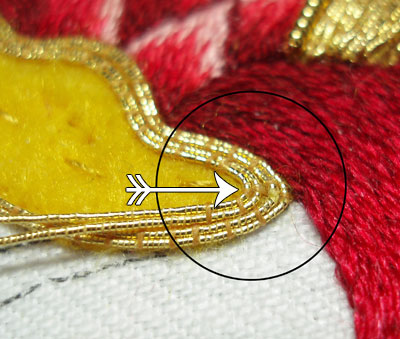
In the "corners" of the shape (the area inside the circle in the photo above, where the arrow is pointing), I always stitched a couching stitch, pulling the passing thread into the corner to fill it. I pinched the threads with tweezers, and I couched them singly - that is, the outermost thread first (after pinching it) and then the innermost one (towards the inside of the bowl) next, pulling it in next to the first one.
As the shape narrowed, the pair of passing threads wouldn't fit into the corner, and so I plunged one and continued couching the other, folded to fit into the corner.
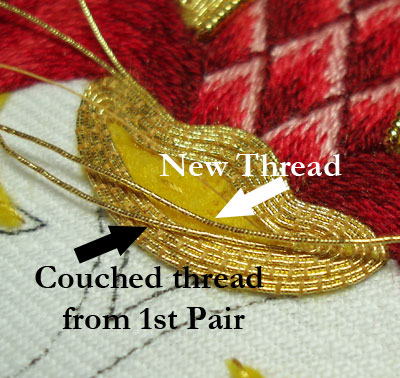
After passing the corner with the one remaining thread, I added a new passing thread to it, to make a pair again. For the new thread, I left a tail that had to be plunged. I plunged it after taking the first couple stitches over the new pair of threads, so that the tail was worked into the corner to make the layout of the threads as clear as possible for the next time I approached the corner. As the shape filled and the center area became smaller and smaller, it was more difficult to fit the threads in, but as much as possible, I kept on filling, plunging a thread when I needed to, and picking up a new thread.

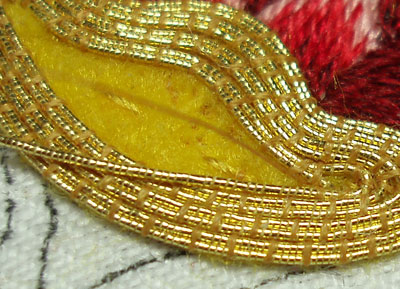
The pinch of the passing threads in the corner, and the couching threads in the corners, and the plunging of the threads in the center as things narrowed - these all created a line in the center of the "bowl" - and you might be tempted to say that it looks as if the darned thing is smiling.
I can't look at it in certain light without bringing to mind a pair of lips.
But it depends on how the light catches it - sometimes, the center crease is not as obvious. I suppose you'll have to take my word for it - the photo above certainly doesn't make that claim too clear!
If you don't like the line in the bowl area, there are other ways you can couch the passing threads in - you can go vertically, and plunge on each end around the shape, or you can start in the middle and work outwards in an oblong, or you can couch pairs of threads horizontally and plunge them on each end around the shape.
I'll be leaving this the way it is, though. It does not look quite as "odd" in person, and hopefully, future photos will bear witness to this!
For previous posts on this goldwork embroidery project, please visit the following links:
Stylized Pomegranate Pattern used for this project
Setting up the Project on a Frame
Preparing the Ground Fabric with Felt Padding
Selecting Colors of Silk for the Project
The Stitching Begins - SIlk Shading
Continuing the silk shading - the left side
Finishing the silk shading
The Goldwork Begins: Smooth Passing Thread
Check Thread for Outlining
Chip Work Filling with Check Purl
Outlining with Stretched Pearl Purl
|
