Spot Samplers can be a lot of fun to embroider! I’ve gotten a few requests about how to create one, and that’s the whole fun of it, really. The purpose of this type of sampler is simply to practice and get the “feel” for stitches, motifs, and so forth. It’s not necessarily something that’s planned out meticulously ahead of time, or that follows a stitching chart. Still, the stitcher, while working on it, kind of gets an idea of where the next spot should land.
I’ve added a few more spots to my sampler since you saw it last, so I’ll show you what I mean by being “unplanned” but still planned ahead, in the head.
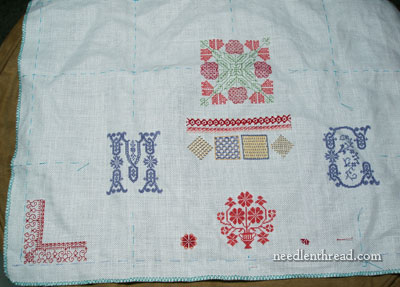
You can see the sampler is beginning to look a bit more “spotty” – that is, instead of large chunks of design (like the center medallion or the Quaker motif, or even the large initials), I’m starting to add smaller bits that concentrate on specific stitches.

The diamond-square-square-diamond sequence was not planned on a chart. I didn’t think about it much, really. I just knew that I wanted to add some squares (approximately 1″ squares) for filling stitches. I “eyeballed” the center of that area, but didn’t really count it meticulously vertically and horizontally. The fillings, from left to right, are diagonal lattice in a diamond, diagonal lattice in a square, cloud filling, and square lattice in a diamond.

I surrounded the two center boxes with a whipped backstitch.

While finishing off the filling boxes, I decided I wanted to work some running stitches (or darning) as a filling, but I didn’t want to do a tiny box. It was while working on the tiny boxes that I decided to put a line of darning stitches above, in the coral colors.
While working on the darning stitches, I was thinking about herringbone stitch, which, like the darning stitches and the fillings, can work as a counted stitch or a regular surface stitch, so I wanted to include herringbone stitch somewhere. When I finished the darning lines, I thought they looked rather blah and that they needed something a bit bolder above them. So that’s where I worked the herringbone stitches. I worked two rows that mirrored each other, and then worked an upright cross stitch inside each herringbone center. The upright cross stitch was a last minute addition. When I finished the herringbone rows, they seemed to lack something; hence, the upright cross stitch.
So you see that this type of sampler is really just a “practice” sampler – it is what a sampler is, or at least, what one used to be. Planned samplers (that follow a chart or patterns) nowadays are generally for a decorative purpose (though practice samplers can also be used for decoration). But the sampler essentially has always been a piece on which a person practiced and played. And remember, a sampler isn’t necessarily only counted stitches and techniques. I’m getting ready to move into surface stitches shortly on this sampler, and I’ve got all kinds of ideas brewing on how I’ll display them.
If folks are interested, I can go into detail about selecting the right fabric, choosing colors, and setting up a general layout for a “displayable” spot sampler. Let me know if this is something that intrigues you!
Hope you have a terrific Friday and a great weekend ahead – with plenty of time for your needle ‘n thread!!