Last week in this series on developing a spot sampler, we discussed choosing and setting up fabric, and picking out threads and colors. Now it’s time to stitch. There are a number of ways to go about exploring stitches on a spot sampler. You can plop motifs, stitch samples, lines or bands down wherever you want, or you can plan out where to put things ahead of time. On my sampler, I’ve done a little of both, but pretty much, I’ve looked ahead to see where I might stitch the next element.
The first thing we stitched in class were initials on the sampler, to mark them as “ours.” Initials or signatures or first names, or first and last names – all of these work when it comes to marking the sampler as your work. Normally, the signature comes at the end of the work, right? Well, ours came at the beginning for a couple reasons: 1. There are heaps of initials available online in counted format, and since we’re doing a little bit of counted work first, initials seemed an easy and available way to get started; 2. initials are personal, and I think they helped the students form a “personal connection” with their samplers.

You don’t have to develop the spot sampler in the same sequence that we’re working, but I’ll lay these different steps out in the same sequence, so that the progress photos make sense.
Determine the Placement of Your Initials
If you plan to go with counted work for the initials, you’ll need to figure out a general area that you’re going to stitch the initials.
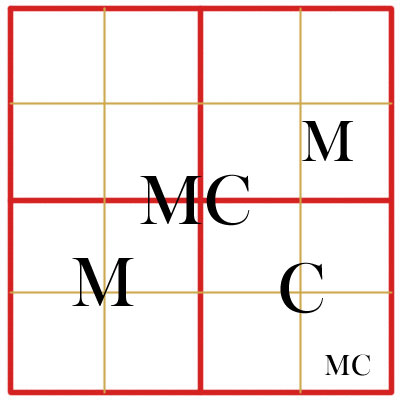
In general, these are the areas where my students ended up stitching their initials. The off-set one on the top right represents the randomly placed initial. Some students stitched their first and last initials, and some stitched only their first initial, because they chose a more complex pattern.
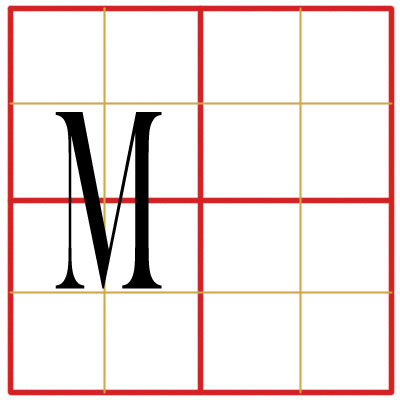
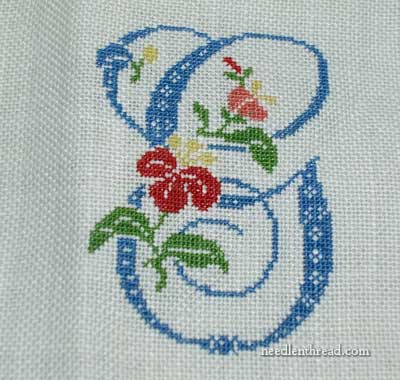
And one student stitched one Very Huge initial, which took up a good quarter of the sampler. Everything else on this sampler will probably end up being relatively small, in order to fit it all in. (Either that, or rather crowded!)
Get Familiar with Counted Cross Stitch
Before the students stitched their initials, they got the hang of working counted cross stitch by doing small samples for their stitch journals, using these samples:
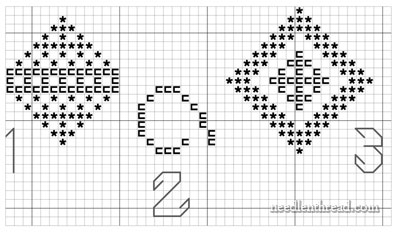
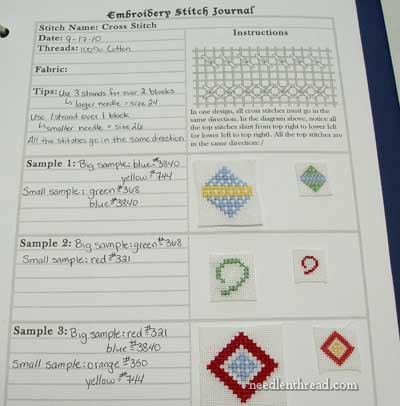
They worked the samples over one thread of fabric, using one strand of floss, and then again over two threads of fabric, using two strands of floss, so that they could see the difference in the result (this “over one thread” thing is explained below). Once their samples were finished, they put them in their stitch journals:
The samples aren’t really necessary for those who are already familiar – even vaguely – with counted cross stitch. But for first timers, the samples really helped the students get the hang of stitching on the grid.
If you’re new to counted cross stitch, then I suggest watching this counted cross stitch video to get the hang of basic counted cross stitch. Once you know the basics, it’s just a matter of following the chart. That video explains very well how to follow a chart.
When working counted cross stitch, you can work over one thread or over two threads of fabric. Let me show you what I mean:
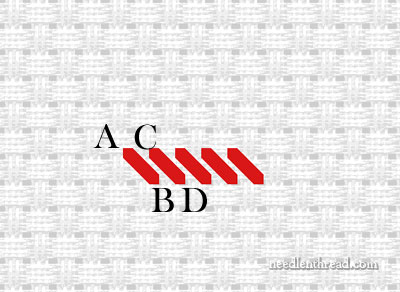
The first stitches in a line of counted cross stitch over one thread of fabric will cross from one hole to the very next, diagonal across the weave (up at A, down at B), then in the hole directly above B, the needle comes up (at C) and crosses diagonally to the very next hole (D).
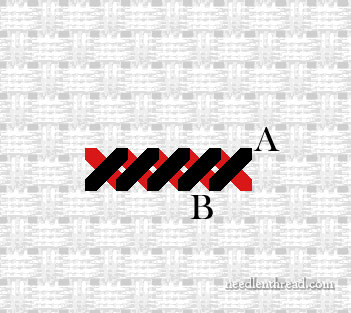
Once the line of diagonal stitches is finished, you can cross them by coming up at A and going down at B, working back across the stitches to cross them, all the time crossing over one thread in the weave of fabric.
In stitching over two threads of the fabric, you cross over two threads, as shown in the diagram below:
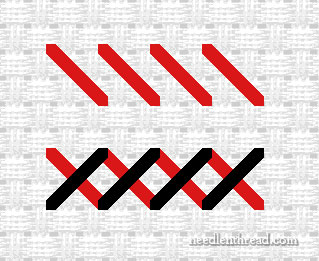
In stitching over one thread of fabric on 25 count or higher linen, you can use one strand of floss. In stitching over two threads, you’ll want to use two or three strands of floss. (We’re working on a 25 count even-weaven linen, as explained in the previous article on selecting and setting up the fabric for the spot sampler.)
Stitch Direction
There may be a tried and true, absolute rule for stitch direction in counted cross stitch, but to tell you the truth, if there is, I don’t know it. The only “hard and fast rule” for stitch direction is that, whatever direction your stitches cross in, they should be consistent. All the top stitches on the cross stitch should point in the same direction.
The Look of the Initials
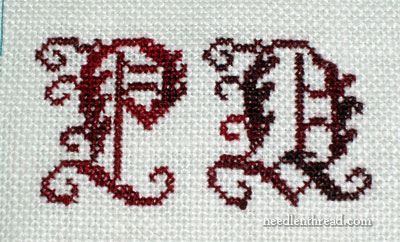
Large cross stitches tend to create a rather pixelated look. Whether or not you like the look of larger stitches is really up to you. Your eyesight may actually help you determine this, too. On high count fabrics, it is more difficult to stitch over one thread, because it may be more difficult to see the holes in the fabric. Magnification and good lighting can help with this!
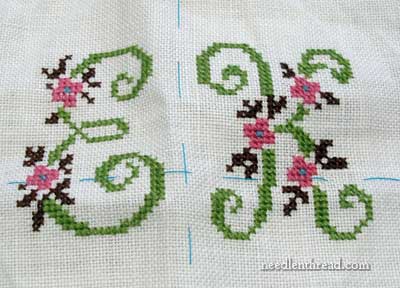
In the photo above, you can see the results of stitching over two threads of fabric, using two strands of floss.
Above, the student stitched over one thread of fabric, using one strand of floss.
Some students chose very small designs for their initials and stitched them over one thread, so that they took up only about a 1″ x 2″ space on the sampler.
Counted Cross Stitch Monogram Patterns
Way back in August when I was preparing for this phase of the sampler, I showed you the cross stitch initial charts that I prepared for my students. I used the initials found at Pattern Maker Charts, which is a blog that offers out-of-print designs for cross stitch and embroidery, in various software formats. Since I use MacStitch, I had already downloaded lots of the charts available on Pattern Maker. With or without software, you can still print the charts from Pattern Maker by just printing the image. This really is an excellent source for initials, but it does take a while to filter through all the charts to find initials that you like.
Placement of Design
Once you find an initial that you like, you need to determine where you will place your design on your sampler (see above) and do some counting to get the design situated in the right spot.
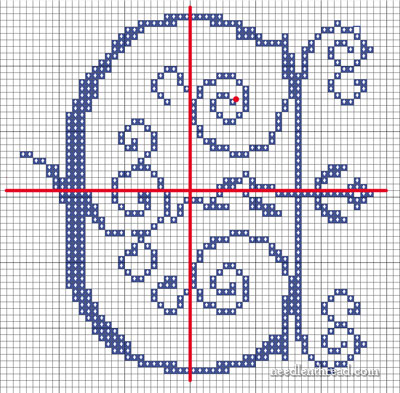
First, find the center of your initial by counting the width and height of it, and dividing by two. Mark a line in the center. The red lines in the chart above indicate the center (more or less – it’s one off on the height…!). Then, find a place that makes sense to start the design. I chose the spot where the red dot is, to the top right of the center. If you’re working in a centered area on your fabric, you have to find your starting point on the fabric by counting the threads of your fabric from wherever you’re centering the initial.
Count the squares up on the chart and then over to the right, to get to your starting point. If you’re planning to stitch over two, remember that each symbol on the chart represents stitching over two, so you have to multiply by two when you’re looking for that spot on your fabric. If you’re stitching over one, each square only represents one thread of fabric. For stitching over one, to start this chart on my red dot, you’d count up 14 threads of fabric from the center point of your design area, and then over to the right 7 threads. If you’re stitching over two, you’d count up 28 threads of fabric, and then over to the right 14 threads.
And voilá! You’re at your starting point. Now just follow the chart. If you’re stitching multiple colors in the initial, determine your colors ahead of time and make sure you can tell where the color changes are going to be on the chart. (The charts on Pattern Maker are mostly monochrome, meaning they’re set up for one color.)
Counted Cross Stitch in a Nutshell
In a nutshell, if we were to distill counted cross stitch down to the fundamentals, here you have it: wherever there’s a symbol on your chart, put a corresponding x on your fabric. (Perhaps a bit too simply put, but that’s really the basic concept behind counted cross stitch.)
Final tip: Be careful of carrying threads – try to work in the natural direction of the design in such a way that you don’t have to carry threads over large areas. If you have to carry your thread on the back over more than three threads of fabric, you should finish off and start a new thread.
You can follow along with the development of a spot sampler by visiting this index page for the Spot Sampler Project. Next up in the series, we’ll pass pretty quickly through the next counted section – a Quaker motif – and then spend a brief time on blackwork, followed briefly by a few other stitches suitable for counted work, and from there, onto regular surface stitches, which will make up the bulk of the sampler.
Whew!