Yesterday, we looked at the difference between the twist of an s-twisted embroidery thread and the twist of a z-twisted embroidery thread. Today, we’ll look at how the twist affects certain stitches, just so you know that you should be aware of the difference in how z-twisted threads take to certain stitches.

I’m beginning with a #5 perle cotton by DMC, which is an s-twisted thread. Here, I’m starting the stem stitch, working it from left to right with the working thread below the needle.

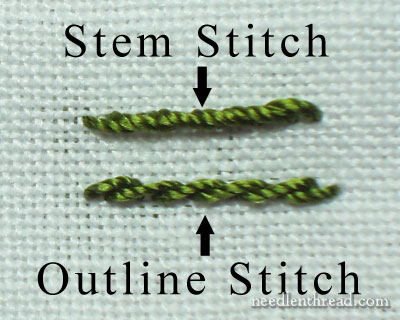
This is what the stem stitch looks like when stitched with an S-twisted thread. Now, keep in mind, this is what stem stitch is supposed to look like. The stitches overlap, they are distinguishable, and the thread maintains its twist – all of which produces the rope-like took of the stem stitch.

Now, using the same thread – a #5 perle cotton by DMC, which is an s-twisted thread – I’m stitching an outline stitch. The movement of the stitch is the same as the stem stitch, but the working thread, when working from left to right, is kept above the needle.

You can see the difference between the stem stitch on the top – which maintains its distinguishable stitches and the twist in the thread – and the outline stitch below, which untwists with the movement of the stitch and doesn’t maintain clearly distinguished stitches.

Now, the z-twisted thread. Above, you can see I’m starting the standard movement for the stem stitch – working from left to right, and keeping the working thread below the needle.

But, look at the outcome. It doesn’t look like a stem stitch, does it?

Now, I’m working the outline stitch, working from left to right, with the working thread above the needle.
Because the twist of the thread is different, the stem stitch stitched with a z-twisted thread looks like an outline stitch, and the outline stitch looks like a stem stitch.
So here’s a good question: What defines the stitch, the stitch movement or the stitch outcome? If I were looking at the stitches above, without examining the twist of the thread, I would call the top stitch sample outline stitch, and the lower stitch sample stem stitch. Wouldn’t you?

Here you can see them lined up side-by-side, the s-twist on the right and the z-twist on the left.
Now, for practically stitching purposes, here’s the rule: If you are using a z-twisted thread and you want the result of the stitch to look like the result in the instructions you are following, move the thread in the opposite direction, whenever a thread movement is indicated in making a stitch, but go through all other steps the same way. For example, if you are told to stitch from left to right, keeping the thread below the needle, instead you’ll still stitch from left to right, but keep the thread above the needle. If you’re told to twist the thread clockwise, twist it counter-clockwise. The exception for following written instructions would be if you are following instructions written specifically for Brazilian Embroidery. Brazilian Embroidery characteristically uses rayon thread, which is z-twisted.
Finally, the point of this is all rather moot, if you don’t use z-twisted threads. If you use cotton threads exclusively, you don’t have to worry about it! But oh—-!!!!! What a world of threads is out there! And what a world of varied and beautiful results can be had by trying them out!
Any questions? Feel free to leave a comment!

