This past weekend proved to be good and bad. Good, because I was able to devote quite a bit of time to the Pomegranate Corners wool embroidery project. Bad, because everything seemed to go wrong with the project from the outset!
I’m going to show you all the ways I went wrong, starting today with the framing up of the project. Now, despite the “negativity” that you might think accompanies this post, in fact, overall, it was a positive experience. When everything goes wrong, it’s hard to see how the experience can be positive, eh? But really – it was a positive and productive weekend, because once I got going and making all kinds of mistakes, the fire was lit! I was into the project, and determined to make headway.

My first big mistake on this project, and one that I refuse to correct for various reasons including not wanting to waste a perfectly good piece of fabric that I know I can “make good,” was that I cut the original piece of fabric too small. It’s always better, in cutting fabric, to be safer than sorrier – better to be an inch over in size than an inch under. I was an inch under. I gave myself two inches on each side of the design – but I should’ve given myself three. Oh. That makes me two inches under! Instead of a 14″ square, the fabric should have been a 16″ square.
The reason for why the fabric should have been cut larger is actually a question of equipment. If I had had a 13″ frame, I would’ve been fine.
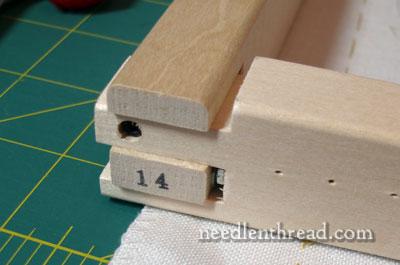
Unfortunately, I only had a 14″ frame.
I’m using Evertite stretcher bars for this project. They are my go-to frames for working an embroidery project that will be on the frame for an extended amount of time. If you don’t know what Evertite stretcher bars are, take a look at them! They’re great.
When I realized my fabric-and-frame conflict, I decided to switch to a slate frame, even though it takes a bit more time to set an embroidery project up on a slate frame. I got out all the necessary supplies to dress the slate frame, then lined up the project with the tapes on the roller bars of the frame, and found the opposite problem! The slate frame was too small!
So what to do?
The only option was to extend the size of my fabric, by mounting it on another piece of fabric, so that it would fit the 14″ stretcher bars.
I opened my fabric cabinet and started looking for muslin. I usually have an abundance of muslin in reserve, because I use it for a lot of things – for lining projects, for testing patterns and tracing tools and things like that. Oh, yes. Muslin was what I needed.
And… I was out!
(Do you ever have days like this?)
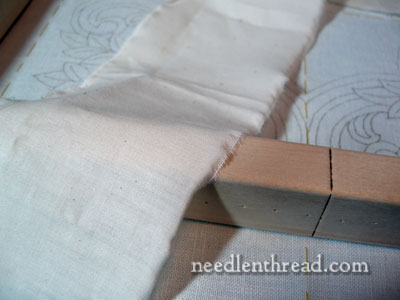
Digging a little further, I found a scrap about 16″ long and 10″ wide. Not. Quite. Big. Enough. I wanted to sew the ground linen of the project onto a larger square of muslin, mount the whole piece onto the stretcher bars, and then cut the back of the muslin away, inside the stitching area. This is what I would normally do, if I don’t want to stitch through the muslin. And it’s quick, you know. Just square up the linen and the muslin so they are both on the grain, pin them together, and run them through the sewing machine. I normally use a zig-zag stitch or an overcast stitch, depending on which foot is on the machine. Well, if you don’t have a machine, you can hand stitch the linen to the muslin, using a herringbone stitch.
But all I had was this muslin scrap. And it wasn’t big enough.
So, what to do?
By this time, I was in a bit of a hurry and feeling a bit pressured by the clock, which was moving forward at an incredible speed, snatching my day from me! And for some reason, when I start feeling pressured by the fast-fading day, I start losing my love of the project, and start viewing it as my Mortal Enemy. I tried to regroup. I tried to tell myself that wool embroidery was not my Mortal Enemy. I tried to tell myself I was having fun.
It didn’t work.
Finally, I pulled myself together and tore the muslin into 2″ strips. Ahhh. That was rewarding. It is always rewarding to tear fabric – it alleviates a lot of frustration!
I sewed the 2″ strips to the four sides of the linen, and was rewarded with an 18″ square of fabric now, which could be easily framed up on the 14″ frame, with plenty left over to trim.
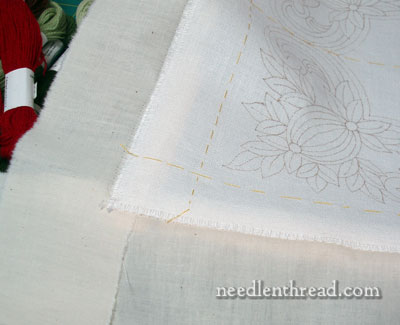
There it is. Ready to frame up. Perfect solution!!
I tacked in one side, then tacked the opposite side. Then I tacked the third side. All was going well….
And then…. I went to tack the fourth side, and that’s when I saw that I had somehow missed the edge of the linen when sewing it to the muslin, and I had a good three inches of linen-not-connected-to-muslin staring me in the face.
So what to do? Do I take out three sides of tacks and start over again? Oh, Mortal Enemy, you know me not! No way!

The fourth side, I tacked on top of the frame, right through the edge of the linen.
And you know what? I could’ve done that in the First Place, on all four sides, without the muslin, without looking for the slate frame, without hemming and hawing over how to solve the Frame-Too-Small issue! Uhhhhh…. what was I thinking?!
That is how the first session with this project went. But that’s ok! Because all’s well that ends well.
Ends well? Well…. you’ll have to wait to see what happened when I started stitching! But more on that, later….
I hope your weekend was a stitching success!
Other posts on this project:
Pomegranate Corners – Free Embroidery Pattern
Setting up Pomegranate Corners – fabric selection, transferring the design, and preliminaries
Wool Embroidery Thread Selection for Pomegranate Corners

