Here’s my next adventurous phase on the Pomegranate Corners wool embroidery project. Here, I’ll show you what I did next with the leaves, which I had picked out previously because I decided I wanted a vein down the middle, where the two sides of the embroidered leaf meets in the middle.
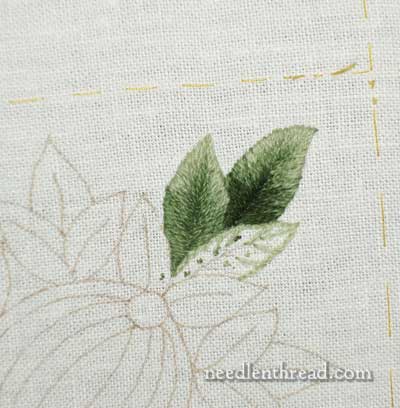
Right away, you can probably see a number of minor problems in these two leaves. Yes, they have the vein that meets in the middle. Whoopdeedoo! A vein is nothing, if the leaves look lousy, right? There’s are a couple things amiss here. I’ll talk about that below.
Still, I kept going, thinking that maybe it was just me. Maybe it was lighting, maybe it was the stitching angle, maybe it would look better once other leaves were added, maybe…. but May bees don’t fly in January.
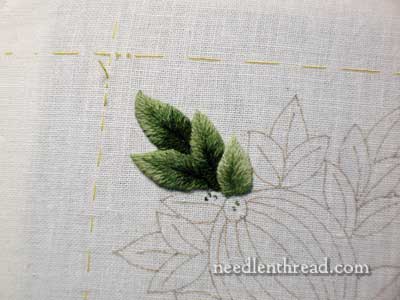
Actually, when I got to the front leaf and added it, over all, from this angle, it doesn’t look bad as in horrible, but … the problems are still there, and I knew they would bug me, especially because I knew I could (and should have) corrected them a bit earlier!
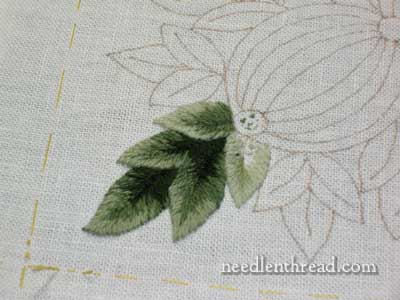
It wasn’t until I was almost finished with the last of the leaves in the foreground that I decided. And once I decided, it didn’t take long to go from the above, to this…
… on the front, and this….
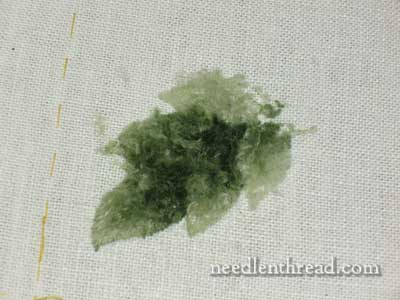
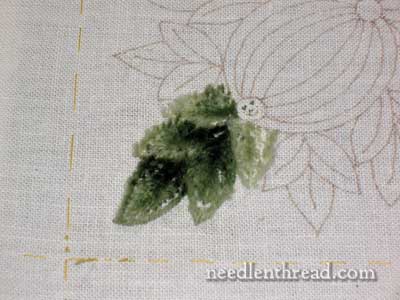
… on the back.
A reader wrote to me not too long ago about picking out threads, wondering if there was an easier solution to getting threads out of the fabric when a mistake was made – something easier than tweezers, snipping, and picking.
There are tools out there that are supposed to make this process easier. For example, there’s “Judy’s Boo-Boo Stick” (which I’ve mentioned before – a long time ago!). The concept behind this tool, which is tipped on each end by what looks like tiny bottle-brush bristles, is that you roll or lightly rub or scratch these bristles on the surface after you’ve snipped your stitches, and it helps pull the fibers of the snipped threads out of the fabric – kind of like the bristle brush on the base of your vacuum cleaner, only without the suction. The bristle brush on your vacuum cleaner turns and catches threads and the like on your carpet and picks them up, right? So in concept, this is a good idea, and it works pretty well with your standard cotton floss.
But this particular tool doesn’t work so well with wool. Or maybe it works too well. Much like that bristle brush on your vacuum, which can get all knotted and clogged up with threads if you don’t clean it off regularly, the Boo-Boo Stick gets so matted with wool when removing these types of threads, that’s it’s a pain to clean it off, let alone your fabric!
Really, the best tools for picking out this type of stitching is a pair of tiny sharp scissors (or a very good, small seam ripper), your fingers, and a pair of tweezers. There’s no magic wand you can wave over your fabric to revert it to its original blank thread-free state!
But one thing that helps when doing this type of clean-up job is Attitude. You have to set your mind right! How often do we come to a point in stitching where we’ve made a mistake that must be removed, and suddenly, that mistake sprouts into Jack’s beanstalk. It becomes Abnormally Huge in our eyes, and bammo! We come to a stand-still on the project. We can’t get back to it. It’s turned into a Monster, and it’s “easier” just to stash it aside and think, “I’ll get back to it later.” Have you ever noticed, in cases like that, that Later is awfully slow in coming around?
When I get to this point – like the point where I was, with the leaves in the wool project – I adjust my attitude. Especially if it’s a project that I like (or at least, that I liked up to this point!), how silly it would be to forestall, simply because I have some picking to do. The sooner I do the picking, the sooner I can move forward. “Reverse stitching” is often just as much a part of the embroidery process as stitching is. It sometimes has to be done. Putting in, taking out – sure, there’s a big difference. But if you don’t take out what you need to take out, you’ll never be satisfied with what you put in afterwards!
When it comes to picking out, don’t leave it for later. Do it right away, so that, in the next stitching session, you can start afresh. That’s how I generally handle these types of situations.
Now, to get particular on what was wrong with the leaves above, here’s what I didn’t like:
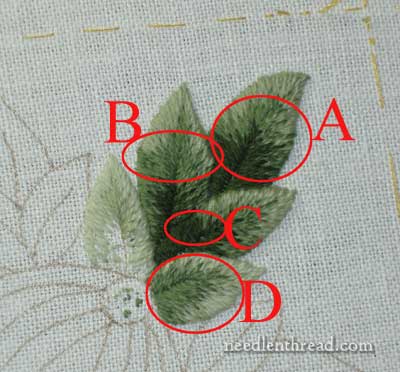
A. The darkest shading on the back leaf is wrong, especially on the left side of the leaf. The angle of the stitches on the left are too horizontal.
B. On the middle layer of leaves, on the left leaf, there is a point on each side of the leaf that is “squared” off – there’s too much of an angle there on the outline of the leaf, and it draws the eye to the color change and makes it look wrong. That needs to be smoothed out. The rest of the leaves are rounded, and that one on the left looks too stiff.
C. Where C overlaps B, the dark green runs together, and I’d like to soften this, so that leaf C is noticeably above leaf B.
D. There’s too much of the medium green in the center, and not enough of the medium-light. I want the front leaves here to be a bit lighter.
Now that I’ve done all the revision work (at least in my head), it’s time to do the final draft! Next time we visit this, I hope to show you a much improved bunch of leaves! That will be my stitching goal on Saturday.
Other posts on this project:
Pomegranate Corners – Free Embroidery Pattern
Setting up Pomegranate Corners – fabric selection, transferring the design, and preliminaries
Wool Embroidery Thread Selection for Pomegranate Corners
Framing Up the Project for Stitching – mounting the ground fabric on stretcher bar frames
Pomegranate Corners Wool Embroidery: The Stitching Begins

