Last week, I introduced you to my current “15 Minutes at a Time” needlework project – a micro-stitching project featuring a miniature Cluny tapestry. Here’s my update for this week on the project, just to establish that 15 minutes here and there (admittedly, sometimes 30, and sometimes 10!) can add up!
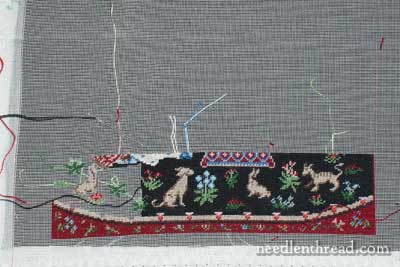
Well, you can see what a sloppy mess the project is, once I’ve got several embroidery threads going. From corner to corner (in the red there) that’s about 5″ wide. The strip is about 1.5″ tall.
This is where I was last week:
Quite a bit has gone in this week. I’m cheating, though, now that I’ve moved towards the left edge! Technically, in work like this, I think it’s better to work the background first, as it gives you somewhere to hide the threads as you cross from the smaller little elements within the piece, if you cross from them. Some stitchers think you shouldn’t cross from one element to the next, but considering that some of those elements are maybe a quarter inch away – perhaps half an inch at a stretch – I figure more thread is used in running under on the back and ending, and then using a waste knot to start a new thread. If the background is stitched first, then you can move to each element, running a thread under the background threads on the back, and keeping things pretty neat.
The difference between carrying your threads before the background is stitched is that, as you stitch the background, you have to be very careful about how you stitch over the lighter and colored carried threads. The placement of a carried thread can put a background stitch out of whack, leaving space around it, so that the lighter or colored thread shows through. And this can look pretty bad if it’s happening all over that dark background!
So – anyway! – I did cheat, going against my better judgement by stitching in the little elements on the left side of the design before stitching in the background. But I think that’s helped a bit in speeding things up, even though I’ve had to be careful about how I place my background stitches. My latest 15 minute sessions have been pretty fruitful, since right now, I’m just stitching background.
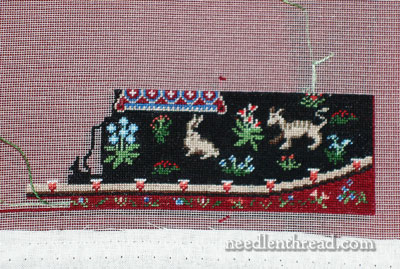
And speaking of background stitching…. is it boring? On this type of work, which is counted work done in one stitch only (tent stitch), it can definitely tend towards boring. If I were doing this as full-sized cross stitch or counted needlepoint or what-have-you, I probably wouldn’t be doing it. The fascination of this project for me is its miniature size and the Cluny tapestry subject-matter. With this piece, as the background fills in, the elements that are already stitched really pop out. So the background stitching is kind of like reading a good, meandering but suspenseful book. It takes a while to get there, but I’m eager the whole time to see the outcome. And that makes the journey a bit more pleasant!
Some tricks to speed up your 15 minute sessions with your stitchery:
1. Prepare your needle and thread for your next encounter at the end of a stitching session. That way, when you get the chance, you just pick up your project and start stitching. You don’t have to fiddle with threads.
2. Keep tools in a definite location (a little tray, a magnetic tin, a needlebook made to hold scissors, too – whatever!) and keep everything together in one spot. That way, you don’t have to search for tools each time you sit down for a short session. (You know: “Where the heck did I put my scissors?!”)
3. If you’re doing counted work, keep your charts in order. If it’s a multi-page chart (the whole chart for this project is 9 pages!), then keep out only the chart you’re working on, and put the others away so they aren’t cluttering up your work space or confusing the issue on which chart is which. I staple mine together in the order I plan to work them (which isn’t necessarily the “recommended” order!) and then I remove each chart from the stapled bunch as I need it. When I’m finished with each chart, I file them away in a folder, to keep them from getting lost.
4. Find a reasonable way to organize your threads for a project. If you’re working with stranded cotton, pre-cut your threads to your desired length, and put them on something like thread drops. You can keep the whole bundle of thread drops in a zip-lock to keep the threads clean while you’re not using them, and then, when you sit down to stitch, take the bundle out and hang it on the knob of your light or somewhere like that. Hanging these types of organizers is better than having them lying on a surface – especially a cloth surface – where the threads can get more easily tangled up. If you’re working with spooled threads (like certain silks), a small wooden spool rack (they sell them at sewing stores, with space for 12 spools or fewer) can be a great accessory.
5. If your living quarters don’t allow for leaving your project out, conceive a convenient storage method so that you can quickly pack up and quickly retrieve your project. Don’t store anything else with the project – just the bare essentials that you need for this particular project. A basket, a small box, a tote bag, a large zip-lock bag – something just large enough to hold the project, but small enough that it isn’t intrusive – are all good options. It should be something that you can slide the project into after working your short session, and something that’s easily transportable, in case you have some sessions on the go.
What about you? Any pointers to add for making short stitching sessions fruitful? Feel free to leave a comment! You can also check out the comments that were left on last week’s article. Some great ideas there!
Have a terrific weekend!

