The other day, we discussed the direction in which buttonhole stitch is worked, and I demonstrated that the direction you move with your buttonhole stitching can change the look of the buttonhole stitch. Well, the same principle is true with bullion knots. The direction in which you wrap the knot makes a difference in the way the bullion knot looks.
Now, this isn’t to say that wrapping in either direction is wrong; rather, that stitchers should be aware of the difference in direction in which they wrap the knot, and if their bullions are coming out looking different from each other, the difference may very well be due to the direction in which the thread is wrapped around the needle. Keep in mind that sometimes, you want one result or the other in your bullions.
A few photos will demonstrate this.

The embroidery thread that I’m using in these photos is perle cotton, which is an s-twisted hand embroidery thread. You may wish to read a little bit about the differences between s-twisted and z-twisted embroidery threads, and take a look at the photo comparison between stitching with an s-twisted and a z-twisted thread, to get an idea an idea of the differences between the two types of thread if you aren’t sure what I’m talking about or would like to know a little more about it. And if you’re not familiar with the bullion knot and how it is made, you are welcome to take a look at my bullion knot video tutorial or to consult any number of stitch dictionaries that may help you see how the stitch is formed, step-by-step, as this is not actually a tutorial on how to make a bullion.

I’m using a milliner (or straw) needle here, which is the ideal needle for making bullions. In making the stitch in the photo above, I’m wrapping the thread clockwise around the needle, or in this case, with the needle pointing up in the fabric, I’m wrapping to the right as the thread passes over the needle.

As the thread wraps under the needle, it is going to the left. The thread is wrapped around the needle the required number of times to make the bullion knot the length you want.

Keep an eye on the working thread. It’s looking pretty healthy in its twist, right?
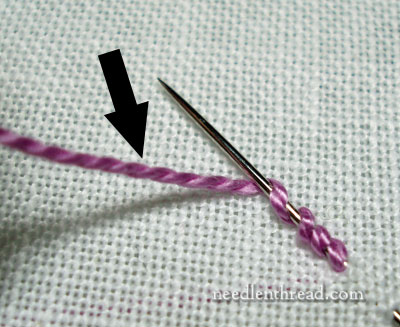
If you look at the thread at this point (where the arrow is pointing), you can see that it is maintaining its twist.

The bullion knot in the photo above is the one created in the steps of the previous photo. And now I have the needle in position to start another bullion, but this time, I’ll wrap in the other direction.

So now, I’m wrapping counter-clockwise, passing the thread under the needle to the right….

… and over the needle, to the left.
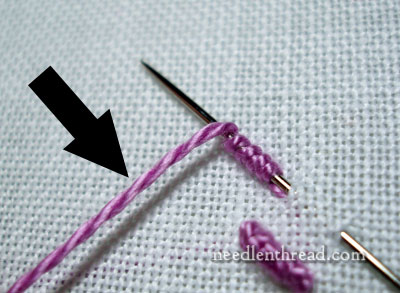
As the thread is wrapped around the needle, notice what’s happening to the working thread. The twist is stretching out and the thread is losing its tighter twist.

The knot on the left is not quite right because I pulled too tight at the end, ending up with a tapered knot… though sometimes, a tapered knot might be what you want (for certain types of flower petals and so forth). Still, aside from the difference in the overall shape, you can also see that the threads wraps look different. The knot on the right, which untwisted the thread as I worked it, looks like it has more wraps on it (it doesn’t) and overall, looks smoother. The knot on the left, which kept the twist of the thread, shows more definition of the perle cotton.
Now, if you are working with a z-twisted thread, to get either look (the right knot or the left), you’d have to twist the thread in the opposite direction shown above – because this is just one more proof that there is a difference in the outcome of the stitch, depending on the type of thread you’re working with!
So the question is, what look do you want in your bullions? Do you want a smoother, softer look? Or do you want a well-defined wrap? It’s really up to you! Changing the direction of the wrap is an interesting way to achieve a varied look in your bullion roses, flowers, and whatnot!
Try it! Play with bullions and see which direction of wrapping you like best, or how you can combine the two to create a subtle difference within an element made up of bullions.
And now, your turn! When you make bullions, which direction do you automatically wrap the thread and why? Or is it something you’ve never really thought about? And who would blame you?! It’s a tough stitch to get consistently right, and it takes practice to make beautiful bullions! A bullion’s a bullion – why complicate things?!? (Go ahead! You can say it!) Feel free to leave a comment with your thoughts!

