Monograms and satin stitch just seem to go together. True, true, there are other ways of embroidering a monogram, besides using satin stitch. But I’m infatuated with satin stitch – it is the Queen of Stitches, in my book. It’s a gorgeous stitch.
Here’s a little monogramming project I’m working on right now. It’s not “little, little” – the monogram itself is 3″ tall – but it’s not huge, either. It’s just a little monogram being stitched onto a lovely linen towel.
I started out using Londonderry linen thread, which is a high quality linen thread (as linen threads go, it’s really the smoothest one I’ve ever used). Londonderry linen thread comes in 5 different sizes (from 18/3 – 100/3), and for this project, I started out with 80/3 (which is fairly fine, for linen thread) in red.

But my first results were a bit on the sorry side. Linen thread and satin stitch can work together quite well, but they don’t work super well together on elements where the stitches should “hug” the shape, like on the dot above, which looks pretty cr—- cruddy. Of course, the problem could definitely be the stitcher and not the thread – true!!! I don’t mind saying that. But I had a hard time getting the smooth results that I wanted with satin stitch, using the linen thread.
I’ll definitely try it again later with the linen thread, on a different design, though. Never give up on a good thread!
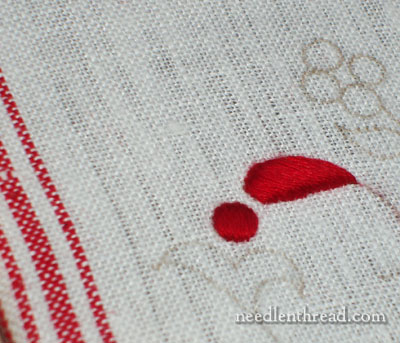
Still, this piece needed to be suitable for a demo, so I wanted a thread that I was comfortable working with, and that new stitchers would also be comfortable working with…. so I switched to my Ultimate-Stand-By-Favorite-Ever-Thread-for-Monogramming, cotton floche.
Cotton floche is a delightful thread for monogramming. It is softly twisted cotton with a nice sheen (from mercerization), and it screams “Satin Stitch with Me!” whenever you look at it.
I was much happier with the results of the satin stitch, using the floche.

On this particular monogram, I’m combining satin stitch, stem stitch, and seed stitch. I don’t normally outline satin stitched sections after satin stitching, because it hides the beautiful smooth edge which is characteristic of a good satin stitch. But on this design, as you can see in the lower right corner of the photo above, I did outline the outside of the main elements forming the monogram with stem stitch, to define the letter a bit more. Next time, I probably would not do this, but I’m not going to pick it out on this monogram, because I don’t want to ruin the satin stitch!

Dots, dots, dots. I love satin stitch dots. I could eat them.

So far, there’s my letter. It doesn’t look like much of a letter. And it certainly doesn’t look like a “B,” but give it a little more time, and it will!
A few tips that help with satin stitch:
1. Always outline the element you’re stitching, unless it is teeny tiny. But for just about any element, a split stitch outline underneath is essential for a clean edge.
2. Use padding stitches if you want any height on your stitched element.
3. Angle your needle correctly when coming up and going down in the fabric – angle it underneath the split stitch line.
4. Make sure you’re using the right weight of thread for your fabric, and the right size needle for your thread. If your fabric can’t hold up to the close stitching on the edge of the satin stitch (if the fabric doesn’t grip the thread you’re stitching with), then it’s a good idea to back your ground fabric with a tightly woven muslin or something of that nature.
Satin stitch. Do you like it? Do you use it often? Do you have difficulties with it? If you wanted to learn something specific about satin stitch in order to improve your satin stitching, what would it be? I’m all ears – leave a comment below!
Don’t forget that I’m giving away a gorgeous collection of silk threads (and gold) this week, so if you haven’t signed up for my Agecroft Sweet Bag Thread Kit give-away yet, head over to that post and do sign up!
See you tomorrow!

