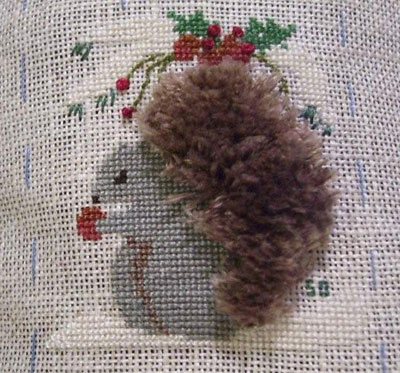
Are you familiar with turkey work? Turkey work, also known as ghiordes knot, is an embroidery technique that can be used to created a fluffy piled clump (for lack of a better word!) anywhere you want one on your embroidery. The technique is used a lot in stumpwork, but it can also be used in other needlework techniques. Turkey work makes great squirrel tails! Like this one, stitched by my sister:
The other day, I was demonstrating turkey work to a fellow stitcher, and we got to talking about Fluff and how to achieve it. I’ll show you what I showed her. This isn’t so much a demonstration on doing a stitch, as much as it is a discussion of fluffing the stitch, so if you’d like to see how turkey work is worked, check out my turkey work video. You’ll see that it’s a Really Easy Stitch – nothing more than a loopy backstitch, really!

I’m working here on felt, using regular six-stranded embroidery cotton, and I’m using all six strands. When doing turkey work, you don’t have to use all six strands – that’s up to you – but you’ll achieve better results, I think, if you use three or more strands of floss, unless you’re doing tiny delicate work, and then you might use two strands. If you use all six strands, you can use a #5 embroidery needle to accommodate the bulk (and you can even get away with a #7 if you need to).

You can see that the stitch produces long loops of the thread that are held in place by these “locking” stitches, which are simple backstitches.

After you’ve filled the area that you want to be fluffy with rows of turkey work, you can use your fingers to smooth the threads together and make them stand up on the fabric. Time for a hair cut…

Now, sometimes you might not want to trim off the loops – it depends on what look you’re trying to achieve – but most turkey work is seen fluffy, and so the tops of the loops need to be trimmed off to achieve this.

At this point, if you want a very long pile, you can fluff the stitches with the eye of your needle, by running the eye through the stitches. But mostly, turkey work is “sculpted” and trimmed to achieve a certain fluffy shape. So start by fluffing a bit, and then trim a bit. And the eye of your needle can suffice to do this – you just have to keep working it through the pile. But if you want a more efficient way of creating fluff, you can use this spindly monster:

This is a nap brush. It’s used to lift pile. You can use it to comb velvet. You can use it to fluff turkey work.

It’s rather a vicious looking thing, isn’t it? But all those little wire prongs there do the job of fluffing much better than the eye of an individual needle.

This is looking a little fuzzy and fluffed after a first combing with the nap brush. Perhaps a bit too fuzzy – it needs a little trimming.

After combing through the turkey work, take your fine embroidery scissors and carefully cut a little bit from your pile. Trim and sculpt in tiny increments – be careful! It’s a lot easier to take tiny bits off than it is to restitch your turkey work if you hack it all away in one swipe! (My dad has that problem when he trims hedges…..)

After you trim a little, go at the pile again with the nap brush. If you need to, you can trim and sculpt again…

… and you’ll end up with a nice fluffy mound of thread, perfect for whatever element you want fluffed up on your embroidery. Are you stitching thistles? Try turkey work! What about a fuzzy caterpillar? Or how about the yellow “beard” on an iris leaf? A fluffy teddy bear? Or a cute baby chick? Ohhhhh, the possibilities!
So if you’re looking to add a little fluff to your needlework, try turkey work. And if you’re planning on doing quite a bit of stumpwork or adding fluff to your other surface embroidery projects, if you can get a hold of a little nap brush from your local needlework shop, it’ll make fluffing fluff fun!
Have a fantastic Friday!

