We’ve already discussed using drawing charcoal for a dark pounce powder, for transferring embroidery designs on light fabric. Then we looked at using talc for light pounce powder, for transferring embroidery designs on dark fabric.
But there’s an in-between.
We’ll call it grey. Or, if you’re insistent on the American spelling, we’ll call it gray. Either way, it’s not black. It’s not white. It’s in between.
And this in-between color is nice, because it’s subtler on both light and dark fabrics.
If you want to be completely Pounce-Obsessed, you’ll want all three: white, charcoal, and grey.
Just to set the record straight, I’m not talking about making your own original pounce powder from absolute scratch. Tanja Berlin does that with her pounce powder, and I applaud her for it. She grinds up the charcoal herself. I contemplated doing that. I have an endless supply of wood charcoal available from my sister’s wood-fired brick oven, but Golly Moses. The idea of grinding it into powder?
No, no.
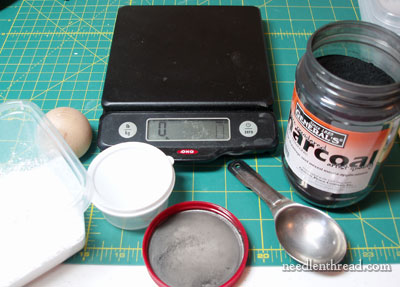
Instead, I used a few pre-made ingredients to make my own grey pounce powder. You’ll need 100% pure cosmetic grade, unscented talc (This guy on eBay sells it in different amounts), powdered charcoal (General’s Powdered Charcoal is available at Blick’s), and a little container or tub to mix it up in – preferably one with a lid that seals well.
I bought a package of 8 little sealable tubs – about 3″ round and 2″ deep – from the dollar store, for (you guessed it) a dollar. They’re fine for storing pounce powder.

Initially, I thought I would weigh out proportions on my kitchen scale, but, since this is for my own personal use and not for any kind of commercial endeavor, I don’t really care how much the stuff weighs or if the proportions are absolutely right every time I mix the stuff up. So I ended up using measuring spoons instead, so that I could keep a vague account of proportions. I started with two tablespoons of talc.

And then I added a quarter teaspoon of charcoal.

White. And black.
Incidentally, if you do this at home, you might want to cover your work area. I didn’t at first, and then I did a little later. The whole process doesn’t make a huge mess, but if you use your work area for other stuff, like cutting white linen, you might want to take precautions. When I finished, a quick wipe-down with a damp cloth got rid of all residue.

Now, because I was using measuring spoons, I was in kitchen-mode. I used a wee little whisk to stir up the mixture.
The whisk is totally superfluous.

You can see that the powder is getting grey, but not quite as grey as I would like, so I added another quarter teaspoon. All told, I think 1/2 – 3/4ths teaspoon of charcoal is good. You might want yours a little darker or a little lighter, so you can always add charcoal powder in little increments and see where it gets you. And if you go too dark, add a little more talc. Too light, add more charcoal. This is hardly an exact science!

Foregoing the Superfluous Whisk, put the lid on the container and shake it up, baby.

Ah. A nice grey pounce powder, and it works grey-t. Great.
So, now you have three shades of pounce, and they should get you through any transfer situation. But don’t worry! That’s hardly the end of the subject!
Your next question is undoubtedly: But what do you use to pounce the pounce onto the fabric? And I hear you! I’ll show you my home-made pouncing tools tomorrow. For a very low cost, you can make several of them, so that you have one for every color of pounce, plus plenty extra, so you can experiment. If you have buddies who like to pounce their embroidery designs, you could make them kits for Christmas presents – or better yet, you could pool your resources and make enough for all of you, and it will cost you very little.
So, tomorrow – my version of a pouncing tool and other needful things to finish up your pounce kit.
Have a swell Friday!

