Much like the Elizabethan Twist goldwork thread that meanders over the flat silk on the background on my Medallion project, this morning’s article is a bit of a long and winding journey.
To start with, I’ll show you an intermediate step in the journey, and then go back and talk a little bit about how I got there.
Leaving my workroom the other night, long after the sun had set and the chill had crept under the doors, I turned around in the dim light afforded by the last lamp in the room, and saw from afar the progress I had made in the day’s stitching. I had my camera in my hand and snapped a quick photo.
Light is a funny thing. Without the direct glare of my stitching lamp over my work – with just the warm glow of one solitary lamp and the far-away wimpy flash of a point-and-shoot camera – the goldwork on the background of the Medallion looked the way I think it will finally look, when all is said and done. It looks…
… gold.
Depending on the angle at which this piece is viewed, the goldwork looks decidedly different, but overall, when viewed from afar, it is a warm, rich, gold that is rather pleasing. And this is exactly what I wanted.

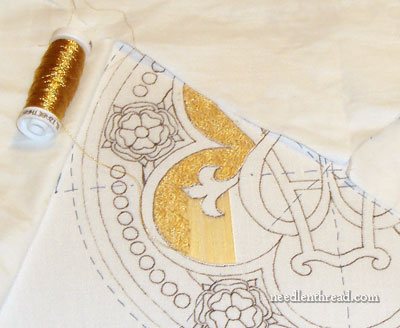
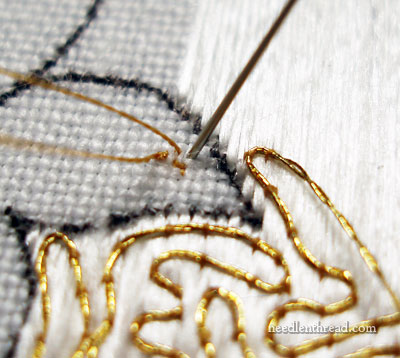
The Elizabethan twist that I’m using is a fine thread. It’s two plies – two tiny gold wires loosely twisted together. It is perfect for this “vermicelli” work.
About the whole question of that name vermicelli, this technique is called so because it resembles vermicelli (the stuff you eat). It is also sometimes referred to as “cornelli couching” – yes, just like the cake decorating technique (called “cornelli lace”) that involves squiggly lines of icing. How many embroidery techniques can you think of that are so closely associated with food? And here’s one that’s associated with two types of distinctly different foodstuffs. Nifty, isn’t it?
Some goldwork books today refer to this technique as vermicelli. Some designers (Alison Cole, for example, who designed a couple goldwork ornaments that involve the technique) call it cornelli couching. In very old embroidery books (church embroidery books, mainly – Lucy Mackrille’s Church Embroidery and Church Vestments, for example), couching the thin gold wire over the laid silk is referred to as Italian Stitch, whether it is couched in straight or meandering lines.
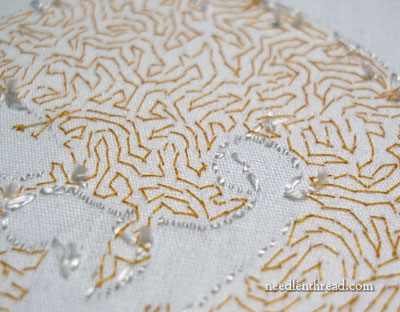
Vermicelli work, cornelli couching, Italian stitch – whatever it is called, the idea is the same: working a continuous thread of gold (or other stuff) that meanders about and twists and turns. For the embroidery to look really nice, ideally the spacing between the formed lines should be kept as consistent as possible. The couched thread (in this case, the 2% gold Elizabethan twist) should never turn into itself or overlap. The thread just goes… and goes… and goes. And the result?
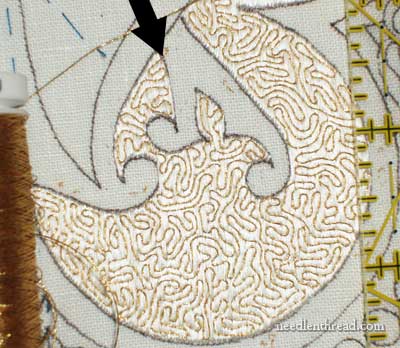
Well, the result is somewhat game-like. If you want to have a bit of “fun,” begin at the black arrow, where the gold thread starts, and follow the thread through the whole area. It’s not really a maze – you won’t run into any blockage anywhere. It’s more like an on-going, meandering path.
If you want an equal amount of fun (I really know how to have fun, don’t I?), turn the work over and do the same thing with the couching thread on the back of the work. You can see that the couching stitches follow the same path as the gold.
This type of couching is easy, in a way. Seriously! It is, after all, only couching. There is nothing complex about the stitch itself. But it is time consuming and it does require looking ahead. There’s no pattern to follow, but you need to know where you are going, so that you don’t back yourself into a corner. If you do accidentally end up stuck in a confused situation where you can’t reasonably turn your thread and get back out into the open to continue your meanderings, it’s best to get stuck at the edge somewhere. Otherwise, if you’re in the middle of your flat silk background somewhere, you’d have to sink the end of the gold thread into the flat silk. It’s better to sink the threads on the very edge of the flat silk area.
To put the size of the area in perspective, I’ve set a ruler next to the embroidery. You can see we aren’t talking about a “huge” area here, but it’s sizable enough that it takes a good length of gold thread to fill this area with the gold vermicelli. I am working straight off the spool, and will only end the thread when I have filled all connected spaces in the background. Where the rest of the design cuts off the background, I will end the thread.
Let’s chat materials.
Threads
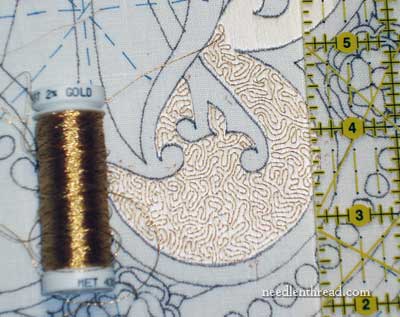
Besides the Soie Ovale (the flat silk of which I spoke previously) and the Elizabethan twist, I’m using YLI’s silk sewing thread, 100 wt, in color 215, which is a perfect match for this gold. It is important that, on this type of work where we’re using good materials and sinking a lot of time and money into the piece, silk thread is used. Why? It’s not just that I don’t like polyester threads for embroidery work, but polyester threads are simply not the same quality as silk. Polyester thread is more abrasive than silk. Silk is a natural “fit” with the natural fibers already being used (the linen ground, the flat silk). Why introduce a chemical plastic into the mix? And what effect, over time, will that thread have on the other materials? I’m not qualified to make any scientific statements, but the fact that silk has withstood the test of time – centuries and centuries of time! – in this type of application is good enough for me to know with confidence that it is a good choice for this type of work. Besides, two hundred meters of thread will last a long time, and the price difference between this type of silk thread and a similar sized polyester is just not that great.
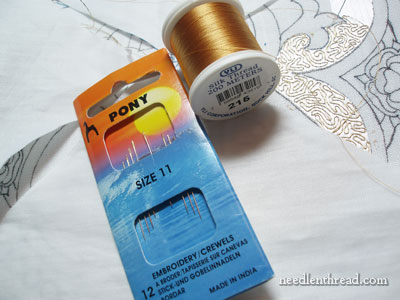
Needles
I’m using size a #11 crewel needle for the couching and a #10 crewel needle for laying the flat silk threads.
Crewel (a.k.a. “embroidery”) needles in size 11 and 12 are often difficult to come by. Hedgehog Handworks carries Pony needles in these sizes. Richard Hemming also makes a size 11 crewel needle, and John James makes a size 12 (but the latter is apparently only available in bulk). Wendy Schoen also carries a #12 crewel, but not the #11. I am not certain what company makes her needles. I may speak a bit more about needles later – I’ve run into a few points (!) that are worth mentioning, but they deserve their own spotlight.
The couching thread is waxed with 100% beeswax. After using different kinds of beeswax for this type of stitching, I’ve discovered that 100% beeswax that’s sold in chunks is great. The chunks can be bricks, disks, or pretty little decorative molded beeswax. The stuff that’s sold encased in little plastic disks for “ease of use” is flaky. I prefer the former chunks of beeswax to the latter flaky stuff in plastic disks. My gauges for choosing beeswax are smell and color. If it has that warm, comforting beeswax smell, and if it has that warm, deep beeswax color (as opposed to light yellow), then it’s generally a good beeswax.
Unlike the gold thread, the couching thread is not never-ending. It has to be cut to manageable lengths, which means that beginning and ending the couching thread happens quite often. The trick to doing so without carrying a long thread across the back of the fabric is to begin and end the couching thread near the edge of the flat silk, using a few tiny stab stitches in the linen ground that isn’t yet covered by stitchery.
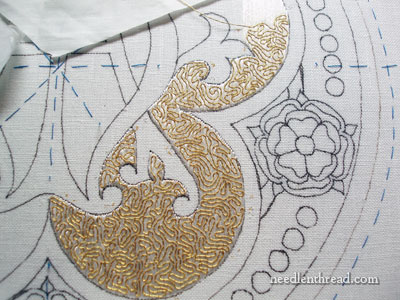
The progress looks a bit hairy in this picture, doesn’t it? And this brings us back to the idea that the work looks different, depending on the angle from which it is viewed.
There are about 20 hours of work in this so far, including stitching, set up and peripherals. It doesn’t look like a lot of progress, but I’m quite satisfied with it. I’m looking forward to forging on.
Well, we meandered together long and far today! But now that we’ve covered the nitty gritty information, the next time we look in on this project, we can just look at progress.
I’ve indexed all the articles focusing on the Medallion Project here, if you’re interested in perusing them.
And as always, if you have any questions, comments, or suggestions, feel free to have your say below!
Enjoy your weekend!

