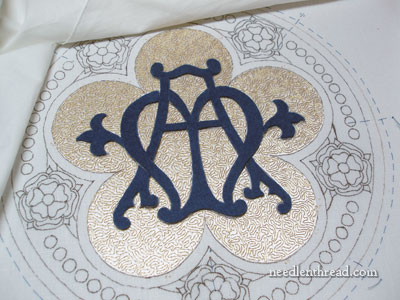
This is how I cut the felt shapes to use for padding under long & short stitch filling on the monogram in the middle of the Medallion project. There are various ways and products you can use for cutting clean shapes from felt. Those of you who do a lot of appliqué are probably familiar with all kinds of ways to go about cutting shapes, and you’ll find that this particular method I’m using is not anything new!
But what I’ll point out here is why this method works well for padding for hand embroidered objects, whether you’re doing goldwork or working regular embroidery stitches in floss on felt.
What Kind of Felt?
The felt I used to cut out the parts of the monogram above is high quality, 100% wool felt. It’s around 1/16″ thick – maybe slightly thicker – but not “very” thick. You can use thicker felt, if you want thicker padding or more “rise” in your stitched area.
Where to Find Felt
For good pieces of felt in a nice color range, I usually order from Wooly Thread. They have a good selection of 12″ x 15″ pieces of wool felt in a variety of colors, and they’re just the right weight for this kind of work. There are other suppliers of felt out there who deal in various weights, types, and thicknesses of felt. Weir Crafts, for example, carries 3 mm thick felt (1/8″), which I’ve used successfully for goldwork padding when I wanted a thicker felt. And of course, with the interest in felting and felt appliqué, there are plenty of other suppliers out there who carry 100% wool felt. A note: I would not use “craft felt” from a sewing or craft store for this type of work. Why not? It is not consistently dense, it’s a lot fuzzier, and it doesn’t hold together as well, especially when cutting detailed shapes. Good wool felt is usually consistently thick, it has a relatively smooth hand with minimal surface fuzz, and it takes detailed cutting well.
Other Needful Things for Successful Cutting
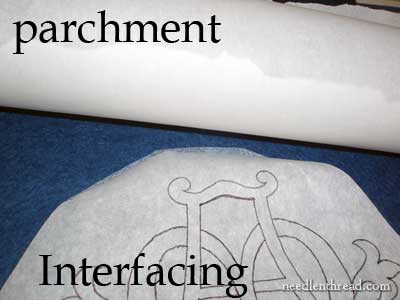
With this particular project, I used interfacing – lightweight, fusible interfacing. Why use interfacing rather than just transferring the design straight to the felt and cutting it out? When you are going to embroider over padding, you need your design transfer to be super-accurate, and you need your edges to be super-clean. To get those really sharp, clean edges and to cut the design out accurately, your felt needs a little help. The interfacing ensures the felt will cut the way you want it to.
Besides lightweight fusible interfacing, other similar products will work. In the past, I’ve used Mistyfuse quite successfully for this type of job, too, but I didn’t have any on hand, so I stuck with the fusible interfacing that comes with a paper backing (Mistyfuse doesn’t have a paper backing – you have to use freezer paper with it). You can also buy fusible interfacing products that can feed right into your printer, which is very convenient, but I didn’t have any of those on hand, either. Now, if you happen to have freezer paper on hand that will fit your printer, and you happen to have fusible interfacing on hand with the paper backing (it won’t work in your printer even if you cut it to fit, because the backing will separate from the interfacing and you’ll end up with a gummed-up printer mess), you can always print your design on the freezer paper sheets, and then just peel the interfacing off the paper backing and use the printed freezer paper in place of the paper backing.
I didn’t do any of that. I just traced the design outline onto the paper backing of the interfacing. Why? Because I’m lazy and I didn’t want to go inside, set up my printer and pull out the freezer paper, resize my design, and all that. So now you know! Lazy, lazy, lazy.
But it worked.
Method of Preparing & Cutting
If you’re cutting out a design that is not a mirror image on each side or that must face in a specific direction, you’ll need to flip your design before printing or tracing it.
Put the interfacing (which by now has probably separated from its backing paper) on top of the felt, put the backing paper on top of the interfacing, and then lay a sheet of unused baking parchment (from the kitchen) over everything to protect the iron from any stray bits of interfacing that may gum things up.
Iron on a wool setting, until the paper sticks to the interfacing which in turn sticks to the wool.
Tips on Cutting
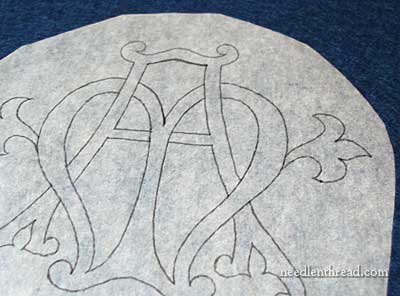
Using a sharp pair of scissors, cut out the design following the outline on the paper. A larger pair of scissors is a lot easier to use for this than a small pair of embroidery-sized scissors, even in the detailed areas of the design. Larger scissors are more comfortable to hold when cutting and easier to control. Cut with the fabric far inside the scissors, using (as much as possible) smooth, longer and continuous cuts instead of small tiny cuts. When you come to sharp little corners and so forth, that’s where you take little snips if you have to. But on the longer lines of the design, try to start way down in the cross-section of the scissors and cut the longer lines in a continuous cut.
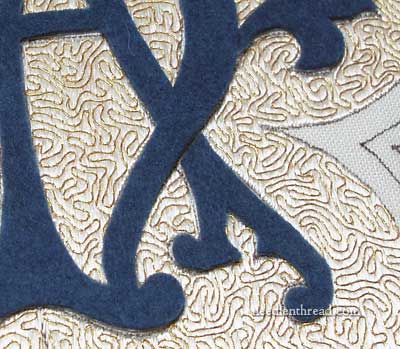
Peel the paper off, turn the felt pieces over so the interfacing-side is down, and you’re ready to go. Do not attempt stitching with the interfacing up (it’ll flake and speckle up your threads), and Do Not Iron the Felt onto the Fabric! The interfacing isn’t there to stick the felt to the fabric. It’s there to stick the design paper to the felt and to make cutting smooth, sharp edges on the felt a lot easier.
Tack the felt on with thread, and then work your embroidery over it. Just sew through the felt as if the interfacing isn’t there. Lightweight interfacing like this (as long as it’s face down on the fabric) won’t be noticeable – it won’t gum up your needle or make it more difficult to stitch through the fabric.
And there you have it – that’s how I cut out the felt padding shapes for the Medallion project. Any feedback? Better ideas for cutting out felt? Other preferences for materials? Any hints, tips, suggestions, questions? Leave a comment below!
If you want to catch up on the rest of this project, you’ll find all the articles related to the Medallion Project listed here.

