Yesterday, nary a stitch was stitched on the Medallion Project! So much for the Weekly Deadline! What does this mean? Simply that next week, I’m going to have to double-time it. I suppose we shall see what happens!
In the meantime, here’s the update, and some answers to some questions that have arisen:

We have two flours de lis now. Anybody else get the sense that this thing looks like it’s fixin’ to fly away? Or is it just me?
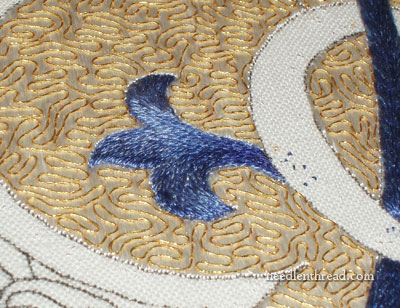
Soie d’Alger makes a beautiful long & short stitch for shading. It’s a stranded silk much like, say, DMC stranded cotton – only it’s silk, so it has a wonderful lustrous sheen and it is slightly softer, so it blends beautifully. It’s my favorite thread for shading.
The little speckles in the white part of the monogram are my anchor threads. By using a waste knot on the top of the fabric, and then stitching a few tiny stab stitches and cutting the waste knot away, I can start and end a thread from the top of the fabric without having to turn the frame over. These little speckles will be covered up. And the thread is perfectly secure. It’s the best way I know of for starting and ending a thread, as long you can do it in an area where the thread can be covered.
You can even use this method of starting and ending threads on a line, as the photo tutorial in that link will show you, as long your subsequent line of stitches can cover up the thread. So if you’re ever troubled about how to invisibly start a thread securely, even on projects like flour sack towels, this is the best way to do it. It holds up to laundering (not that the Medallion will be laundered), it keeps the threads secure, and it’s a nice, invisible way to start and end threads.
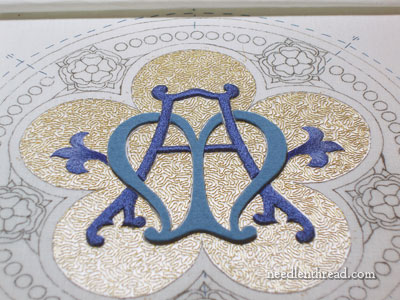
The felt for the M part of the monogram is laid on, ready to tack down. I actually did finish that part, but I forgot to take a photo! You get the sense of what the overall monogram will look like on the gold background, but the blue of the felt is somewhat off color. The M will be slightly lighter than the A.
In stitching over the felt on this project, I’ve learned a few things.
First, it’s not so easy to stitch this densely through the cotton backing, the linen ground, and the thick wool felt. It’s not impossible, but it is certainly more difficult than simply stitching through a single layer of fabric.
Second, I learned that, to cover the felt sufficiently, especially over the sides of the felt, it is helpful to stitch the sides first, at an angle pointing down and towards the middle of the felt-covered area, using somewhat long stitches, and then to go back and work the long & short stitching into those side stitches. This ensures that the sides of the felt are sufficiently covered, without any noticeable gaps. It also creates a nice rounded edge to the embroidered area.
Third, the felt provides extremely good, consistent “lift” to the stitched area, but it requires the tension on the stitching to be kept consistent. If I break for a bit and return to stitching and get out of the rhythm of stitching, I find I have to be careful to make sure my tension matches the previously stitched area. Whereas this might not be as noticeable on the plain ground fabric (but it’s still important, no matter what fabric you’re working on!), the felt provides a soft bed in which the stitches sink somewhat, so if a new set of stitches is slightly tighter than the previous set, I find that the felt dents in. I’ve been careful to avoid that, but I always have to double check to make sure it isn’t happening.
So, there we are! We shall see what next week brings – keep your fingers crossed for me, ok?
If you’d like to follow along with this project from start to finish, feel free to visit the main page for the Medallion Project, where all the articles in this series are listed.
Questions, comments, suggestions? Feel free to leave a comment below!

