Yesterday, we talked a little bit about the split stitch, discussing the direction from which the stitch is split: do you split up into the stitch or down into the stitch?
Yesterday’s article was specifically about the difference in the look of the stitch from the front, when stitching up or stitching down into the split stitch. Today, I’d like to elaborate on the subject, and since there was quite a bit of feedback on the topic, I’ll try to clarify some points.
The models I’m going to use for today’s discussion are stitched with cotton floche, which is a non-divisble, softly twisted cotton thread about as thick as two strands of regular stranded embroidery floss. Floche is a softer thread than perle cotton, which is a thicker thread with a tighter twist, so the stitches don’t end up as defined as they would with perle cotton.
Speaking of thread (seems we’re always speaking of thread, doesn’t it?), we all have our own thread preferences, and when it comes to split stitch, I have a definite preference in threads. I prefer split stitch in single strands of thread – whether it’s a single strand of cotton or silk embroidery floss, a single strand of floche or coton a broder, a single strand of perle cotton, a single strand of wool. That’s just me.
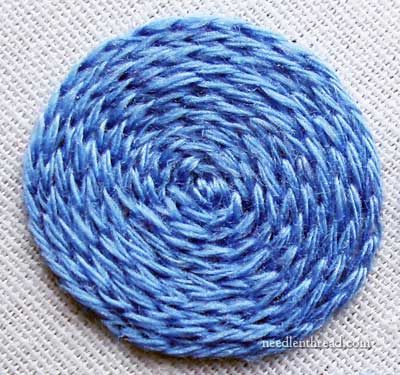
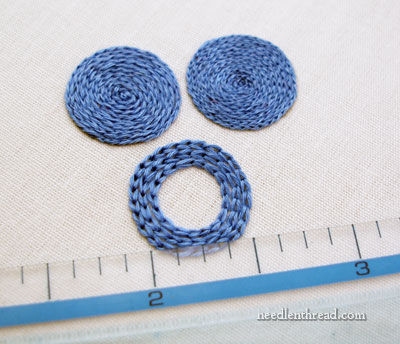
So here we have two split stitched dots on the page so far. The dots are the same size. They are both stitched with the same thread (cotton floche) in the same color (the lighting was a bit different in each photo), with strands of the same length.
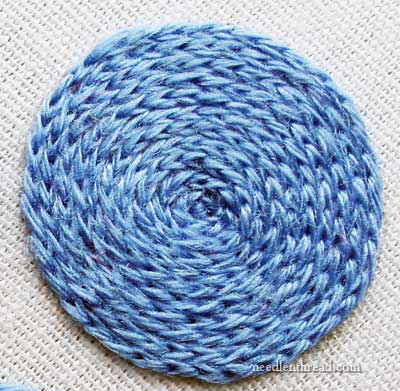
I tried to keep the same stitch length as I worked the outside of the circle on both dots. I fell a bit short on that – the first dot has 31 stitches around the outside circle and the second dot has 35. I found that, to take the curves well on the second dot, I had to shorten my stitch length. On the first dot, I didn’t. The stitch I used in the first dot took the curves more easily with longer stitches.
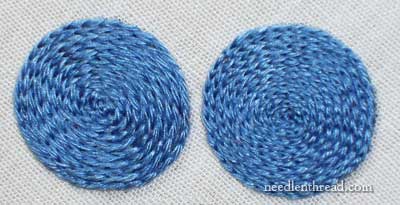
The dot on the left is the same dot in the first photo on the page here, and the dot on the right is the same dot in the second photo.
So which dot is which approach to split stitch? I bet you can guess, though admittedly, it’s a bit more difficult to see the difference with the floche.
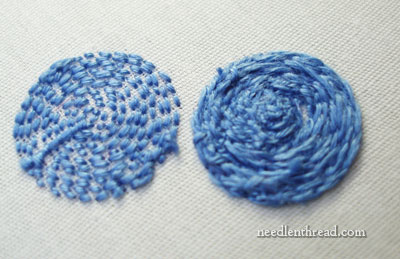
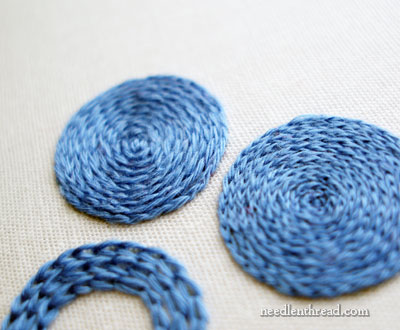
Where you can really see the difference between the two dots is on the back of the stitching.
The dot on the left is split stitch from underneath. The dot on the right is split stitch from the top. And they both form a completely different look on the back of the fabric. The dot on the left (split from below) makes little spaced backstitches on the back of the fabric. The dot on the right makes…. well…. a much thicker carpet on the backside! Something akin to a combination of stem stitch and split stitch.
And that brings us to the difference in the two approaches, and the difference in the stitches themselves.
And that difference is in the way in which the stitches are stitched, the movement of the stitch, and – finally – what the stitches are called.
Like I said yesterday, there are different approaches to split stitch – a lot of stitchers split from the top and a lot of stitcher split from underneath. it depends on the look you want to achieve, how you go about splitting your stitch. But, in fact, the stitches – split from below and split from the top – are actually two different stitches. One is split stitch (it is split from below) and the other, split from above, is called split backstitch. The split backstitch is essentially backstitch extended into the previous stitch, so that it splits it on the way down.
Though the two are similar – they both involve splitting the previous stitch – the second one (split from above) has its very own name, because it is a different stitch. And you can tell it’s a different stitch by looking at the back of the stitch.
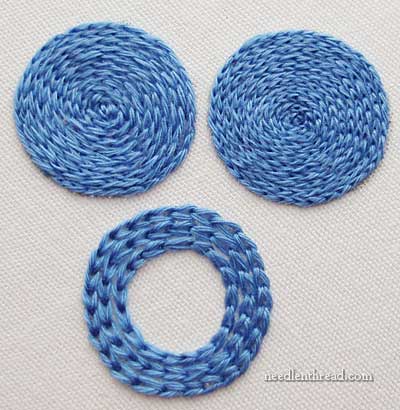
And one final difference between the two stitches: split backstitch uses up significantly more thread than split stitch. The circles stitched above are all the same size – about half an inch in diameter. The split stitch circle (split from below) took two lengths of thread. The split backstitch circle took two and almost a half of the same length thread. So – about 20% – 25% more thread for the split backstitch circle!
I received a few questions after yesterday’s post, regarding chain stitch and whether it is different from split stitch. Yes, chain stitch is a different stitch from either split stitch or split backstitch, a point better clarified by watching this video of the chain stitch. Chain stitch does not involve splitting the thread. Instead, the whole thread is wrapped around the base of the next stitch. So with chain stitch, the resulting “chain” is made from the whole thickness of the thread all the way around. You can see in the photo above that chain stitch makes a much larger stitch.
(I just couldn’t bring myself to fill in the whole chain stitch circle. Now I have someone to talk to out in my workroom. It’s my version of Wilson!)
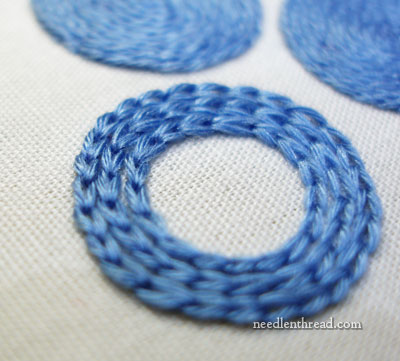
You can see the thickness of the chain stitch better here.
So just to recap: in the three circles above, we have three different stitches: the split stitch, which is split from below the stitch; the split backstitch, which is split from above the stitch; and the chain stitch, which is not split at all.
And finally, to clarify the point I brought up concerning long & short stitch yesterday: long & short stitch involves splitting stitches as well, but it is not technically split stitch, either. Long & short stitch is a filling technique involving rows of staggered stitches, with subsequent rows of staggered stitches coming up underneath the previous rows and splitting them. When split stitch is worked as a filling, it is worked in lines or spirals, like the circle above. Split stitch as a filling is not the same thing as long & short stitch. (I just wanted to make sure I didn’t cause any confusion on that point). The only similarity between split stitch and long & short stitch is the splitting of stitches.
So that’s a little more to chew on, concerning split stitches! Of course, you aren’t obliged to be technically correct in what you call either stitch. But I’ve found that if I’m consistent in calling a stitch by the correct name, I’m able to look them up more easily and to teach them to others with less confusion.
What do you think? Is it worth making the point about the direction of the stitch and the name it is called, or do you think it’s easier all around to just call both approaches “split stitch” and leave it at that? Am I really splitting hairs here, or what?! Have your say below!

