Stretched pearl purl wound with a thickness of colored silk and couched down with the same color of silk is perhaps one of my favorite goldwork techniques. It’s a great way to combine silk and gold to make a striking, eye-catching twist that’s just really pretty.
I’m using this technique on the Medallion Project, and you can see it here along the edge of the “cinquefoil” that forms the center of the the whole medallion.
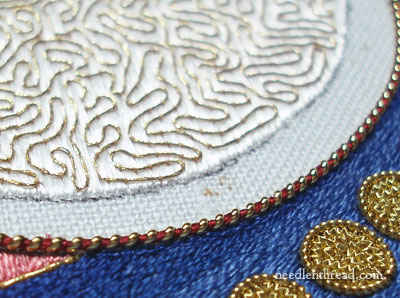
That blank area of linen that’s showing in the photo will be filled with Japanese gold thread, which is couched in double lines to fill the space. Sometimes, when you couch goldwork threads (take, for example, the smooth passing thread in this goldwork embroidery project), you couch them over a yellow ground of felt. But on this project, I don’t want to raise this area at all, so I’m couching the Japanese gold thread right onto the linen, with no padding.
When you’re using a felt padding, the felt hides a multitude of imperfections. It’s a great place to anchor your stitches, and they’ll never be seen once the gold thread is couched over the felt. Working with the bare linen, though, I wanted to be pretty careful about what stitches I anchored in this blank area that would be filled with Japanese gold.
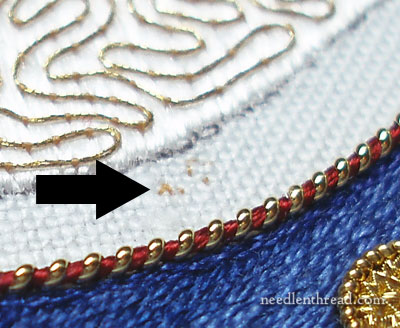
The gold colored silk threads I used to couch the vermicelli goldwork on the background of the cinquefoil were anchored in this area, as were many of the flat silk background threads. You can see them in the photo above.
But to couch the stretched pearl purl, I’d be using red silk, and I didn’t want to anchor the red silk threads in this area, because the red silk anchor stitches could very well show up behind the Japanese gold.
I could have started each red silk thread on the back, by turning the work over and weaving the thread in and out of the back of the stitches already worked. But in my mind, there’s nothing worse than having to turn your work over every time you need to start and end a thread! This is why I love the waste knot and anchor stitches technique for starting and ending threads – you can start and end your threads right on the front of your work without ever turning the whole frame over, as long as you can cover up the anchor stitches somehow.
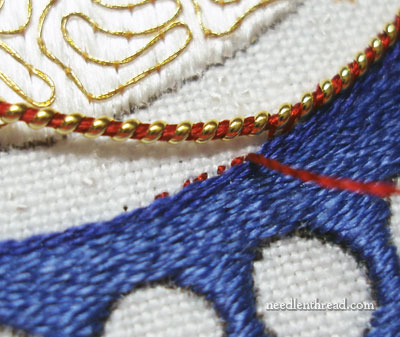
Here’s my cover-up job when I couched the stretched pearl purl outline around the cinquefoil shape in the middle of the medallion:

In the photo above, the arrow is pointing to the waste knot, which I will cut after taking three or four tiny anchor stitches into the fabric to secure my thread. To make sure the red anchor stitches would be completely covered up, I had to place them in the path of the stretched pearl purl, and work them right up close to the edge of the blue.
You can see here all the anchor stitches which will shortly be completely covered with the stretched pearl purl, and my new working thread ready to start couching the pearl purl.
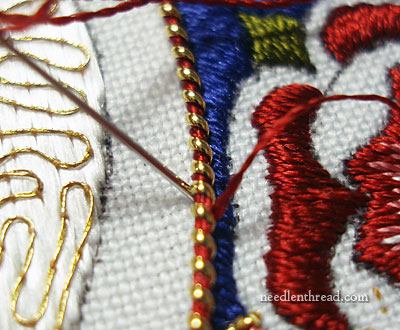
This technique for starting and ending my red silk couching threads worked out really well – none of my red anchor stitches were visible along this line, or within the linen space reserved for the Japanese gold.
So, the next time you don’t want to risk your anchor stitches showing behind any other stitches (for example, if you’re anchoring dark threads in an area that will be stitched in light colors), find a close-by place on your project where you can “tuck in” your anchor stitches so that they won’t interfere at all with other stitching. It’s worth taking time to determine the best place to hide your anchor stitches, because 1. you don’t want them to interfere with other stitching, but 2. you don’t want to have to flip your frame every time you start or end a thread!
More on the Medallion later – I’ve taken a short hiatus (sometimes, a project can get a little too intense, so stepping back for a bit can be a good idea!) and am just getting back into the swing of it. The goldwork on the cinquefoil should be finished soon (perhaps today!), and the onto the roses.
The Medallion Project is a commission. The medallion, when finished, will be appliquéd to the back of a Roman-style vestment called a chasuble, in a set of ordination vestments. The chasuble will be made from this liturgical fabric from M. Perkins & Son. The white of the fabric is ‘barely white’ and matches the background creme silk of the cinquefoil on the medallion. If you’d like to follow this project from beginning to end in step-by-step fashion, you’ll find all the articles relating to this project listed in the Medallion Project index.

