The little goldwork dots in the outside edge of the Medallion are under way again. There are 50 of these little dots in the edge, and they’re worked in a combination of pearl purl (for the outline) and chips (little cuts of check purl) for the filling.
If there weren’t 50 of these dots to contend with, I’d say they weren’t too time consuming. The dots are about 5/16″ – 3/8″ in diameter, so they’re pretty small. This makes manipulating the pearl purl (which is a stiff thread) somewhat slightly less than fun. Actually, every time I finish a dot, I find myself saying, “Bah – that wasn’t so bad!” and I move on to the next fiddly little blighter with an ever-increasing excitement at being one step closer to the end.
Today, I’ll show you how I work the pearl purl outlines and talk a little bit about working with this versatile and beautiful real metal thread.
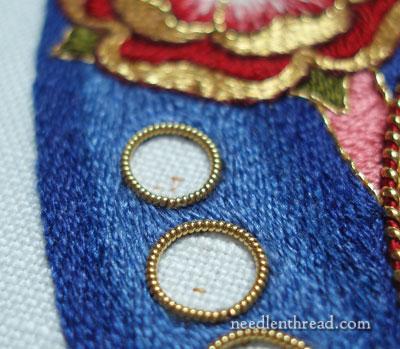
These are some of the rings, unfilled. You can see the join in them where the two ends of the thread come together, and in fact, these are two of the better joins. Right now, it’s just a matter of getting the pearl purl couched on in the ring shape, and when I go back to put in the chips, I’ll nudge the pearl purl about a bit to smooth up the joins.

Since I’m working in bulk here, it’s easier to pre-cut the necessary lengths of pearl purl. For the dots, I need less than one inch of pearl purl, but I cut 20 one-inch pieces of pearl purl to work with. It’s always better to have a piece that’s slightly longer than needed rather than too short.
Before cutting the pearl purl, I pre-stretched the whole length, by running it through my fingers and barely stretching it a bit. This serves to separate the coils slightly (not enough to really be noticed by the eye) and also to take the “boing” out of the length of pearl purl. If you ever have an opportunity to work with this thread, you’ll find that, in a long length, it tends to be rather springy and boingy, until you give it a slight stretch. The stretch stiffens it up a bit and makes it easier to work with.

Before couching the pearl purl onto the design, I wound it around the handle of my laying tool, to put some curve in it. After couching several of these, I discovered it’s easier to couch them into a smooth circle if they already have some bend in them. Winding a one-inch piece around the narrow round handle of a tool puts enough bend into the piece to make it easier to manipulate into a tight little ring.

It’s necessary to choose a couching thread that corresponds somewhat to the size of the pearl purl you’re couching. If you’re couching a #3 pearl purl – a very large pearl purl – you can get away with a fairly heavy couching thread. But for the rings, I’m using size “very fine,” which is (you guessed it!) very fine. So the couching thread has to be very fine as well – it has to fit down in between those coils without leaving a noticeable gap. For a couching thread, I’m using a 100 wt. silk sewing thread by YLI. Before stitching, the thread has to be well-coated with beeswax, so I run it through my wax cake about three or four times, and then slowly through my fingers to blend the wax in and remove any excess bits that are hanging about.
I start the couching thread by anchoring it in the middle of the dot using three or four tiny stab stitches. Then I bring the thread up on my outline where I want to start the pearl purl, and then take it back down on the the outline, pulling through until I have a small loop, which can be seen in the photo above.

The length of pearl purl is inserted into the loop, and I slowly pull the couching thread until it is tight around the pearl purl, in the place I want it, which is right between the first and second coil.

In the photo above, you can see the couching thread hugging the pearl purl, right between the first and second coil. Once the couching thread is in place between the correct coils, I give it a little tug, and it pops down between the coils, so that it is invisible.

Couching between every two or three coils, I work my way around the little circle, and as I get towards the end, I snip off any excess pearl purl, so that the two ends can butt up next to each other. The last couching stitch is taken right before the last gold coil, and then out comes the mellor and the tweezers, to smooth up the gold thread and put the ends in place.
I’ll be ringing away the rest of today, and probably tomorrow, too! With all this ringing going on, you might be tempted to think the roses are finished. In fact, they aren’t. They are almost finished – 1.5 to go – but I needed a rose break, and I also wanted to gauge how long the dots would take. So that’s where I am this morning! By the end of the week (or early next week), I should have some overall progress shots to show you.
If you would like to read the back story of this project and follow it along from its beginnings (in the design stages) up to now, you can find all the articles relating to the Medallion project listed in chronological order in the Medallion Project Index. Throughout the series, you’ll not only see the project develop step-by-step, but you’ll also find plenty of tips and techniques that you can apply to your own needlework projects.

