It was last June when I sketched up the original design that would become the Medallion Project. Just short of a year ago! And approximately 450 hours of stitching later – most of which was done between the January and now – it is Finally Finished!
Didn’t you hear all that joyous shouting Saturday around 2:00 pm? That was me. I let out a regular hoop-dee-doo.
This finished medallion will be appliquéd to the back of a chasuble, but that won’t happen until the end of this week. Between now and then, there’s one more step to prepare the medallion for the appliqué process, and I’ll show that to you once I’ve done it. Today, I’ll share with you the final steps in the embroidery.

When last we spoke of the medallion, we looked at the finished silk & goldwork Tudor-style roses. All five roses were finished, but the dots were not filled in. In the photo above, you can see what the whole thing looks like, with the dots finished, but without the finished edge. Notice that the centers of the roses are filled now, as well.

Here’s a shot with the piece on the frame, from a bit of a distance. I think the gold dots worked out well, though admittedly, I was a bit worried about them!

After the dots were finished and the main part of the medallion was finished, it was time to attack the outside edge treatment. This was the final step! I started with pearl purl #2 along the outer edge of the dark blue.

You can’t really notice the pearl purl on its own in the photo above, can you? It does not make a bold statement, but it does provide a nice clean edge along the blue. Never fear, there’s more gold to add!
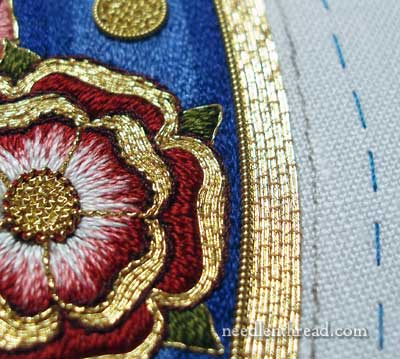
Next up, several double rows of Japanese gold passing thread. This is a beautiful thread – it’s the same thread I used to outline the cinquefoil around the central monogram. I kept the width of this outer outline similar to the width of the outline on the cinquefoil.

And here you have, from afar, the medallion with the Japanese gold completed. But wait… there’s more!

The final round of gold on the outside edge is worked in a beautiful, thick, rope-like real metal thread called Grecian Twist. Grecian Twist is a two-ply metal thread, made from two types of gold – a bright, smooth gold wire and a rougher, matte-like gold – wound around a string core, and then the two threads are twisted together into a rope. The two tones of gold in the twist and the rope-like nature of the thread make Grecian Twist the perfect finishing outline.

And here is the Medallion, with the finished gold edge. But wait – there’s still a wee bit more!

The medallion will be appliquéd to the chasuble using a dark blue silk thread, in stem stitch, to create a finer dark blue rope like line just to the outside of the Grecian Twist, and to “close in” the entire medallion. The dark line around the outside will create a kind of “shadow” around the medallion, making the edge crisp and visible.
Since the piece is not yet appliquéd to the chasuble, to show you the effect of the dark blue outline, I tucked in some blue silk all around the medallion.

Here, you can see the medallion with the blue line around the edge. The photo was taking under a very bright stitching lamp, so let’s step back and see it from afar, too, at another angle, without the bright light of the lamp:

You can see that the blue line is barely noticeable, but it makes all the difference!

There are a few loose ends to tie up still, in the form of two more steps: 1. preparing the back of the medallion; and 2. the appliqué process. I’ll try to show you both.
And that, my friends, is the Medallion Project. Thank you so much for joining me in the journey! It’s been a challenging project, but sharing it with you along the way made it really fun! I love hearing your feedback, reading your suggestions and ideas, and soaking up your enthusiasm, which was often spurred me on and kept me going! So thanks for that!
If you would like to see the Medallion Project develop from start to finish, you’ll find all the articles for this project in the Goldwork & Silk Medallion Project Index. The articles are arranged chronologically, from the beginning design process to the finished project, with all kinds of tips and techniques shared along the way.

