One request that’s been coming up on the website and via e-mail lately is whether or not I can provide a pattern for working a sampler of surface embroidery stitches, for practicing all the various embroidery stitches shown in the embroidery videos here on Needle ‘n Thread.
Good news! You don’t need to a pattern to work a sampler for surface embroidery stitches! Let me show you what I mean.
It’s important to understand, though, that I’m not “creating” anything specific here. There’s no finished whole as far as a picture goes, when all is said and done. At the end of the whole sampler process, you won’t see some beautiful needlepainted bird, or a lovely piece of goldwork, or anything like that. Instead, you’ll have a piece of fabric covered with a whole colorful bunch of all kinds of different stitches, worked pretty much according to whim.
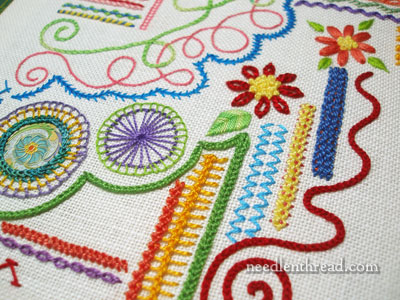
This is the larger of the samplers I’ve been filling with random embroidery stitches in order to have small samples to photograph for the videos or for the Stitch Play series.
On a 9″ x 14″ frame, I mounted a piece of Round Yarn white linen (available through Hedgehog Handworks). My intention was not necessarily to create a full sampler, but that’s what it has worked out to be. See, working many samples on one larger piece of fabric is a lot more economical than working many samples on many small pieces of fabric. Having this type of “doodle cloth” set up and ready has saved me time and money – and it has worked into a rather colorful collection of stitch samples.
If you are wanting to learn a plethora of embroidery stitches, just to work them out and get the hang of them, then set up a larger piece of fabric for that purpose. Think of it as a “doodle cloth” where you can doodle your way through various stitches you want to learn. You don’t necessarily need a specific structure or organization to the layout – think “doodling.”

Working randomly on a larger piece of fabric gives you plenty of freedom for working out the stitches, trying out different threads, playing with color, working through tricky techniques – and all with room to “grow” across the fabric. Do what you want to, where you want to, working the stitches until you have them figured out and are comfortable with their movement.

You can see that there’s no real layout here. Some of the stitches are worked in lines and bars, some in scrolls and scoops.
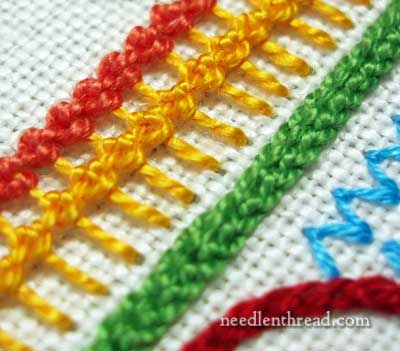
There’s no rule about which stitches go next to which stitches. In fact, in the photo above, I’ve combined two stitches – the gold stitch is a knotted pearl stitch, and on one of the “arms” of that stitch, I worked a raised chain stitch. I just wanted to compare the texture of the two stitches, so it seemed like a good way to get them close to each other.
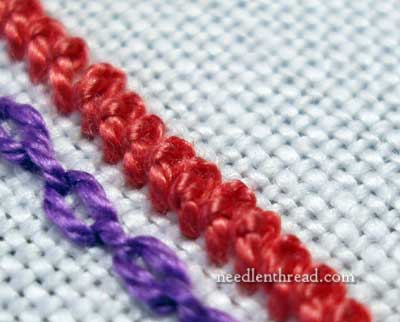
Chinese knots are lined up here next to a cable chain stitch. I don’t know why I put them next to each other – perhaps just because that’s where I had space.
You don’t even have to choose coordinating colors (though you can, if you want). This is a great way to do some “stash busting” while you’re learning. Just use whatever threads you have on hand. (Any excuse to make room for new threads…)
Working randomly like this will help you discover a lot about the whole concept of the stitch, and how we learn to stitch. See, usually we rely solely on a book or a video or someone else’s instructions to learn a stitch. But as you work randomly, you will likely find better ways for you to work the stitch – little tricks that make working the stitch easier for you, but that still give you the same result.
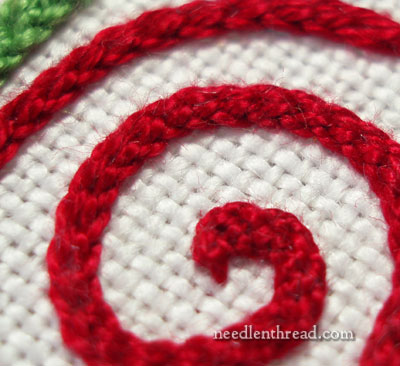
For example, the Hungarian braided chain stitch (pictured above) is always illustrated in books as worked down a line towards the stitcher. But once you work the stitch a bit, you’ll probably discover that it’s a lot easier to work it up the line, away from you. And it doesn’t change the look of the stitch at all.
You can’t necessarily do that with every stitch, it’s true – changing the orientation of the stitch may change the whole resulting stitch, but these are little things you’ll discover and get a feel for, by working stitches randomly on your own, without someone telling you exactly what stitch to work where, in what direction to work it, and so forth.
What you learn from working a sampler of stitches randomly is valuable for future embroidery projects. For beginners especially, this type of stitching familiarizes the embroiderer with technique, materials, color, texture – all the aspects that come together in any embroidery project. This type of stitching helps the stitcher gain a certain ease and confidence with stitches in general, while teaching a very good lesson on how to work things out for yourself – from reading stitch diagrams, to recognizing and correcting mistakes, to choosing colors and threads, and on and on and on.
The random sampler stitched like this works well for someone who wants to learn a variety of stitches, and who isn’t concerned so much about creating a “finished product.” If this description fits you, then throw off the shackles of a “pattern” or “kit” for creating a sampler, and leap into the world of random stitching!

