Today’s Stitch Play is a bit challenging – but, oh! the satisfaction of conquering a challenging stitch! True, this isn’t the Most Challenging Stitch Combination in the world, but it is challenging enough that many stitchers simply don’t bother to tackle it, even though it creates a beautiful, intricately laced border or band.
Tomorrow, I’ll have a Stitch Play Printable available for you. This is a new idea – we’ll see how it goes over. The Printable will take you step by step through the whole process of creating the interlaced herringbone, not only for the simple band shown below, but also on corners, complete frames, and circles. More on this at the end of today’s article!
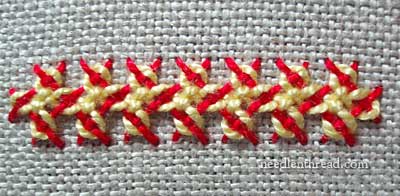
This stitch combination is the interlaced herringbone. It consists of a row of double herringbone stitch, interlaced in two passes. To create the stitch correctly, it is essential to work the double herringbone stitch correctly. And – sigh – this is where some of the frustration can come into the picture. Unfortunately, there are a few stitch dictionaries that present the double herringbone stitch incorrectly.
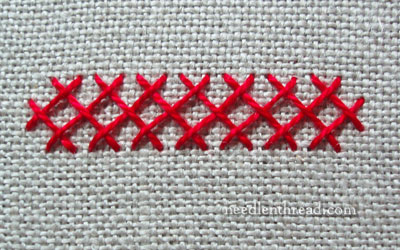
To start with, you must work the double herringbone stitch, and it has to come out looking like the band of double herringbone pictured above.
To help you get the double herringbone foundation correct, you might want to watch the double herringbone stitch video here on Needle ‘n Thread. Getting the movement of the stitch down is important. It’s doubly important to realize that double herringbone is not simply two rows of herringbone stitch worked on top of each other. Instead, there are certain “over-under” passes that must be made correctly for the stitch to interlock.
It is easier for beginners to work the double herringbone band shown in the photo above on even-weave fabric. If you use a relatively low-count linen (say, 25 threads per inch), you can easily create the double herringbone band shown above by counting the threads of the fabric.
For this tutorial, I’m using #5 perle cotton and a 26 count even weave linen called Montrose 1750, by Legacy. This is a nice “chunky” linen that works really well for all kinds of historical samplers (especially the counted variety), as well as for these surface embroidery stitch samples, and any surface work that involves using a heavier thread.
To make getting the foundation layout easier for you, here’s a diagram:
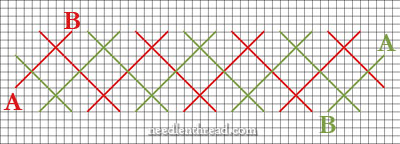
This diagram shows you the band on a graph, so that you can clearly see how the shape of the band should be laid out. The red lines indicate the first pass with the herringbone stitch, moving from A to B in red and continuing down the line (check the double herringbone stitch video for the movement of the stitch and the over-under sequences), and the green line represents the return pass, starting at A and moving to B and back down the line. So, if you want to count the fabric threads to get the layout precise, that diagram will help you. Then, once you’ve gotten the hang of the layout of the foundation, you can move on to working it without counting threads.
Or you can just work it without counting threads! They key is to lay out the band of double herringbone according to that general shape.
Once you get your double herringbone band worked out, it’s time to lace it.
Two points before you begin:
1. Use a contrasting color as you practice – it will make it much easier to see what you are doing.
2. Change to a tapestry needle for the lacing. In this photo tutorial, I’m using #5 perle cotton with a #20 tapestry needle for the lacing.

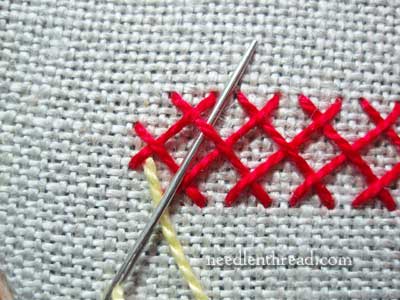
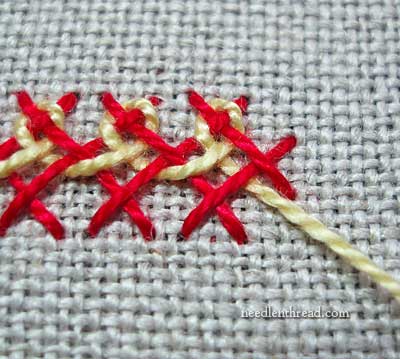
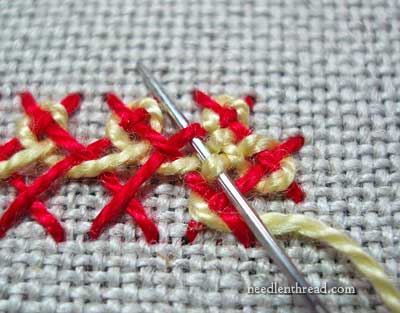
To begin the first lacing pass, bring the needle up in the fabric in the middle “elbow” on the left end of the double herringbone band, right where the stitches cross each other.
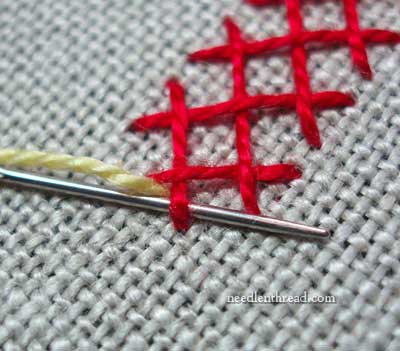
Immediately pass your needle underneath the lower “arm” of the elbow, so that the needle is passing under the stitch, towards you.
Whenever you are lacing in an upwards direction (away from you), the overs and unders always alternate, so that you are never passing under two threads in a row. This is very important. As I’m moving upwards away from me on this part of the stitch, notice that I’m going over and then under the foundation threads.
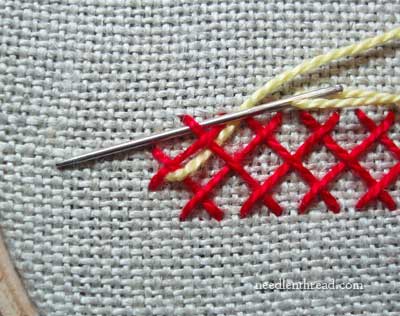
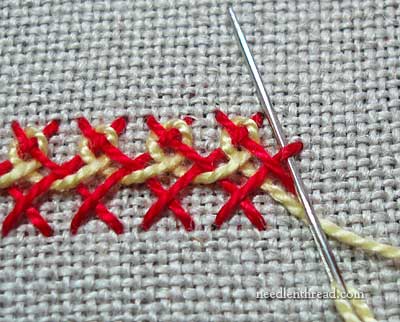
As I pass across the top of the foundation, I’m still working over and under, alternating the over-under.
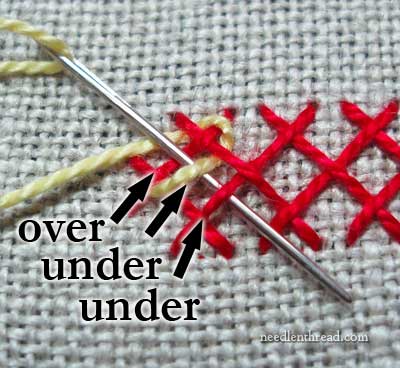
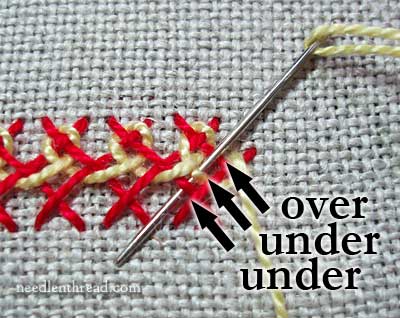
Now, I’m going to pass down towards me. And this is where things change a bit. When I pass down while doing the lacing, the sequence is over-under-under. I pass over the first foundation thread, then under the lacing thread and then under the foundation thread. Remember: over-under-under when coming down towards you.
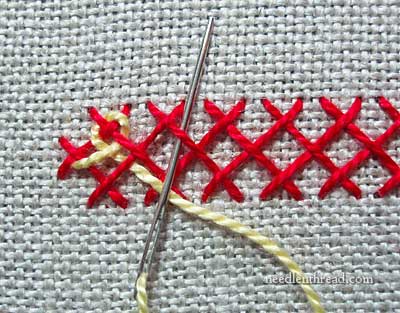
When you reach the center in the foundation band, you move back up, repeating the whole process so far, until you reach the end of the band.
Remember, when you turn to go back up, the sequence is again over-under.
When you arrive at the right end of the foundation, you’ve just come down, completing an over-under-under sequence.
Go around the end by passing over and under.
Now, your needle will head down again, and it will pass over-under-under. Remember: down is over-under-under.
Passing around the lower tips of the foundation, the sequence is again over-under.
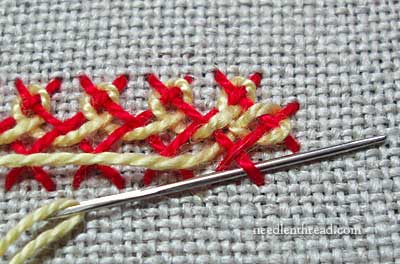
Passing upwards, you now have an extra lacing thread in the middle. Because you’re going up, you know that the sequence is over-under-over-under, alternating the over-unders.
Repeat the process all the way back to the beginning of the foundation band.
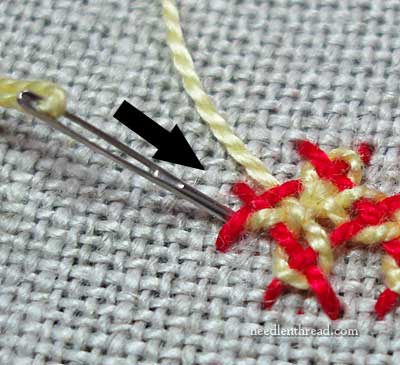
After completing the upward over-under-over-under sequence at the end of the band, you pass over the top arm on the left side of the foundation, and take your needle down in the same hole where you began the lacing adventure!
You have successfully laced the double herringbone band!
Stitch Play Printable
So I had this idea that I could offer you printable versions of the more complex Stitch Play techniques, or combinations of several techniques that are related in some way. I’ve worked up a printable for the interlaced herringbone, to test the waters.
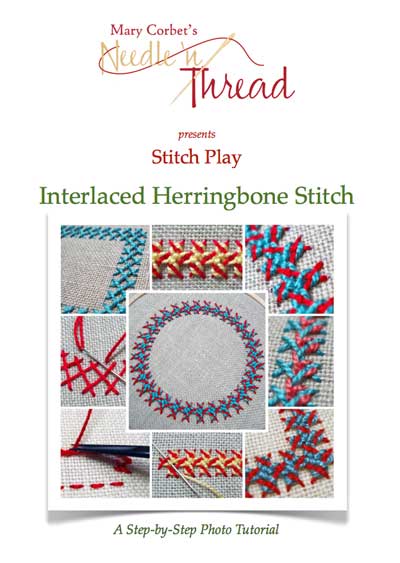
The printable covers everything you need to know about creating the interlaced herringbone, from materials used, to starting and ending threads, to stitching the double herringbone foundation, working on a corner, working a whole frame, and working perfectly spaced circles. Once you have these techniques down, the Interlaced Herringbone World is your oyster!
All the topics are covered with clear diagrams and step-by-step photos, in much more detail than I can cover on the website, and are organized with a table of contents. This particular booklet is some 20 or so pages of instruction. You’ll be able to print the pages you need and take them with you, away from the computer, to play with.
My plan is to charge a modest price for an auto download. The price is based on the level of complexity of the technique and the amount of instruction provided. Should the idea of Stitch Play Printables prove popular and should I do this again, some printables will likely be a lot shorter than others, and so the price would definitely vary, to keep the printables affordable.
The nice thing is, you’ll be able to choose which techniques and stitches you want further instruction on, in a printable format. You won’t have to buy, for example, a whole book, just to learn one technique.
And of course, the series will still continue on the website here, as normal.
So right now, that’s an idea I’m playing with. Tomorrow, I’ll post the first printable for you. Any thoughts or ideas? I’m all ears – feel free to share your comments below!

