I don’t know why I did it. Perhaps it’s because I couldn’t get over the orange kick, after playing with orange Trebizond silk and plaited braid stitch. (Remember that? I’m not really an orange person!)
More likely, though, it’s because everywhere I look right now, someone is proffering the latest Pumpkin-Something, and I am beginning to feel Oddly Short of Mainstream. To solve the problem, yesterday I took five minutes out of my already off-course day and fiddled with orange thread to create a pumpkin.
If you want to add a of Petite Pinch of Popular Pumpkin to your embroidery, here’s an easy and quick way to do that!
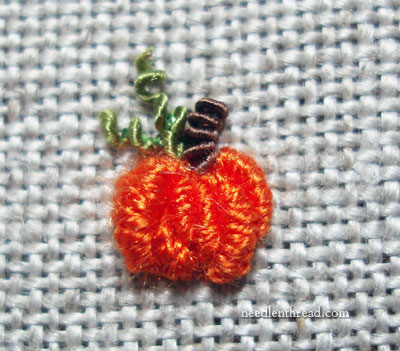
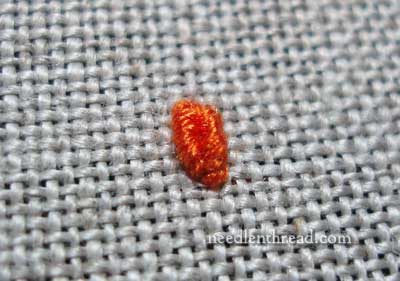
This is the pumpkin. It is made from bullion knots, with tiny bits of silk wrapped purl for the stem and curly vines. Please note that it is not a Perfectly Symmetrical Pumpkin. It isn’t supposed to be! And this makes creating these little guys that much easier.
I used 3 strands of Soie d’Alger silk, color #633. You can really use any kind of embroidery thread for this – if you have some orange DMC stranded cotton on hand, use that! If you have perle cotton, floche – whatever! – use it. Heavier threads work well for the more Ponderous Pumpkin; a few strands of finer threads work well for the Petite Pumpkin.
You can substitute brown and green floss for the stem and vines, too.
Concerning needles, a milliner needle (also called a “straw” needle) makes bullions a breeze. If you don’t have a milliner needle, that’s ok – you can still make bullion knots with a regular embroidery needle. The difference is that the milliner needle has a long shaft the same thickness as the eye, so it’s easy to pull the needle through the wraps of thread. If you plan to use bullion knots regularly in your embroidery, it would be helpful to invest in a package of milliner needles in various sizes.
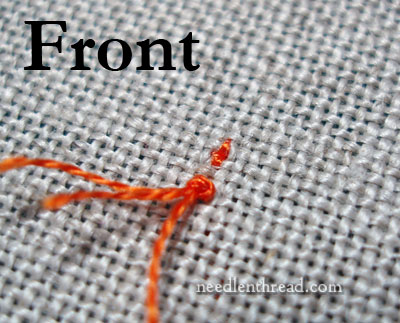
Start with a knot in the end of your thread, and go down into your fabric, leaving the knot on top. Make three tiny stab stitches in the area of your pumpkin’s body, so that the pumpkin, once stitched, will cover the stab stitches.
This is one of the easiest ways to start an embroidery thread. If you’re unsure of how to start a thread this way (or you want to try the same concept with line stitches), you can check out this tutorial on using a waste knot and anchor stitches on a line of embroidery.
After you made your little stab stitches, cut away the knot from the front of the fabric. Now, you’re ready to start.
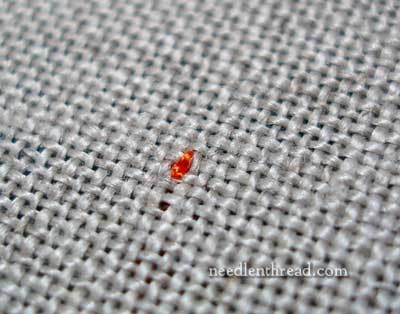
Make a bullion knot right over the anchor stitches. If you’re not sure how to make a bullion knot, you can check out my how-to video for bullions. I updated it this past summer, so it’s a lot clearer than the old one.
This first bullion knot will be the center of your pumpkin.
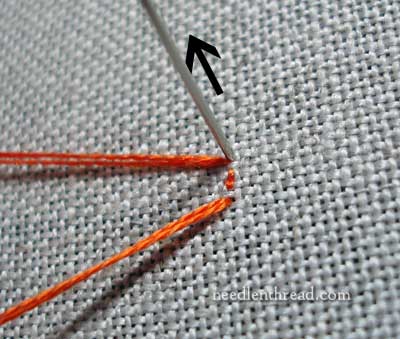
Now, move off to the side of the first bullion (doesn’t matter which side), and make another bullion. With subsequent bullions after the first one, start and end the bullion right next to where the first bullion began and ended (even in the same hole, if you want to, for the second and third bullions), and add a few more wraps on your needle, so that the subsequent bullion knots “hug” the center bullions.
You can see here how the second and third bullions (one to the right and one to the left of the first center bullion) start and end in the same area as the first bullion, and how they hug around it. That’s what you want to happen.
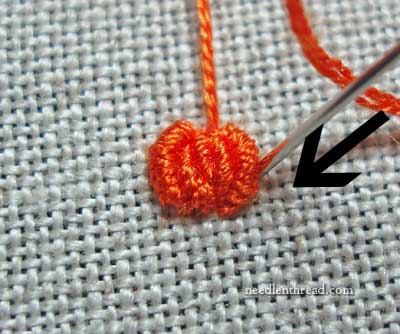
Now I’m going to build the pumpkin out a little farther, by working to the right, but notice that my stitch is beginning and ending right above and below that bullion stitch to the right of center.
For this fourth bullion, I’ll add even more wraps – maybe two or three more – than I used on the second and third stitch, so that this stitch hugs all the way around the stitch next to it.
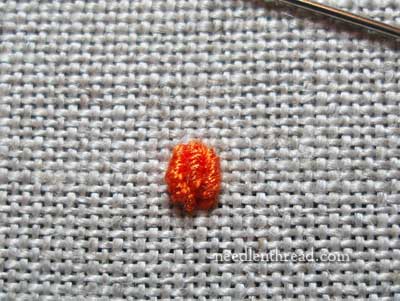
You can see that I have a little overlap going on in some of the center bullions, and that is fine. You don’t want the pumpkin to be perfectly, absolutely symmetrical. Show me a pumpkin that is, and I’ll change my mind! Normally, pumpkins are a bit irregular (at best!).
Now, you could stop at this point, and you’d have a recognizable pumpkin, right? Still, I’m going to add one more stitch on each side – but not a whole stitch.
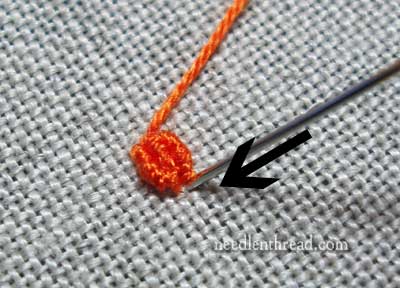
To the right of the outermost bullion on the right, I’m going to add a smaller bullion. This smaller stitch starts up at the top of the pumpkin – you can see where the thread is coming up for the start of the stitch in the photo above.
But instead of wrapping this outermost stitch all the way down and around the previous bullion, I’m only going about half-way down the pumpkin, and I’m angling my needle underneath the other bullion there, so that this last stitch on the right really hugs in and under it. This is going to give some lift and a sense of dimension to the pumpkin.
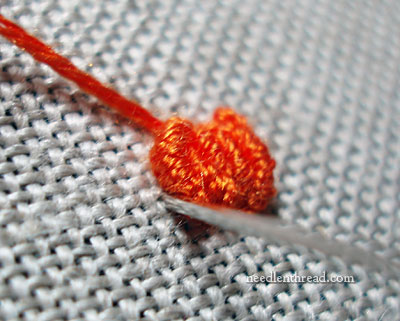
Now I’m doing the same thing on the left side, and you can really see in the photo above how the needle is angled in and underneath the last large bullion on the left.
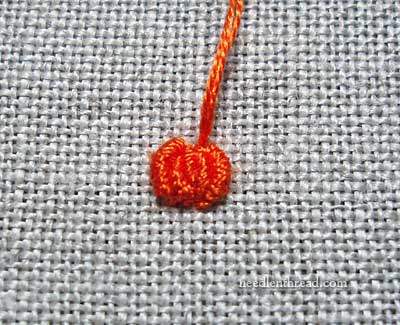
For the stem, I took a little snippet of brown silk wrapped purl (it’s the same stuff I used to make the leaves for my autumn tree) and sewed it in place, bending it slightly, and then two little green bits of stretched silk wrapped purl served as the curly vines.
If you don’t have silk wrapped purl on hand, no worries! Stitch a small brown, tan, or pale green bullion for the stem, and couch down a couple little loops of floss for the curly vine bits.
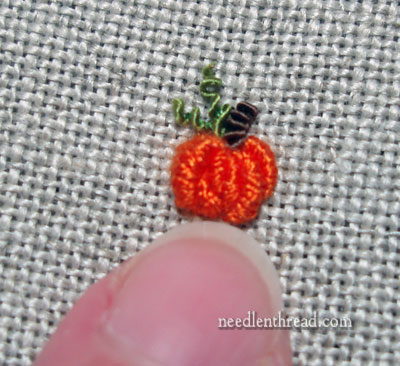
My imperfect pumpkin is rather small. That’s the tip of my index finger there, right below it. Of course, I could have Huge Fingers, so here’s the pumpkin next to a ruler:
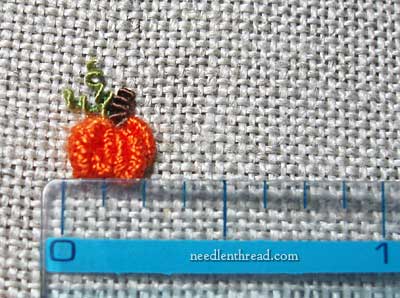
It’s about 1/4″ across, and just about that high to the top of the stem.
You can make your pumpkin a lot bigger by using a heavier thread. My plan was originally to try this with the orange Trebizond, but then I remembered that the plaited braid stitch ate it all. You can also use perle cotton in various weights, if you want. Whatever thread you have on hand that’s orange, or some similar color that would mimic a pumpkin, will do the trick!
You can also pad the pumpkin to make it really stand out, if you’re stitching a larger pumpkin. Take a look at this tutorial on padding a satin stitched dot. If you build up your padding the same way, you can then stitch your bullions over it.
However, if you’re stitching a tiny pumpkin like mine, there’s really not room for padding!
I suppose you know what happened next, after I stitched the first wee pumpkin?
No, I didn’t add a face (I thought about it!)…
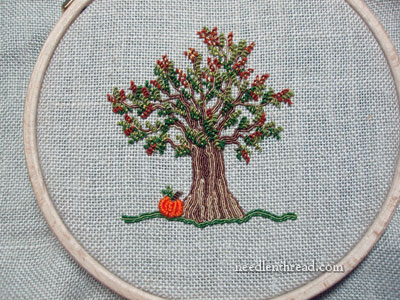
Instead, I decided to plant one under the tree!
Go play with bullions and stitch yourself up a pumpkin patch! It takes less than 5 minutes to stitch one pumpkin, so you can whip up at least a dozen in less than an hour.
And when you’re finished, you’ll be ready to pour yourself a pumpkin latté, slice yourself some pumpkin bread, slather it with pumpkin butter, dip out some pumpkin ice cream, serve up some pumpkin scones, pop some pumpkin popcorn, ladle out some pumpkin polenta as a side with pumpkin stew, fry some pumpkin pancakes, roast some pumpkin seeds, dollop some pumpkin whipped cream onto your pumpkin pie, munch some pumpkin brownies, crunch some pumpkin cookies, slurp up some pumpkin punch…
… or just wait patiently for Spring, when we begin to ween ourselves once more from our Preoccupation with Pumpkin!

