One of my favorite aspects of Needle ‘n Thread is that I can bounce ideas off all of you, and I can always count on your good advice! Many creative minds are better than just one, and you all are The Best of the Best when it comes to giving good input!
And so, after reading through your thoughts the last time we discussed this Hungarian redwork design, I did indeed re-vamp the design to add some kind of sensible completion to the blocky ends of the table runner layout. Like some of you, I didn’t mind the straight ends (and they certainly would make fabric finishing much easier), but I like the scalloped ends better.
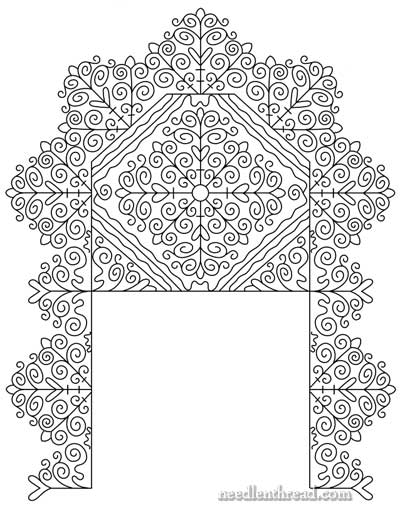
I wanted to keep, as much as possible, the integrity of the original design. My goal is not really to add anything different to Lilly’s original drawing. At the same time, I want to keep the bulk of the drawing intact, without eliminating anything major from the design.
It made sense to me, then, to work with the repeats on the edge, and to arrange them into a “scallop” design around each end of the whole layout.
Changes in the Embroidery Pattern
I made one small elimination in the design, though. It’s not enough to mess up the “integrity” of Lilly’s original design. Here’s what I did and why:
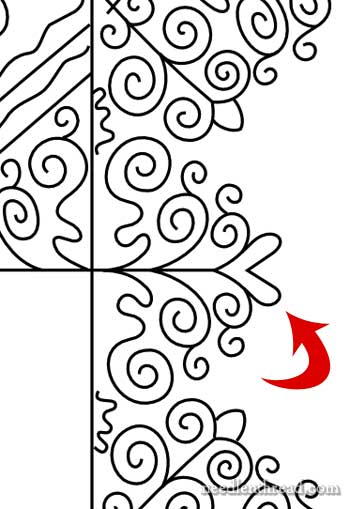
Above, the red arrow points to the smaller “scallop” element. In the original, the straight line up the middle of this element passed through this heart shape, which was capped by a small rounded peak, also split by the center line. I shortened the center line to the base of the heart shape, and removed the little peak above the shape. You can compare this change to the original shown in this article, if you like.
My reasoning for changing this element? I like the fact that the peaks of alternating scallops down the side are different – they don’t all end with the same little bump shape – and I like the little heart. It fits the folky nature of this type of embroidery.
Enlarging the Embroidery Design
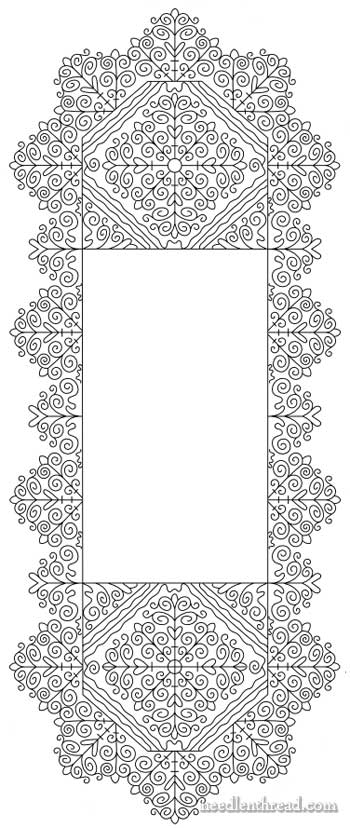
Pictured below, the whole design looks small and delicate, doesn’t it? But imagine it enlarged, so that the width of the design is 16″ from the widest points. That’s how large the design will be for the runner.
With the design area 16″ wide, the length of the whole embroidered area becomes approximately 40″. The finished runner will be 18″ by 42″, which means my fabric needs to be at least 22″ x 46″, giving me an excess of 2″ all around the finished size of the linen.
I’m thinking about angling the cut of the ends, to follow the shape of the runner, but this is a decision that can be made later. If you look at the PDF pattern provided at the end of the article, you’ll see what I mean. There are red lines marking a possible shaped end. Feel free to share your thoughts on that! Should the linen be finished with straight ends, or shaped ends?
Embroidery Stitches & Threads
When enlarging a design this much, the whole design takes on a different look. It’s not quite as “lacy,” for example – the pattern becomes bold, the individual elements have more space around them and each line is itself much larger, too.
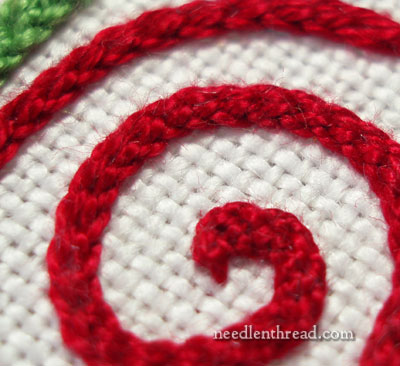
This overall enlargement of the design works out well, considering the types of threads I’m considering for the stitching, and the main stitch I want to use. The Hungarian braided chain stitch is a textured, chunky stitch, especially when worked in perle cotton, as shown above. I think it’s a beautiful stitch when worked with a twisted thread, and I want to use it for the majority of the lines in the runner. If I use perle cotton, it has to be size 8 or 12, though, to fit the design lines. I’ll test both.
On the other hand, I may use floche or coton a broder. Whichever thread becomes the choice, though, it must absolutely be “wash fast.” That is, the dye on the thread must be fixed. Table linens should always have the ability to be laundered.
Before beginning on the project proper, I’ll do some thread testing, to be certain of thread size and type, and then I’ll put the sample through some washing tests, to make sure that laundering won’t be a problem. I’ll share those tests with you in days to come.
Other Decisions to Make
Besides deciding on thread, a decision must be made on the ground fabric. Originally, I was thinking red-on-white, but now I’m considering going with a natural colored linen, possible Strathaven linen. My thread choice will also influence this, so I’ll be sampling with the threads on both the white Alba Maxima and the natural Strathaven.
Finally, before stitching can actually begin, the fabric has to be cut and set up with layout markings, and then the design has to be transferred. How I will transfer the design is another Big Decision to make. I’m going to do some testing in that area, too!
Proper Prior Planning
You can see that, when it comes to tackling your own embroidery project that’s not pre-planned by someone else, there are many little steps and decisions to make before you actually start stitching. It’s true that some of these decisions can be made in a flash – you conceive a design, and boom-o! You know exactly what you want to do with it and how you want to do it.
But this isn’t always the case. Proper Prior Planning can prevent a sad end result or a major waste of time and materials. It’s good to take your time to plan! During the planning stage, keep your mind open to alternatives and don’t get too eager to rush in. Enjoy the approach – it’s an important part of the process!
New Design PDF
Here’s a PDF of my altered design, if you want it:
Hungarian Redwork Table Runner (PDF)
More later!

