Don’t you just love embroidery projects that allow you to stitch seemingly endless lines of design, without having to start and end your threads often?
In Stitching Heaven, we’ll be able to stitch indefinitely, with miraculously never-ending threads that don’t fray, that don’t tangle. When we want to change colors or thread types, we will merely think it, and it will be done. We won’t have knots on the back of our fabric and every stitch will cooperate. We won’t make mistakes, but we might change our minds. And when we change our minds, previous stitches will disappear as quickly as we can breathe the wish.
Sounds nice, doesn’t it?
After a while, though, I’d get bored. The challenges of stitchery – and overcoming the challenges – may not be half the fun of embroidery, but they are almost all the satisfaction. If you didn’t have to overcome any challenge at all when stitching, would you be nearly as satisfied with your finished project?
One challenge that we have all faced at some point is that of starting and ending threads in a way that is secure, that makes sense for the particular project, and that won’t impair the finished design.
Today, I’ll show you how I’m starting and ending stitches on the Hungarian Redwork Runner. These are methods we’ve discussed before, but here, you’ll see them in action on a real project. I’ve made one alteration in the ending of my threads, though, for this particular project, so we’ll look at that up close and I’ll tell you why I’m doing it.
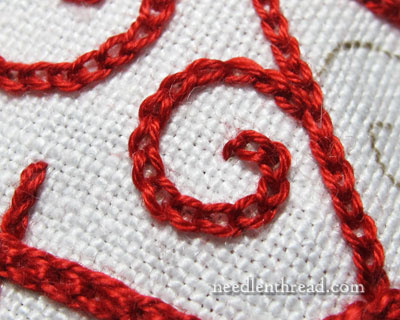
If you take a look at the final design that I used for the Hungarian Redwork Runner project, you’ll notice that there are many starts and stops in the design. Little curls, big curls, broken straight lines, small wavy lengths – on this project, I have to start and end threads All The Time.
Now, this might sound a bit more like Stitching Hell than Stitching Heaven, and it could be, if I let it be. But as Milton would say, “The mind is its own place, and in itself, can make heaven of Hell, and a hell of Heaven.” In other words, it’s all in the attitude! If you accept the fact that you’ll be starting and stopping a lot and don’t let this fact bug you – just look at it as part of the process – then it’s not nearly as big a deal.
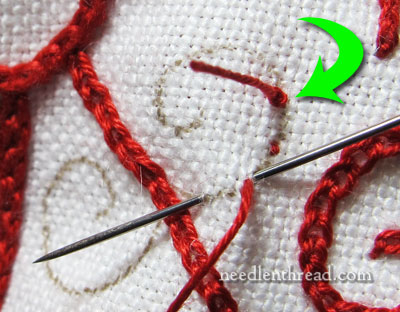
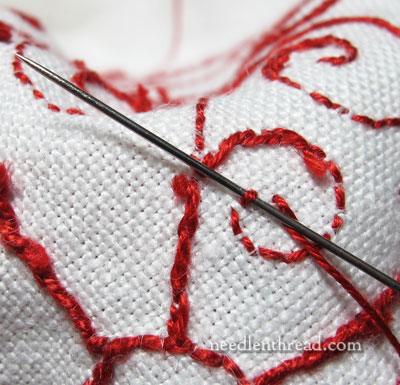
To start the threads for this project, I’m using a waste knot on the top of the fabric (see the green arrow in the photo above), after which I take about three tiny, spaced backstitches towards my starting point.
Here are the three little backstitches, and my working thread (on the left side of the photo, right up next to the chain stitched line) is now in position to start stitching that curl. The stitching direction will be towards the knot.
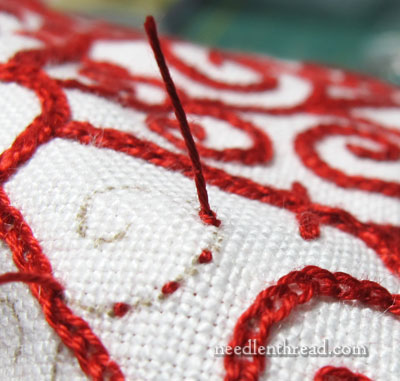
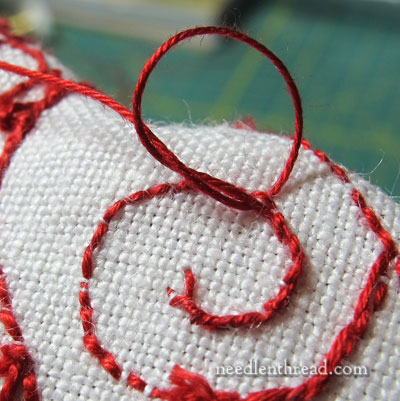
Here I am, heading towards the knot. Hello, knot!
Once I arrive within spitting distance of the knot, I pull it up and snip it off. Goodbye, knot!
And then I continue on my merry way, finishing the curl.
This is a close-up photo of the curl, which is stitched in chain stitch using coton a broder (aka “cutwork” thread) #25 in color 321. Even this close up, you’re pretty hard-pressed to tell exactly where those backstitches are, right? They’re completely covered, even though the chain stitch is a relatively open stitch, compared to other line stitches.
And my starting thread is perfectly secure. Not only does it begin with those backstitches, which are secure in themselves, but then it is further stitched over with the chain stitches. It’s S-E-C-U-R-E. And it’s happy. And I’m happy.
I love starting threads this way! Especially on an embroidered piece where the back is not covered, this is a clean and simple way to secure the starting thread.
Now let’s migrate to the Back of the Piece, where things start looking a bit hairy and not too attractive. The perle cotton used for the heavier lines is much thicker and more difficult to hide in a slender, subtle way on the back. The coton a broder is much easier to finish off on the back, because it’s not only a finer thread, but it’s not as tightly twisted. Though they are such different threads, I end them both the same way.
If I were able to take some small backstitches in an adjoining line that would eventually be covered with stitches, I’d end the thread the same way I started it. But in most situations on this design, that’s not possible. So, in most instances, I have to whip the working thread around the stitches on the back of the piece.
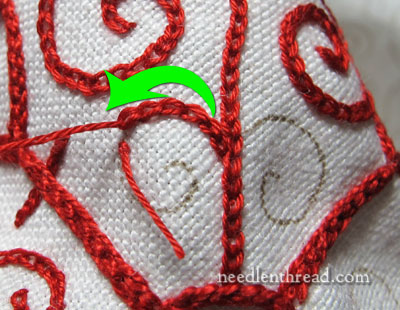
You can see in the photo above that I’m heading underneath the back of one of those stitches.
I whip the thread around 8 or so stitches on the back, and then… and then….
… and then I do something that I don’t normally do on the back of my embroidery.
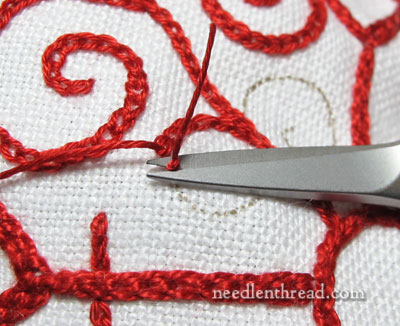
I tie a knot.
Noooooooo! Not a Knot, you say!
Yes. A knot! I say.
It’s just a simple overhand knot, and I pull it so that the knot cinches up right next to the stitches on the back. Then I clip the thread close.
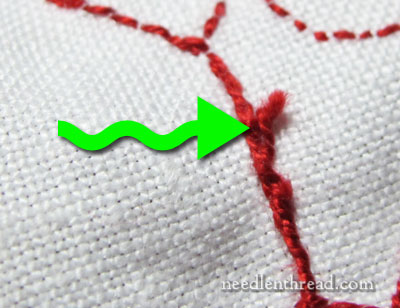
Why the knot? Because of Tweakers. The green arrow above points to a Tweaker. Tweakers are annoying, hairy, bouncy, intrusive things. And we don’t like them on the back of this type of embroidery.
The perle cotton especially is prone to tweaking, and if you merely whip around the stitches on the back (even if you “hitch” the thread by taking one whip stitch backwards and then moving forward again), when you trim that perle cotton, it’s going to retain the tendency to scooch out of its situation. And as it scooches, it will form a Tweaker.
Now, you can trim the Tweaker, but trimming a Tweaker is a lot like cutting the tail off a lizard. It’ll come back. And you can only trim Tweakers so far, before you end up without any thread left to tweak on you.
The thread needs something to restrain it from tweaking about, and I like a tight little overhand knot for this job. It is subtle, and it restrains the loose thread ends.
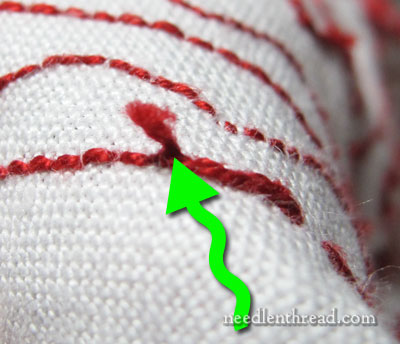
Here’s another Tweaker.
Can you see why I don’t want the rotten little things on the back? So, I tie a knot, and it helps. Mind you, the knot is small – it’s not a big, lumpy knot. Just one overhand twist cinched firmly is all it takes.
When the piece is finished and washed for the first time, a little miracle called Shrinkage will happen, and this will also help reduce the tendency of the threads to move. The thread will shrink – ever so slightly, but just enough to allow it to grip the threads around it.
So that’s how I’m starting and ending the threads on this project. I’ll share an update with you on the project soon, so you can see how far it’s come.
What about you? How do you end threads on the backs of table linens and the like, when the backs will be exposed and the item will be washed? Any tricks you’ve learned that you’d like to share? Feel free to leave a comment below – we’re all ears!
If you’d like to see this project from its developmental stages until now, including tips and materials and all that good stuff, feel free to visit the Hungarian Redwork Runner project index.

