So, you’re venturing into a stitch or technique that requires a padded outline underneath the stitch…
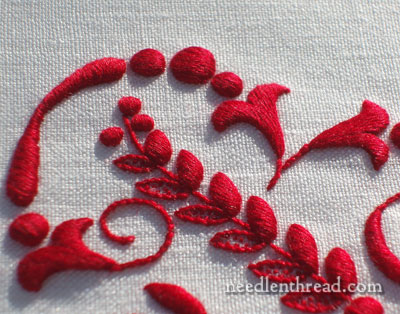
For example, you’re working a satin stitched monogram, like this one:
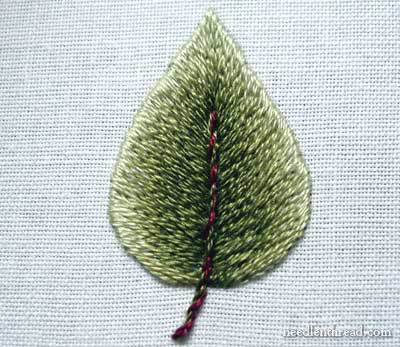
Or you might be working a leaf shaded in long and short stitch, like this one:
You want the edges clean and straight and slightly raised, right? To achieve this, the instructions will usually require the embroiderer to split stitch an outline around the element, and then to embroider just over the split stitch line. Rarely do such instructions call for a backstitch outline.
There is, believe it or not, a reason for this. We might think the designers are conspiring to drive the embroiderer nuts – after all, it’s a whole lot easier to backstitch a line rather than to split stitch it.
With backstitch, you’re working each stitch movement from the front of the fabric to the back, and you can see exactly where your needle’s going. With split stitch, you’re working the stitch movement from the back to the front of the fabric, coming up blindly somewhere in the middle of the previous stitch, in desperate hope of splitting it!
Split stitch can be hard to do. It takes practice. But there’s a reason for split stitch, and all those designers that call for it as an outline underneath an embroidered element really do know what they’re doing, and they’re not out to drive you mad.
I promise.
Backstitch vs. Split Stitch – They’re Different
Let’s look at the reason why we use split stitch for outlining underneath underneath an embroidered element, instead of backstitch.
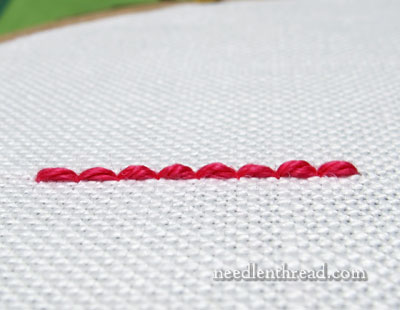
This is a backstitched line, seen from a side angle. Think: Compressed Loch Ness Monster.
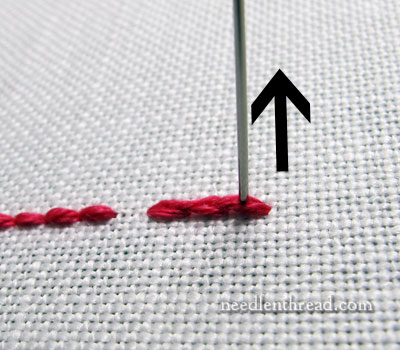
When working a proper split stitch line, each previous stitch is split by the needle coming up from the back of the fabric and through the stitch. This upward movement pulls the fibers of the previous stitch up with the thread as it passes through and raises the previous stitch up with the current stitch.
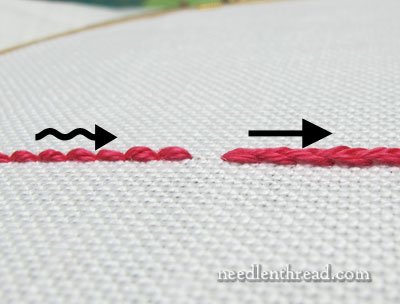
See the difference in the surface of the two stitches? The backstitch on the left is bumpy. With the split stitch, each stitch creates a bridge between it and the previous stitch. The stitches morph into each other. And the resulting surface of the line of stitches is smoother than the backstitch. The “bridges” of the split stitches will support a smooth, clean edge for the satin stitch or long and short stitch that follows.

If you turn your fabric over, you’ll discover another reason to prefer split stitch to backstitch. On the back of the fabric, the backstitch creates a bulky line. It actually creates either a split stitch line or a stem stitch line, or a combination of both, depending on where the needle entered the fabric in relation to the threads on the back.
The split stitch creates a much less bulky line of small running stitches.
So, on the back of the fabric, you’re not going to get as much bulk and build up when you begin working your satin stitch or long and short stitch over the split stitch line. This allows the embroidery on the front of the fabric to lie flatter on your finishing surface.
A Compromise: Split Backstitch
If the split stitch is just too difficult to manage, you can compromise and work a split backstitch, by splitting the stitches from the top instead of blindly from below.
The result isn’t quite the same as regular split stitch – the line will dent slightly, and the resulted split stitches will be more open, but it’s a good compromise between the split stitch and the backstitch, if regular split stitch is too harrowing.
Practicing the Split Stitch
But it doesn’t hurt to try to get the split stitch down. Try it first with softly twisted, slightly heavier threads like floche or coton a broder, or with a really thick, softly twisted thread like DMC 4 Retors Mat, which is what I’m using in the photos above. A softly twisted thread is much easier to split than a heavier, tightly twisted thread like perle cotton.
As you take each stitch forward in your split stitch line, pull gently on your working thread from the back of the fabric to keep that stitch down on the surface of the fabric as you bring your needle up into it. This will keep the stitch in place, making it easier to split.
Once you get used to splitting the stitch from below using a thicker thread, then move on to a finer thread, like one strand of floss.
Splitting Between Two Strands of Floss
I know what you’re thinking! Why not just use two strands of floss and come up right between the two strands?
Well, splitting between two strands of floss is not quite the same as regular split stitch, because you aren’t really splitting a thread. You’re parting two threads and coming up between them. So taking that route won’t really get you used to splitting the single thread that’s often required for outlining.
Give it a try! As with any stitch, ease comes with practice.
Your Thoughts?
What about you? Any insights into how you outline elements to pad satin stitch or long and short stitch? Any argument for backstitch? Any tips on making the split stitch easier? We’re all ears! Feel free to leave a comment below!

