Yesterday, we looked at a piece of ecclesiastical goldwork embroidery that I’m deconstructing and photographing along the way.
Today, I’ll tell you my reasoning behind why I’m taking this piece of embroidery apart, and we’ll start the deconstruction process together. Follow along with me here to see what these grapes are made of and how they’re made, and what it’s like to take a piece of goldwork like this apart!

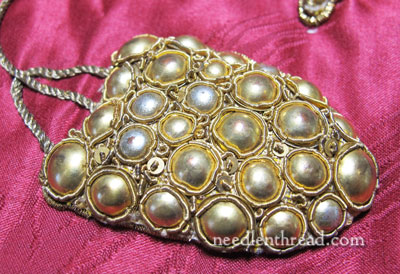
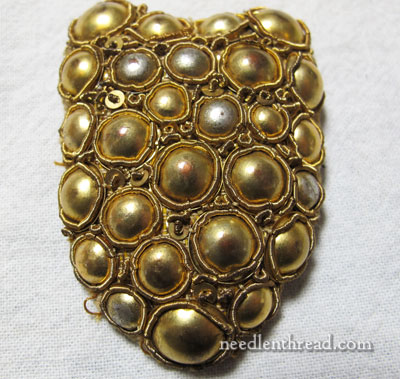
This is the bunch of grapes that we’ll be concentrating on.
Why Deconstruct this Embroidery?
Before we start disassembling the grapes, I suppose I should offer my “apologia” (as in, defense of conduct) for what some may consider a heinous crime against needlework. Here is my reasoning:
1. This piece is no longer capable of its original use.
2. It is not the best example (or even close to the best example) in its category, and therefore it is doubtful that it would ever find a home in any museum. It could sit on my shelf forever, untouched, but then what?
3. If every single textile in the world were saved and stored because it shouldn’t be taken apart, many questions about how they were made, by whom, and with what materials would never be answered. Besides, there wouldn’t be storage space enough to keep them all, or museums that could afford to house them.
4. Greater value will come from the piece in what I can learn about it while deconstructing it, than would come from the piece if it were simply stored or displayed on my wall.
5. Even William Morris and his wife spent much time on their trips abroad “snipping apart embroideries” to see how they were made. “Afterwards we studied old pieces and by unpicking etc. we learnt much, but it was uphill work, fascinating but only carried through by his enormous energy and perseverance” (from a letter of Jane Morris to their daughter May Morris). They knew the value of taking apart old pieces of embroidery to learn from them. That’s what I propose to do here.
Of course, I’m always open to arguments against the process, but those are my reasons, for what they’re worth. This is not to say I encourage you to disassemble every piece of old embroidery that comes your way (on the contrary!), but in this particular situation, I think there is good reason to take apart this piece.
Deconstructing the Goldwork Grapes Slip
First, let’s take a look at the grapes up close.
How about a little closer, so you can really see the details?
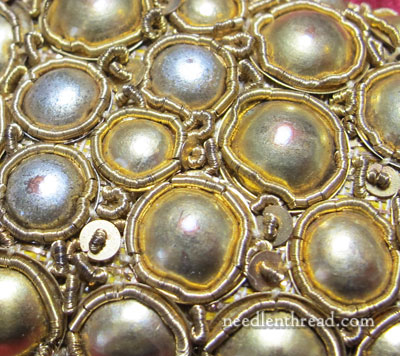
You can see that the grapes are metal and domed, that they are surrounded by purl (those work-looking gold threads) and that there are a few spangles scattered amongst them.
If we turn the whole piece over, we see the threads on the back that connect the whole bunch of grapes to the ground fabric. These aren’t threads used to do the embroidery, but rather threads used to appliqué the grapes to the ground fabric.
So the first step is snipping these threads so that the whole slip (embroidered appliqué piece) can be removed.

Once the threads are snipped, the bunch of grapes can be gently pried up from the fabric, and any stubborn appliqué threads can be snipped from underneath the bunch of grapes on the front side of the piece.
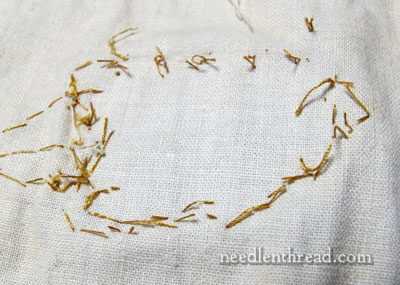
The line of metal thread you see lying loose here was used to outline the bunch of grapes. We’ll talk more about it farther down the road, when we discuss the assembly of the whole embroidered piece and some theories about it.
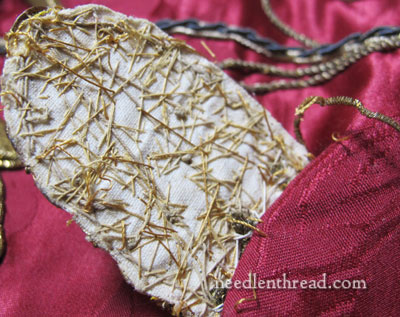
Once all the tacking threads around the grape bunch are snipped, we can turn it back and see the underside of the embroidery work. There are several various weights of thread here. The heavier ones were used to fix the grapes in place, with finer ones used for sewing on the purls and the spangles.
The back fabric here is a fine, high thread count linen. The back is as hard as a board, and the threads are not quite brittle to the breaking point, but more brittle than if they had simply been coated with wax. The back of the piece was obviously coated with some kind of glue, which hardened the fabric and also stiffened the threads. My guess is a wheat or rice starch glue, or something similar.
Here is the bunch of grapes, removed from the ground fabric. It is about 3″ high and 2″ wide.

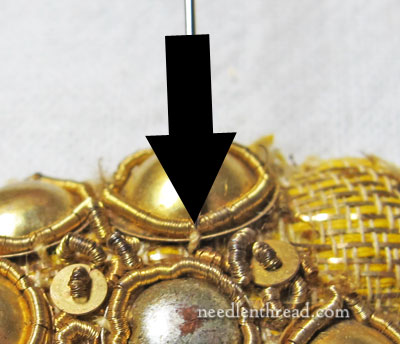
You’ll notice up close that the purls around the “domes” are crimped or dented in four place around each dome. Each of these dents marks the spot where the dome is sewn onto the foundation. By snipping the thread right under the crimp in the purl, we can easily disconnect each dome from the fabric.
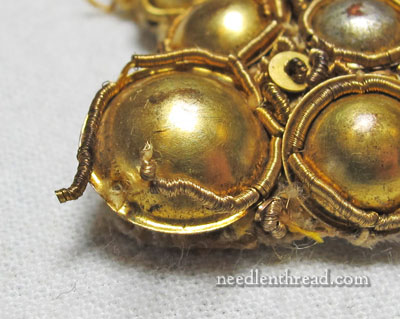
Here, you can see up close what happens when you snip the thread right under the crimp in the purl. The purl comes loose, and so does the dome.
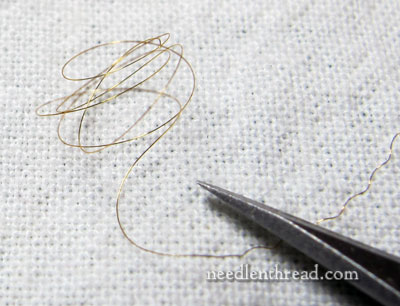
Incidentally, the purl itself is extremely fine. In the photo above, you can see the wire the purl is made from. I simply stretched the purl out of its coil. My tiny embroidery scissors are in the photo as well, to give you a little perspective on how fine the wire is.
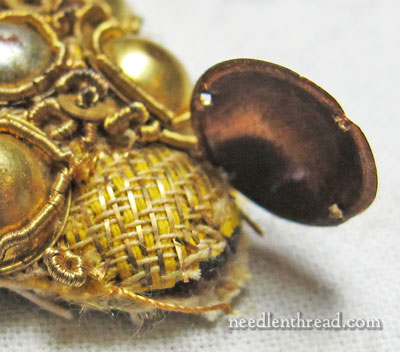
Here’s the first dome, lifted away from the foundation. The fabric immediately beneath the dome is a herringbone-weave yellow fabric shot with gold.

Notice that there’s a turned-up lip all around the dome, making the whole metal dome piece look something like a shallow bowler hat… or maybe an old army helmet?
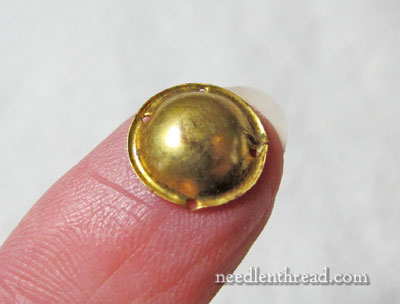
This is the largest size grape in the bunch, and to give you a sense of size, here it is, resting on my finger tip.
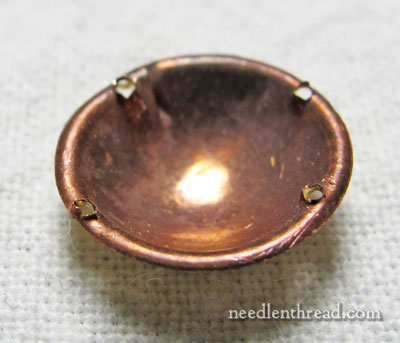
If you turn the dome over, you can see that it is hollow like a bowl, that it is a copper color underneath, and that the edge is pierced in four places so that it can be sewn to fabric.
In the photo above, you can easily see one of the stitches that passes through the pierced hole in the lip of the dome. It is also crimping the purl along the lip of the dome. The purls are sewn on this way:
The needle and and a fine thread were brought up through one pierced hole in the lip of the dome piece, the purl was strung onto the thread like a long bead, and then the needle was taken back down into the same hole, leaving a loop in the purl that fit around the dome.
Then, at each pierced hole in the lip of the dome, a slightly thicker thread was used to stitch from the outside of the lip into the hole in the dome, over the purl and down into the hole. This stitch crimps the purl slightly, and it holds the dome and purl in place. This was done in all four holes, all around the dome.
I snipped these threads just under the lip of each dome (and the finer thread on which the purl is strung) to remove each dome and its purl ring.
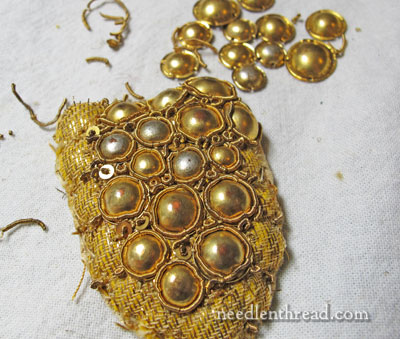
Here is forty five minutes of progress in deconstructing the grapes. The outside perimeter is almost finished, and you can see the herringbone-weave yellow fabric on the foundation fairly well.
Next up, we’ll look at all the grapes and metal threads removed, and we’ll take apart the foundation and see what’s under it!
Any questions or comments? I’m all ears – feel free to leave a comment below!

