A couple weeks ago in a Stitch Fun article, we looked at how you can alter the look of a basic stitch by either lacing it with another thread or whipping it with another thread and I showed you a little sampler of different ways you can whip and lace stitches.
Today, let’s play around with some chain and braid stitches!

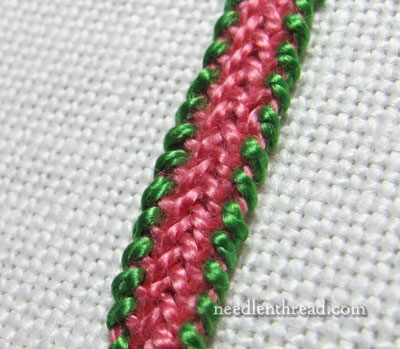
The top line of stitches here is the whipped chain stitch.
Why whip a chain stitch? Good question! The whipped chain stitch forms a much heavier, bolder ropey line, compared to whipped backstitch or whipped running stitch. The line sits up fat and round on the fabric. The chain loops on the chain stitch line are squeezed shut a bit, but you can still see them, and they add a little touch of texture to the line.

The second line of stitches here is also whipped chain stitch, but instead of whipping around the whole chain stitch line, I whipped around one side of each chain stitch in one direction, and then came back along the line and whipped the other side of the chain stitches.
You can vary the finished look of this variation of whipped chain stitch by changing the direction from which you pass under the chain stitches.

Here’s the same technique in the dark red and dark blue chain stitch. This time, I whipped both sides from the center out. I started whipping the stitch at the same end of the line of chain stitches, and whipped from the center out to the end of the line, then moved back to the beginning of the line, and whipped from the center out on the other side of the chain stitch.

This is a fun technique – it’s a great way to embroider a fine braid-like line in alternating colors without having to use two threads at once, like you do with the checkered chain stitch.

You can whip practically any braided and chain-like stitch, in one way or another. Above, you can see the Hungarian braided chain stitch in orange, with one side whipped in yellow. Whipping a braid-type stitch adds a nice finish on one side of the braid or both sides of the braid.
Besides adding an “outline” color, it raises and tightens the edge of the braid just slightly, too.
In the photo above, I’ve whipped the edges of the plaited braid stitch, to create a very bold line with rope-like edges. I love this combination! I’m playing with it right now on a little knotwork design, which I’ll show you in a few days.
You don’t often see plaited braid stitch added to in any way, because it’s already a fairly dense, somewhat complex stitch. But whipping the edges of the braid looks pretty neat, and it’s fun!
If you have trouble conquering the plaited braid stitch, try my Stitch Printable for Plaited Braid Stitch – you’ll be a pro at it in no time flat!
Mind Your Needle
When whipping or lacing stitches, don’t forget to switch to a tapestry needle! The blunt tip won’t snag the stitches, making it much easier to pass under them quickly.
Why not try your hand at different combinations of whipped and laced stitches, to add some extra color or extra interest to your embroidery projects and samplers? Whipping and lacing stitches is a quick and easy way to add just a touch of something different to the standard stitch repertoire.
And doggonit, it’s just fun to do!
Stitch Fun is a series of tutorials here on Needle ‘n Thread that explores different embroidery stitches and what we can do with them. If you’d like to take a look at the other tutorials in the series, feel free to visit the Stitch Fun index!
