Earlier this week, we began deconstructing various elements on a piece of old ecclesiastical embroidery, to see how the elements were originally made and to learn something about the materials and techniques used.
You can find the photos of the whole piece of goldwork embroidery in the first article in the series, and you can find the rest of the backstory, along with my reasons for deconstructing this piece, in the second article of the series, where we began deconstructing the goldwork grapes.
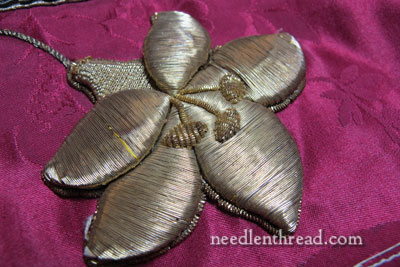
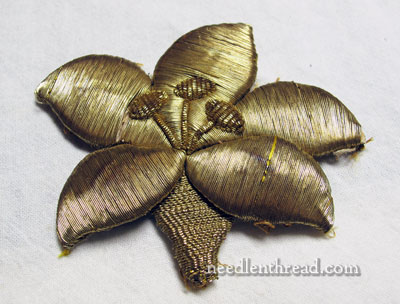
Today, we’re going concentrate on this piece of high relief goldwork:
When I first look at a piece like this, I start asking questions that occur to me as I take an “overview” of the piece.
So first, let’s just look at the piece in general.
We see that there are three different goldwork threads involved in creating the lily: a smooth passing thread that covers the lily petals, rococo (a crimped passing thread) that covers the base of the lily (in the top left corner of the photo), and bright check purl, used for the stamens.
If we turn the piece over, we can see that it was applied to the vestment ground fabric in an appliqué technique. That is, the lily was created on a different ground fabric, cut out, and then sewn onto the vestment fabric, in the same manner that the grapes were made and then applied to the vestment.
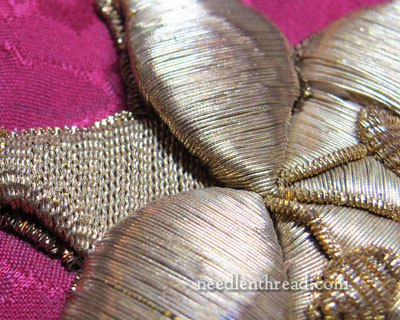
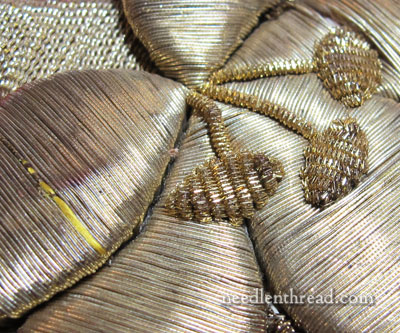
Turning it back over, we can look up close at the way the petals of the lily seem to overlap each other and the base of the lily (made with the crimped gold thread).
We know that the whole lily was sewn to the vestment in one piece (by looking at the back), but when we look at the front, it might seem that the lily itself was constructed in pieces. Given the way the petals overlap here, it almost looks like each piece was embroidered separately, and then all the separate pieces were brought together to make the lily.
Well, it’s a possibility. A little further study will help us determine if this is true or not.
Let’s remove the lily from the ground fabric, and see what else it can tell us. Here’s the lily, off the ground fabric in one piece.
If each piece of the lily were embroidered separately and then brought together to make the whole lily, then when we turn this over, we should be able to tell by the stitching on the back.
The back of the fabric of the “slip” (the embroidered appliqué) would look a lot like the back of the vestment in the photo further above – it would look like more appliqué on a piece of ground fabric, right?
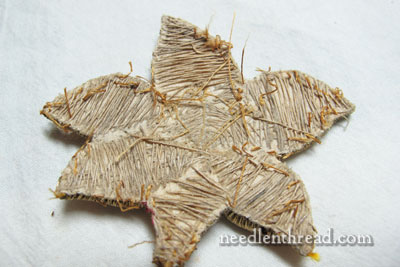
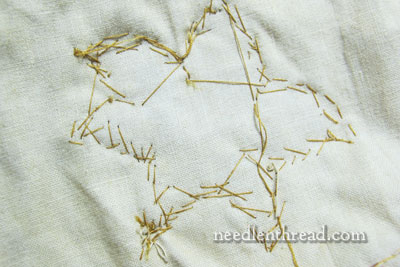
Ahhhhh…. but it doesn’t! The ground fabric on the slip is the shape of the lily, and all over the back of it, we can see the threads involved in the actual embroidery of the whole lily. So the lily was embroidered as one piece, not assembled with many embroidered pieces.
The threads on the back of the embroidery are quite stiff, and rather dirty looking! This is a rougher, heavier thread – more like string. And this makes sense, because this thread is not visible on the front at all. Why use good silk embroidery thread for couching, when the couching thread is not at all visible?
Also, considering the couching technique used, it is important that this thread be very sturdy indeed.
The heavier threads on the back look and feel as if they are coated with beeswax, which is necessary to protect the thread from the wear and tear it will receive from the metal threads.
So that’s an overview of the lily. Whenever I look at a piece like this up close, even though some questions may be answered by a cursory study like this, many more questions are generated.
For example, how were all those fine gold threads sewn on? What is the padding made of? What was the order of work in embroidering the lily? What are the threads made of, and do we have the same threads, or something equivalent, available today? How were the stamens stitched down through all that padding? Will there be anything underneath all the gold that might show a relationship between the lily and the grapes we already took apart? The list could go on and on…
Next up, we’ll take the lily apart and answer some of those questions – and hopefully any others that you might have, too! What questions would you want answered as we tackle the lily and take it apart? Do you have anything in particular that you want to know? You’re welcome to ask questions by leaving a comment below. You can also do like I did, and jot down a list of questions that occur to you, and then see if the answers become clear during the deconstruction process.
If you’d like to read the previous articles about this topic, you’ll find an index of all the articles in this series on Deconstructing Goldwork here.

