Continuing with different lattice stitches in the Stitch Fun series, today we’re going to look at battlement couching.
I think this is my Favorite laid thread / lattice technique – I love the way it looks when it’s worked with several colors! When it’s just worked with one color, it’s kind of ho-hum, but when you start adding a gradient of color, it’s much more exciting!

Battlement couching is made up of a series of layers of laid threads crossing over each other, with the last layer of laid threads couched to hold everything in place. It’s a relatively simple technique that creates a pretty impressive effect!
So let’s look at how it’s done!
You’ll start by working a grid of laid threads, just as you do with any other lattice technique. Lay down all the threads that go in one direction first, then cross over the first layer with the second layer in the other direction.
So what you have here (in the photo above) are two layers to make the grid – the first layer slanting from lower left to upper right, and the second layer from upper left to lower right.
Make sure the first laid threads in the first color (the first two layers to make the original grid) are spaced far enough apart to fit all the subsequent lines of color in between the first lines. Here, my grid lines are spaced about 1/4″ apart.
The second color is worked just to one side of the threads in the first layer. Make sure that the first set of laid threads in the second layer of color (pictured above) are stitched in the same direction as the very first layer you put down. This way, each layer of threads alternates direction.
Then, when you work the second set of lines in the same color (crossing over the laid threads you just stitched), make sure that this layer is on the inside of the squares formed by the first grid. You can see a “V” of the lighter thread inside the darker thread grid below it.

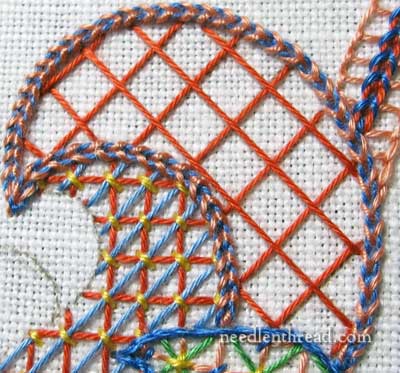
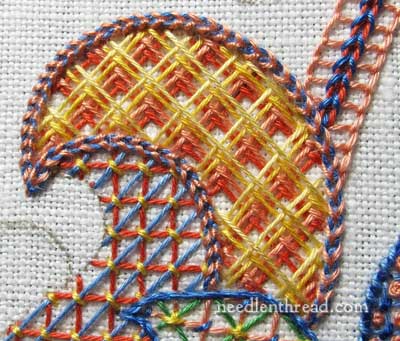
And now you can work a third color in the same manner, just off to the side of the second color. In the photo above, you can see that we are gradually filling in the whole grid.
And here’s the second layer of the third color, finished.
You could stop here if you wanted, but I want to fill in the whole grid, so that very little white is showing. But this is where battlement couching is fun – you can change the way it looks by filling it up more, or filling it up less! You can also alter the appearance by working from light to dark, instead of dark to light – it’s up to you!
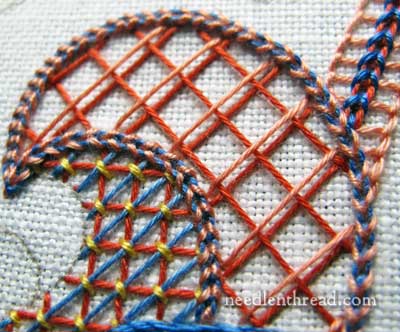
And here’s the fourth color, a slightly lighter yellow, laid down…
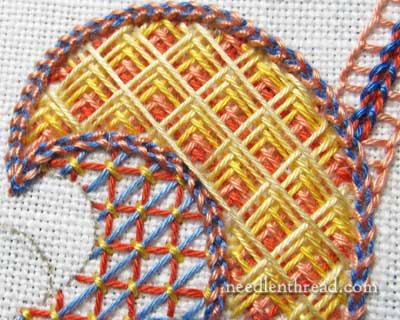
…and finally, I added a fifth color in the lightest yellow.
Now all the laid threads are complete.
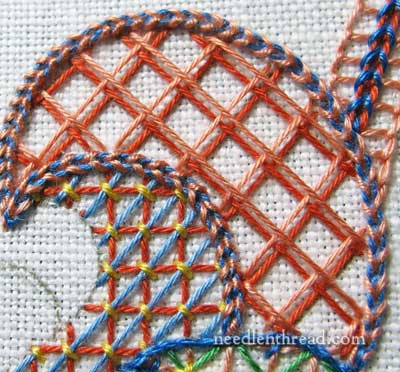
Let’s pause a second, though, and look at that photo above. See the long line of the lightest yellow on the top layer, that stretches across that inside curve on the shape we’re filling?
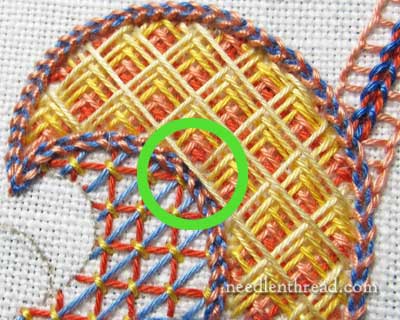
Here’s the problem area, circled. When your grid lines get this close to the cut off for the shape, you have to judge whether or not you want to stretch the line all the way across the shape.
In fact, this is going to be a little problematic, because when I couch the thread there, I’m going to get a little wiggle in the line. I probably should have ended the line on one side of the apex of that inner curve, and then started the line again on the other side of the apex of the curve. But I didn’t!
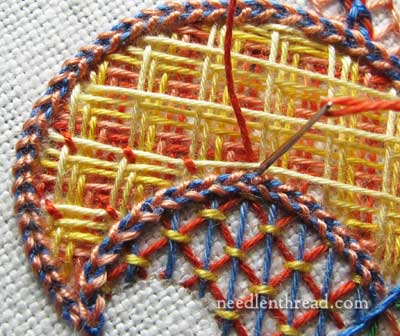
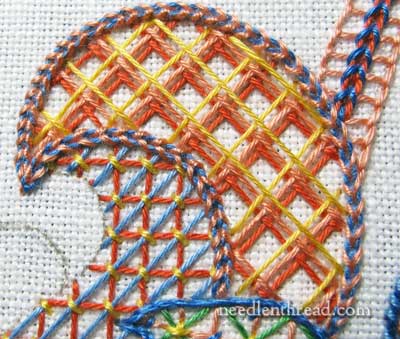
Now, it’s time to couch. I chose the dark red again to couch the final layer down, because I wanted the contrast, and I wanted to accent that dark color again.
When you couch the threads down, you’re only couching the intersections formed by the last color. Once that intersection is couched, all the layers are secure.
Notice in the photo above that there’s a bit of a drift going on in that longer, problematic line I mentioned. Yep – there’s gonna be a wiggle!
Make sure, when you try battlement couching as a filling within a shape, that you judge carefully whether or not your lines are too close to the edge. (Don’t say I didn’t warn you!)
And there it is, the finished battlement couching. The wiggle in the line isn’t too noticeable – it’s just right there at the apex of the inner curve.
So, go try battlement couching to fill a shape! And feel free to play around with it to create different looks, by changing the number of layers (fewer layers will leave your ground fabric showing, which can be a nice effect), by altering the direction of the color gradient (dark to light or light to dark), and so forth.
If you’re working with silk and goldwork, one approach to battlement couching is to use a color gradient for all but the very last grid layer, and for that last grid, to use a gold thread. It’s Very Pretty when done this way!
You can find similar tutorials for other lattice techniques listed in the Stitch Fun index, where you’ll also find the embroidery pattern I’m using for this sampler, which will eventually be a whole jumble lattice fillings and other Stitch Fun techniques that we’ve covered. If you’re not familiar with laid threads and lattice techniques, you can find basic information on working lattice fillings in the tutorial on Griffin Stitch.

