Ahhh…. finally! Today, we are going to see how to add some embroidery to empty eggshells that we’ve already prepared by drawing the design, drilling, and cleaning (which is what we covered in the last article in this whole series on embroidered eggs).
If you’re just stopping by Needle ‘n Thread for the first time and want to know more about embroidering eggs, you can check out the Embroidered Eggs Index, where all the articles on the topic are listed.
Let’s look at a how to embroider lines and swirls on a whole egg shell, using a technique that creates a smooth, flowing line. Once you get this concept down, you’ll be able to apply the concept to other stitches. But I think it’s important to start simply, and then to move forward to the more complex.
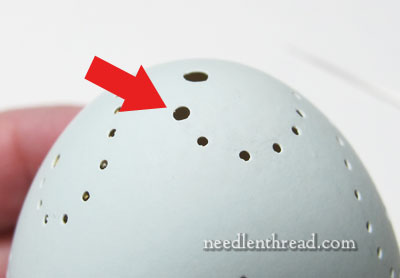
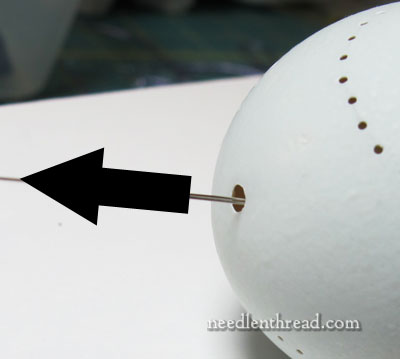
The hole with the red arrow pointing to it is the beginning of the embroidered line (but not where I begin the embroidery). Notice that it’s a little bigger than the other holes.
On swirly designs, at the intersections of the swirly lines and at the beginnings and ends of the swirly lines, I enlarge the holes slightly while I’m drilling. At the intersections, I’ll have several threads going through the holes. And the larger holes at the beginnings and ends of lines give me somewhere to pass the needle if I need to, even if they already have a stitch coming out of them.
So the red arrow points to where the design line starts, but it isn’t actually where I’m going to begin the embroidery.
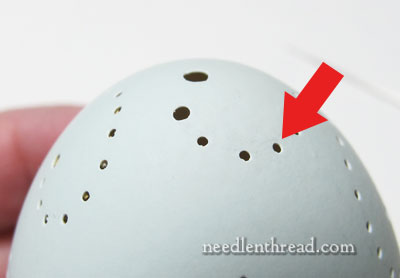
I’m going to begin the embroidery three holes away from the start of the line, so that there are always two holes between the holes that mark the beginning and end of the stitch.
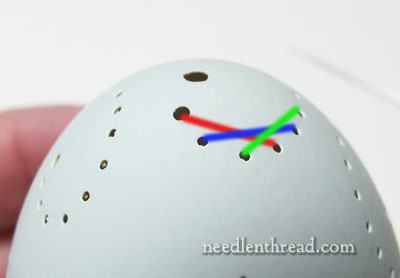
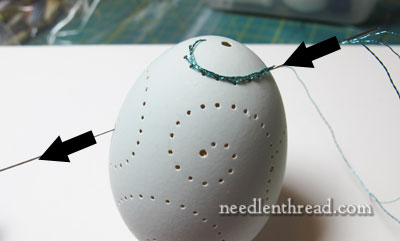
The stitches that we’re going to take will end up like the colored lines above. The red line is the first stitch, the blue is the second, and the green is the third. Each stitch always has two holes skipped.
Why this stitch? It creates a smooth curve, that’s a little open and lacy (so it broadens the end of the swirl a bit), and it’s easy.
You can switch it up a bit if you want, keeping the needle above the working thread the whole time, as you would with a stem stitch, and that will tighten the line around the curve up a little bit. But I’d suggest starting as simply as possible, so that your good results (with as little frustration as possible) will encourage you forward to try other techniques.
If we were doing backstitch on this line, by the way, the swirl would be embroidered, but it would be a little choppy looking. We’re shooting here for a smooth swirled line.
So that’s how the stitch is going to work. Let’s see how to do it.
Put a nice fat knot at the end of your thread. It needs to be large enough that it won’t pull through the small hole where the first stitch starts. (That’s why we’re starting the first stitch there, and not in the big hole at the beginning of the line.)
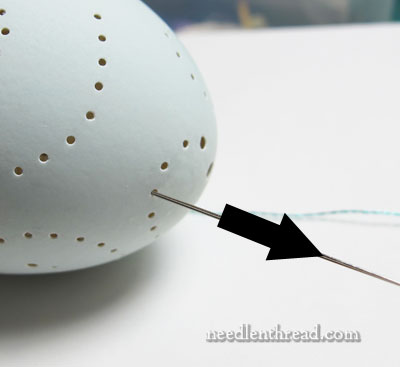
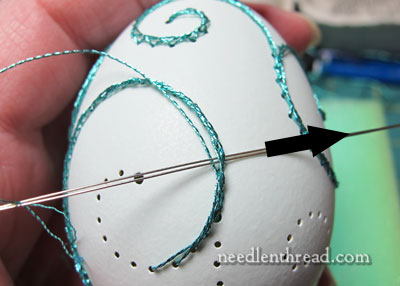
Enter the egg somewhere opposite to your first hole. For me, it was the large hole at the bottom of the egg. Make sure that whatever hole you take the needle into the first time is large enough for the knot to pass through. The knot will pass through the entry hole, but catch behind the smaller hole where you’ll begin your stitching.

Pull the thread through until the knot catches, and then take your needle into the egg wherever the first stitch ends.
Pass the needle through the egg to a larger hole opposite. At this point, I’m still working in the hole at the base of the egg, but eventually, the angle will become to extreme, and I’ll choose a different hole on the other side of the egg.
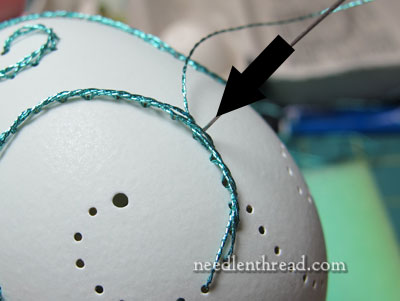
Pull the needle through, then pass back into the same hole you just came out of, and take the needle out on the other end at the beginning of your next stitch.
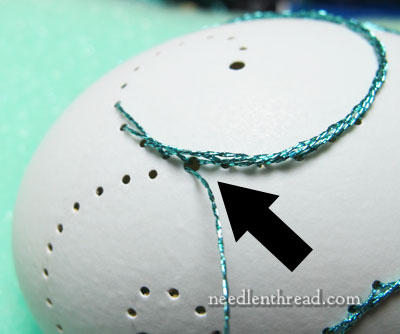
That’s it! That’s the concept, in a nutshell! You always have to move out of the exit hole at the end of one stitch and back into the same hole you just came out of, to enter the egg and begin your next stitch.
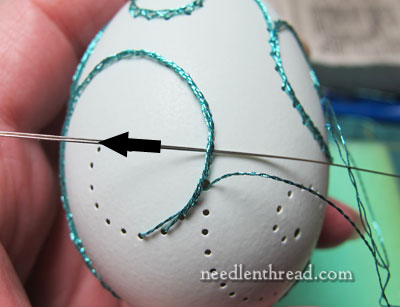
As your embroidery on the egg progresses, the angle in which you exit the egg and re-enter will change, and so you have to seek out other holes to exit and re-enter the egg. You want to find holes that will allow you to move the needle in and out, without creating pressure on the egg due to a strange angle on the needle.
The exit hole also must accommodate the working thread, and the threaded needle. Sometimes, you might have to pull that working thread out of the way as you pass back into the egg, to create as much space as possible for the threaded needle to pass through.
Remember those long-eyed beading needles I talked about when we spoke of embroidery supplies for embroidering eggs? This is where they come in Really Handy. First, they are long, so you can pass across the whole width or length of the egg easily; second, they are flexible, so the pressure the needle might make on the egg if you’re slightly off-angle is not nearly as intense.
When I need to end the thread on this type of stitching, this is how I do it.
I bring the thread up into a whole on an already-embroidered line. If there’s a larger hole available, that’s great, because it’s always easier to get in or out a larger hole.
I pass the needle and thread underneath the embroidered line, one hole up on the egg (but I don’t enter the egg).
Then I move up another “space” and pass under the embroidered line again, in the opposite direction.
Then I go down into the egg in a relatively “tight” hole (but not too tight that it won’t take the threaded needle, or it will crack!)…
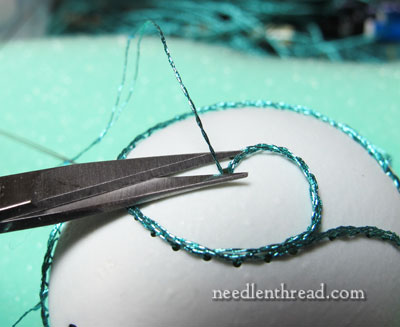
… and out another hole, and snip the thread close. The thread end will float around inside the egg, and it will most likely eventually get caught behind other stitches. Even if it doesn’t, it’s secure enough that it isn’t going to come back out of the egg.
You can also pull the end through the hole at the base of the egg, and just hold it out of the way while you embroider the egg. Eventually a stitch or two will pass around it and pull it and hold it inside the egg. Or, you can just hold it out of the way until you’re completely finished, and incorporate it somehow into a tassel or something at the base of the egg.
Some Egg Embroidery Tips
1. Use Good Lighting! Most of the time, you’ll find you’ll need the light a little bit behind the egg. If you backlight your egg slightly, it’s easier to see the needle to aim it out of the egg again. After a bit of practice, it becomes easier to find the exit hole with the tip of the needle.
2. Don’t be inhibited by things you wouldn’t do on fabric. Most of the time, you just have to improvise to see what will work best, especially for things like ending threads, starting threads, making a stitch look right. There’s not really a chance of “doing it wrong” here, because… well… there’s no rule book on embroidering eggs!
3. I can’t emphasize the big eye beading needles quite enough. I haven’t broken an egg since using them. They’re worth it!
4. Once you get comfortable with this simple technique for lines and swirls and the whole exit-enter thing with the way the embroidery works, experiment with other stitches! The concept of how the embroidery is done will remain the same – as long as you have an exit and re-entry hole, you’re good! – so working out how to do other stitches is just a matter of trying them.
Next time, we’ll talk about some other stitches that work really well on whole egg shells. Hopefully, I’ll have the turkey egg in the photo above finished by then!
Any questions? Feel free to ask them below!
If you want to follow along with this whole sequence of tutorials on embroidered eggs, check out the Hand Embroidery on Eggs Index.

