Last week, I introduced you to a new embroidery project I’ll be working through here on Needle ‘n Thread, called Mission Rose.
So far, we’ve looked at fabric choices for the ground fabric, transferring the embroidery design to the ground fabric, and framing up the fabric to get it ready for stitching.
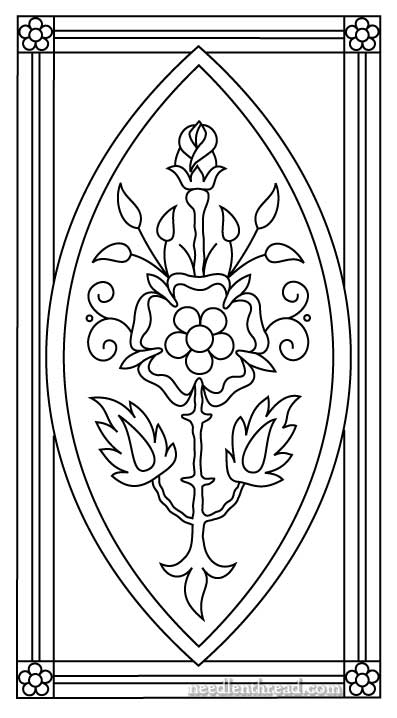
Here’s the pattern I’m using for Mission Rose, in case you want to follow along on the project.
The overall design was inspired by and taken from this fragment of silk and gold ecclesiastical embroidery, where most of the stitching was originally done in tambour work.
Mission Rose as I’m doing it is not an ecclesiastical piece – it’s simply decorative embroidery, and for now, my “finished vision” of it involves framing and hanging. I think if the design were a little wider, it would make a nice book cover or something like that. It would also make a great insert for a box top, for a long box that opens on the short end. But for me, I want to frame this one.
If it comes out, that is….!
You’ll notice that I didn’t use the acanthus that’s found on the design on the original embroidery fragment. I debated about it, and I worked up a version of the pattern that has the acanthus leaves on it, too. But I like the simpler line border better. It sets off the rose and doesn’t distract from it. By the time I had decided on this, I’d also named the project Mission Rose, and the simpler border goes well with the “Mission” style, I think.
Another change that I made was in the rosebud at the top of the design. One reader mentioned that the original looked like lips sticking up there. And I agreed with that assessment! The rosebud on the original is the typical stylized rosebud that you often see on pieces like this, but I decided to make it a little more rose-bud-looking. I ended up with something that looks like it’s wrapped in a snuggly bathrobe. But I think it will serve my purposes when it comes to the embroidery on it.
A final note: when I transferred the design, I bypassed the squiggly nature of the stem and went for clean lines.
Mission Rose Hand Embroidery Pattern PDF
Here’s a printable version of the pattern, for those who want it:
Mission Rose Hand Embroidery Pattern (PDF)
If you choose “no scaling” (or whatever similar option you have) on your printer settings when you print the design, it should print exactly that the same size I’m using, which is 4″ wide by 7.5″ high. You can, of course, enlarge or reduce it, if you wish.
Eventually, I’ll post an index for the Mission Rose project, so that all the articles relating to it can be organized in one place for your convenience.
If you have any questions as the project goes along, don’t hesitate to ask!
Enjoy your weekend!

