This whole Mission Rose project has me a little bit excited – I love seeing an embroidery project come together! I’m dying to get on to the goldwork around the frame of the piece!
But before I can move to the outside, I have to finish the inside. Isn’t that always the way of it? It’s another case of “dinner before dessert”…
After finishing the filling on the large leaves, the next step is doing all the outline work on the rest of the rose part of the design. So here it is – the goldwork outlines on the lower part of the rose stem and around the large leaves.
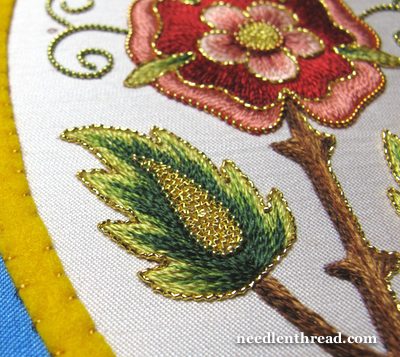
First, the goldwork outline around the leaves. This outline is worked in check thread, which is a wavy or crimped goldwork thread that is fairly flexible. I like it for couching outlines – the crimply-ness of it adds a nice sparkle.
To apply the outlines, I’m using a gold-colored fine silk thread that’s covered with beeswax (it protects the thread from the abrasive metal threads). The stitch is a simple couching stitch just over the thread. The couching stitches are worked perpendicular to the gold thread, and to end a line of the gold thread, the ends are plunged to the back of the embroidery, where they are sewn down with the couching thread.
You can read all about plunging the ends of gold threads in these earlier articles on Needle ‘n Thread:
Making a Plunging Lasso
How to End Couched Goldwork Threads
The large leaves have lots of little sharp tips to them, so when working the goldwork outline around these tips, a pair of tweezers for pinching the gold thread into a sharp bend is absolutely essential.

Once the large leaves were finished, it was time to work around the outline of the stem with the same check thread. In the photo above, you can see several of the threads waiting to be trimmed and plunged to the back of the embroidery.

Here’s a little closer look at the stem area. I really love check thread for this kind of work, because it hugs up next to the embroidery very easily.

Stepping back a little way, you can see the whole lower part of the rose area, finished. The outline is noticeable, but it’s subtle – a little sparkle, a little definition, and that’s it.

Stepping back a little farther, you can see the outline on the base of the design, but the top is not outlined yet (and the bud hasn’t been touched with gold yet). The outline thickens up the design a little bit, but not enough to make it bulky or bothersome.
So, that’s the Mission Rose so far! What do you think? Do you like the addition of the gold? Or did you like it better without? Have your say below!
If you’d like to follow the Mission Rose project from start to finish – including the backstory, what inspired the project, the pattern I’m using, and the whole sequence of stitching the project so far – feel free to visit the Mission Rose Project Index. You’ll find all the articles arranged in chronological order, from beginning to end!

