Do you ever find yourself, mid-embroidery-project, facing a problem that you knew you should have addressed much sooner?
Well, that’s where I’ve been lately with the Mission Rose. There is a problem with it. And, like many problems that we run into on needlework projects, just the mere thought of the problem and how to rectify it was slowing me down.
But, just like with many problems we face in life, if we avoid it, it just gets bigger! Before you know it, you’ve got a proverbial Mountain where there should just be a wee Mole Hill. And most of that mountain is built in our minds, more than in reality. That is certainly the case with this problem on the Mission Rose.
The problem needs addressing. I can’t fudge it and make do. I needs must correct it, in order to move on with confidence in a decent outcome.
And so… here’s the problem, and my solution.

It’s a corner problem. A month or so ago, I was talking to a friend on the phone who follows Needle ‘n Thread, and she asked if I had “stitched myself into a corner.” And indeed, I have.
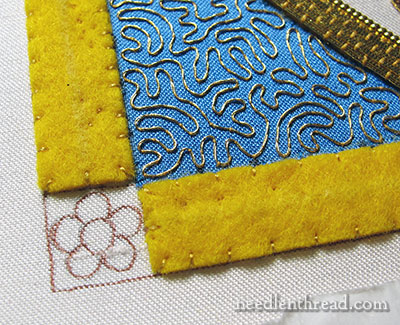
The problem may not be readily apparent. See where the felt ends? In that corner, the felt ends exactly on the design line. Good, right?
Well, no, actually.
At the end of the felt, gold threads have to be plunged. And in plunging the thread and working an edge around the gold, each frame piece will encroach upon the corner. And the corner will become off-set and much smaller.

The fact that I’d already begun the goldwork on the outer frame did not help elevate my mood as I pondered this whole situation.
Finally, though, I decided there was nothing for it. The felt had to be trimmed.

First thing I did was go through and cut the tacking threads at the end of each felt bar around the frame.

Then, using a small pair of sharp scissors, I folded the felt upwards and trimmed off a tiny cut just along the edge. I didn’t need to trim much – just a tiny bit.

Here, you can see one corner with the trimming accomplished.
I’m a bad trimmer. I treat trimming the same way my dad does. My mom learned a long time ago to never let him near a hedge or a bush with a pair of clippers, if she wanted anything left!
I kept wanting to trim a little more, to “even it up.” But I held back!
Once the trimming was done, I went back and tacked those ends of the felt back down.
Now, I’ll have room to plunge threads and also to outline the frame with another heavier thread, just like I did with this part of the inner goldwork frame.

Aha! I bet you weren’t expecting to see this!
Initially, neither was I!
My original plan for the corners involved small round garnet (red) beads with a pearl center for the flowers. The beads would sit up high enough to work with the thicker heavier gold thread frame, and they would provide a kind of decorative inset to the corners.
The beads I had in mind don’t work. I’ve looked high and low for a deep red garnet bead that doesn’t have a purple tint to it, but with no luck.
So decided to try something different. I decided I’d appliqué some deep red silk (to match the rose) into the corners, and work the flowers a different way.
But alas! The only red silk I could find looked orange on the piece. It just didn’t work.
So I opted for red silk thread – the same thread I used predominantly in the rose – and I’m filling the corners with long and short stitch in that color, to give a nice red silk background.
Why not satin stitch? you might wonder. Satin stitch is beautiful. And the space is not all that large, so it seems like it would be a good choice. But I’m going to be sewing something on top of the stitches, and it’s very easy for satin stitches to separate and show the ground fabric. That will be less likely to occur with the long and short stitch filling, which is much more dense and compact.
And so, here I am, handling the corners before I intended to.
The felt problem is situated.
And I’m moving forward again.
See? It wasn’t that big of a problem. It took me about five minutes to rectify it. But I troubled over it and avoided the Mission Rose for almost two weeks because of it!
The lesson I learned (again! this has certainly happened before!): If I tackle my stitching problems head on, once I realize they’re there, I’ll see how minor they really are, and I’ll move forward much faster.
And now, onward!
If you’d like to read the backstory and follow along with the Mission Rose project from start to finish, you’ll find all the articles relating to the project in the Mission Rose Project Index.
