All the waste knots cut, all the threads secured – ’tis the finish of this second practice piece on my quest to learn how to wield a tambour hook with accuracy, (relative) speed, and ease.
When working with the tambour needle – and really, when working in any embroidery technique – practice is essential if you want to be perfectly comfortable with the tools, no matter what circumstances you find yourself in.
I prefer practicing on a particular design, rather than in random blobs, rows, and patches. When practicing on a design, there’s that whole Sense-of-Accomplishment Thing going on, you know?
Keep in mind that this project was a practice piece. There wasn’t much planning that went into it. With a little tweaking in shades and placement of colors in the design, I think the finished piece could be much improved. But here it is, anyway, for what it’s worth!

Because of the boldness of the colors, the contrast in the colors and shades, and the placement of some of the colors, it ends up looking a little cartoony, doesn’t it?
If you’d like to use the design for a practice piece, too, here’s the materials information:
Tambour Work Flower Materials
Embroidery pattern: The pattern for the tambour work flower above is available here on Needle ‘n Thread, for free. Scroll to the middle end of the post, for the printable PDF version.
Fabric: I used a small scrap of shadow work linen, but you can use any linen or cotton that has a close weave.
Threads: Coton a broder 25 (DMC Art. 107) in the following colors:
Purples (light to dark): 209, 552, 550
Greens (light to dark): 3348, 3347, 3345
Yellows: bright yellow 743, gold-ish yellow 783
Pinks: light 604, dark 602
Tambour hook – I used a #110
The other day when we looked at tambour flower for the first time, I mentioned several learning points. Well, they just keep mounting up!
The pattern makes for a good graduated study in following paths to fill shapes, for example.
When starting out with the petals, the filling is fairly straightforward and easy. Just start from the outside and work into the middle.
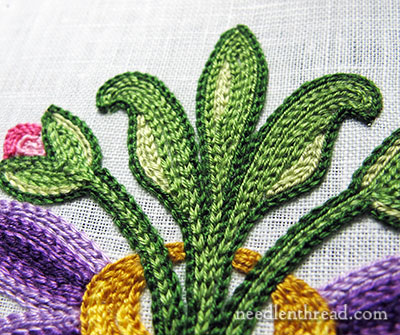
The large leaves get a little more complex. The other day, I mentioned the point about working mirrored elements, one immediately after the other.
With the stamens and little buds in the photo above, I worked the outline first in the dark green to set my perimeter. Then I worked in the “blobs” of light green, and finally, I filled around them with the medium green.
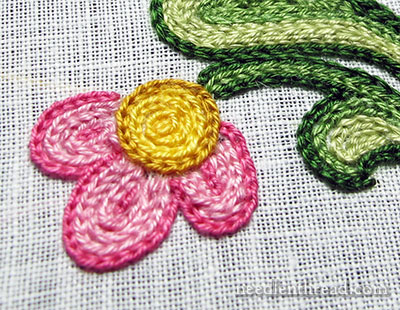
With the pink flowers, I worked the outlines and the dark pink lines inside first, and then filled around them with the light pink.
I had to fudge a lot on a couple of the petals, to get them filled. Next time, I’ll try filling shapes like these with a different approach. I’ve got something in mind that I think would work better, but that needs testing.

My favorite part of this whole piece is the purple. I like the light-to-dark on the leaves.
But I also think the light-to-dark on the leaves contributes to an incongruous look to the whole finished piece.
All the greens, for example, are outlined in dark. But then the purple is outlined in light and works in to the dark.
If you look at the whole piece and squint, you’ll see that the purple kind of sinks away in a lack of definition, compared to the green around it.

I like the way the ring turned out, even though I’m not fond of that bright-bright yellow, and there is a little glitchy thing going on, over there on the right side of the ring.
But what really needs improvement here is the way the elements meet up. The base of the stems is a bit jagged next to the outline of the ring.
Notice that the ring covers up the same type of jagged starting area on the purple petals.
Moral of the story (which is often the case in embroidery!): start with the elements farthest back in the picture first, and then build on top of them.
I worked the petals first, then the ring, then the stems. I should have worked the petals first, then the back of the ring between the stems, then the stems, then the front of the ring.

Overall, it was a good learning experience, and I enjoyed working this little tambour flower. Lots of room for improvement, and plenty of points to practice on in future sessions!
Tambour News
The book Tambour Work that I reviewed last week is officially “out of print” – the publisher no longer has stock.
It’s also completely out of stock at Hedgehog Handworks. Rumor has it, the publisher may reprint the book – more information on that should be available by December.
In the meantime, it looks like Silent Stitches might still have some copies left (scroll about 2/3rds down the page) for $24.95, but I’d drop them a line first, to make sure (since the publisher no longer has stock).
Don’t Forget!
If you haven’t signed up for the tool caddy give-away, it ends tomorrow morning, so today’s your last chance!

