One question that surfaced several times in our recent discussion of tambour embroidery here on Needle ‘n Thread is whether or not you can combine tambour embroidery with other types of surface embroidery stitches in one project.
I’d say the point to remember whenever you’re pursuing any type of adventure in surface embroidery is that you aren’t bound by definite rules that say you can or can’t combine this technique or that technique. While tambour embroidery may be a specific technique that’s most often seen used in particular ways, there’s no reason why it can’t be combined with other techniques and used in any way you want to use it.
That’s the real fun of surface embroidery! There are so many variables, it never gets boring!
On that note, here’s the beginning of a little project that I’m using for further practice in tambour work.
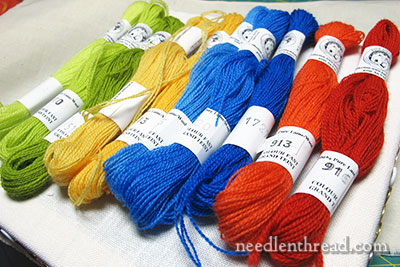
Yes, that’s wool.
This particular wool is Fine d’Aubusson, a four-strand Merino wool made in France by La Route de la Laine for Au Ver a Soie. Many of the colors correspond with Au Ver a Soie’s range of stranded silk, and although the Fine d’Aubusson color range is not as extensive here in the States, I believe in Europe, especially in France, stitchers have access to a much broader color range. Here in the US, there are about 90 colors available.
The wool is colorfast. There are 8 meters per hank, but if you’re only using one strand from the four, that means there are 32 meters of stitchable wool in each hank.
Fine d’Aubusson is a really nice, fine wool for crewel work. I prefer it to Appleton – it’s not cranky like Appleton, it’s significantly less “hairy,” it has a slightly tighter twist than Appleton, and it’s quite easy to stitch with. It’s not as “soft” a wool as Heathway, Bella Lusso, or Renaissance Dyeing wools, all of which have a little more “boing” to them and a lot more of a soft spread. Fine d’Aubusson is a “firmer” wool, for lack of a better word, well-made and perfect for traditional crewel techniques.
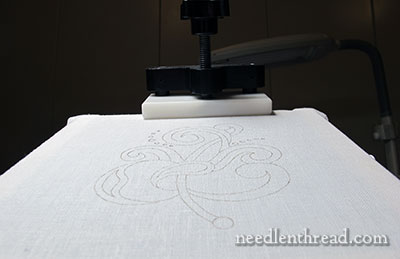
And this is the project that I’ll be using that wool on. The design is this Jacobean Leaf Variation.
I’m using linen for the ground fabric – specifically, a linen called Alabaster Angel by Legacy Linen. This is good stuff, and it’s a good surface for crewel work. Normally, I would use Alba Maxima by Legacy, but I had a piece of Alabaster Angel already cut, and I like both of them almost equally as well.
Legacy’s Alba Maxima is a great linen for general surface embroidery techniques, for crewel work, for goldwork, whitework, and so forth. In fact, it’s a just a great general all-purpose embroidery linen. They’re now producing it in a creamy color, too (not sure what the name is), so now there’s an option between white and an off-white, creamy version of the same linen.
The project is set up on stretcher bar frames – specifically, Evertite frames – and I’m using my Needlework System 4 table stand and frame clamp to hold it, so I can have both hands free for working with the tambour needle.
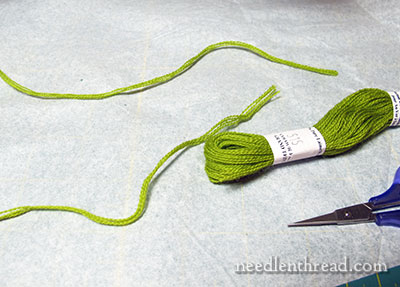
The wool is wound into these small hanks or skeins. Even though one of the speedy advantages of tambour embroidery is that you can work directly off a never-ending spool so you don’t have to change threads very often, in this case, I’m going to cut lengths of thread (about 20-22″) and separate the individual strands.
Now, since I’m still working my way through the learning curve with tambour embroidery (still practicing it regularly, still troubleshooting some variables and so forth), I knew that working with the wool would present some challenges and learning opportunities.
Well, right off the bat, with the first line of stitching, I learned something very valuable.
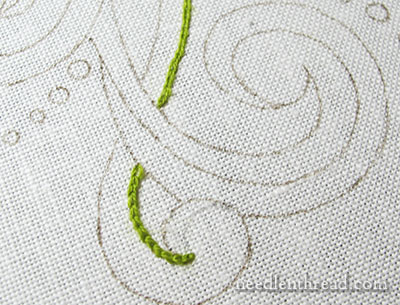
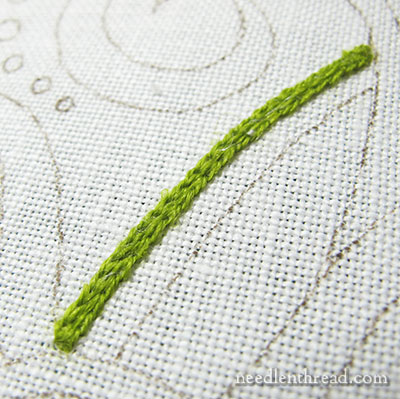
In the photo above, if you look at the chain stitch line coming down from the top of the photo, even though it isn’t super close, you can tell that the line is irregular, it looks awfully tight, it looks a little ratty, and it’s just not pretty. The little curved line at the base of the photo presents a chain stitch that is slightly better looking.
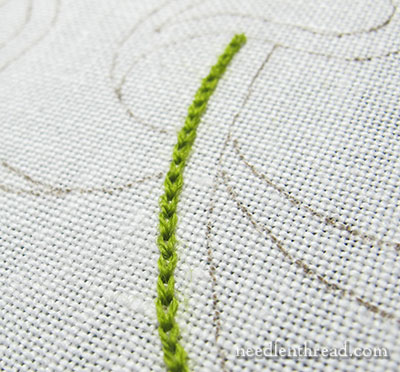
Here, you can see two lines that look somewhat tight and ratty!
Keep in mind that the stitch is traveling upwards in the photo in the line on the far left, and downwards on the line to the right.
So, my first couple lines of chain stitch in wool with the tambour needle were not so pretty, to say the least. As I was stitching, it was very difficult to pick up the thread without snagging the wool (which made the line look ratty) and getting the stitch through the fabric took care. The result was a couple lines of labored chain stitches that needed to be removed.
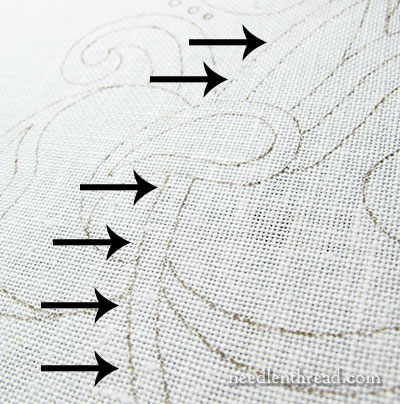
And this point supplies an opportunity I can’t pass up, to sing the praises of Good Linen. In the photo above, the arrows point to the area where I removed two rows of very tightly worked chain stitch in wool. After removing the thread, I ran the eye of the needle down the linen over the holes, and they disappeared. And the linen looks practically just as good as it did when I started.
You just can’t get a similar result when using inferior fabrics. Tearing out stitches takes its toll on flimsy fabrics. But on good linen, we could go around in circles for days, stitching and tearing out, with very little adverse effect on the fabric!
But who wants to do that?
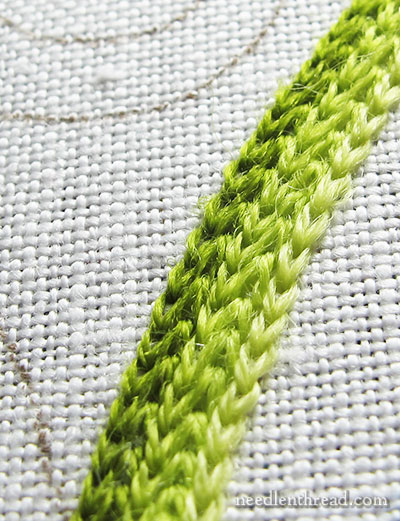
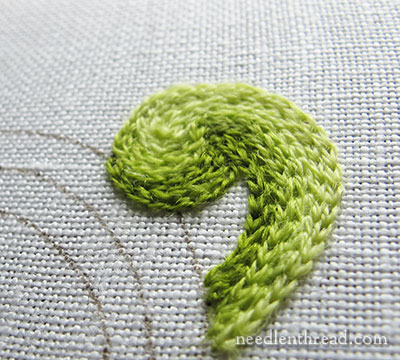
Ahhhh – and now we have a much better chain stitch. The stitches are plump, the thread is not snagged and messy – it looks the way it should look.
I didn’t switch to a regular crewel needle! But I did follow my own advice when it comes to trouble with crewel embroidery. Whenever anyone asks me how to solve thread problems of snagging, twisting, knotting when doing crewel work, I say switch to a bigger needle.
Often, we choose a needle that may “fit” with the thread and fabric in crewel work – the thread fits in the eye, the needle carries the thread through the fabric without any hang up – but strangely enough, if you go one size bigger (and sometimes two), you can usually eliminate all thread griefs in crewel embroidery. You are giving that wool more room to pass through the fabric with less abrasion.
Yes, you might think you’re embroidering with a railroad spike, the needle will seem so large! But as long as you aren’t leaving gaping holes in the fabric around your stitches, then go larger on the needle!
So I followed my own advice. While the size 110 (the largest size in the 3-hook set that comes with the tambour handle) seemed quite large enough to handle a fine thread, it just wasn’t doing the trick.
Foraging through my tambour supplies, I ferreted out a 130. It looked immense in comparison, but it did the trick.
The hook size made all the difference. And the stitching became easy, quick, painless.
These are my first forays into tambour stitching with wool thread. So far, I like it! After finishing the little sample above, though, I’ve concluded that working the chain stitches all in the same direction will produce a much smoother result. I’ll try that in the next space I fill.
The whole project will not be tambour work, though. I’ll combine some regular surface stitches in here as well, using the tambour needle wherever I want some chain stitch filling.
Really, the only advantage of using the tambour needle on chain stitch filling on this type of project is speed. You can definitely work the chain stitch filling faster with the tambour needle, even with cut threads and starting and ending each line.
Oh – well – there is One Other Advantage:
It’s fun!
Resources
You can find the threads and fabrics discussed in this article at Hedgehog Handworks. You can also find a standard tambour set there, which comes with a handle and three needles, the largest of which is a 110.
Different sized tambour needles (over 110) can be ordered through Lacis.
Evertite frames can be found through Needle in a Haystack.
In Canada, you can find the thread and fabrics through Traditional Stitches. In Europe, you can find the threads through Au Ver a Soie and shops that carry Au Ver a Soie products. I’m not sure about the linen. It’s probably named differently in Europe, and I don’t know who the distributor is. In Europe, you can find tambour handles and hooks through Brodely. They sell the handles in two separate sizes, in different types of wood. The largest hook they sell is a 120.

