My first finish in 2014 will be the Mission Rose project – the End is Coming Very Soon!
The Mission Rose is a goldwork & silk embroidery project that I started in the spring of 2013 and have developed step-by-step here on Needle ‘n Thread. If you want to follow the project from beginning to end, you’ll find all the articles relating to it listed in chronological order on the Mission Rose Index page.
I hesitated writing this “in between” article – between my last update and the official finish. But there are a few little musings and tips I want to share.
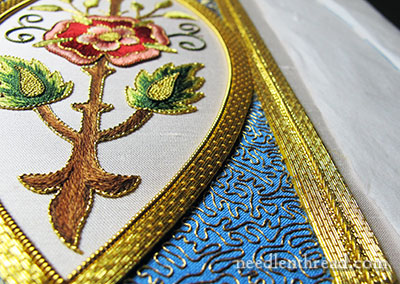
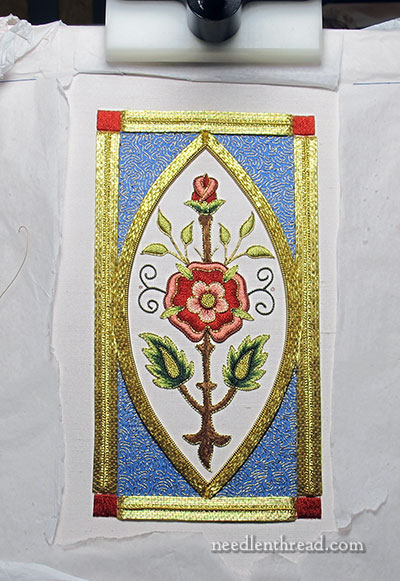
At this point, all the gold on the outer and inner goldwork frames is finished.
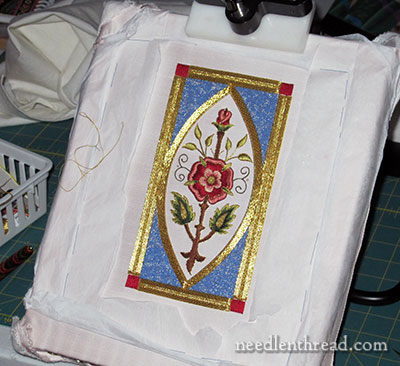
In the photo above, you can see the piece from a little farther away, giving a better perspective on size.
A few readers asked why I started from the outside of the outer frame and worked both sides towards the middle, finishing with the middle.
In most cases, it makes more sense when covering with couched passing threads to start at the middle of a section and work out, especially when working around curves or any shape you’re filling that changes in size. You’d work the center, pretty much where the longest consistent line through the shape runs, and then work out to the sides, ending the threads as you come into contact with the edge of the design. In this way, you get a solid covering of gold that is usually a lot neater, and that gradually and smoothly finishes along the edge of the shape.
I did originally begin working from the center out on the large outer frame, but after putting in two lines of gold on the first side, I picked them out and decided instead to start from the outside and work into the middle.
The main reason for this is because I found the area where the inner frame runs into the outer frame a bit tricky, and I wanted to work that area first, to make sure it was going to “work.”
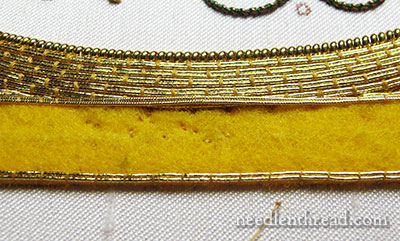
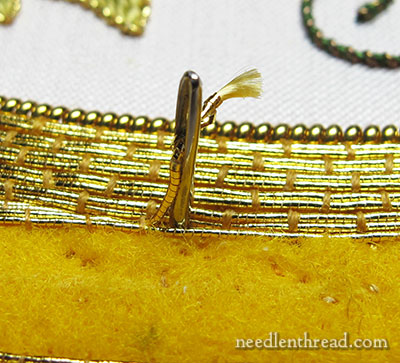
In the photo directly above, you can see where the curved inner frame is running into the straight outer frame. To tackle this are and keep my frame threads running exactly in line, I decided not to cut the passing threads when I arrived at the curved edge of the inner frame, but instead, to extend the passing thread over the curved inner frame (without couching it). Then, I picked up the couching again on the other side of the curved inner frame.
Once the whole line was couched, I went back and snipped the center of that uncouched area, and plunged the threads next to the curve of the inner frame.
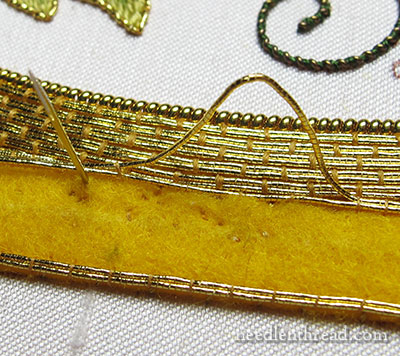
In the photo above, only one thread of the pair that I was couching on the outer frame was broken by the curve of the inner frame. So I continued couching the one thread in the pair along the edge of the inner frame, leaving some extra on the other thread in the pair, so that I would have enough of a tail to plunge and finish.
It all sounds confusing, I know… and in some regards, while I was working on it, it was confusing!
You can see here where I went back to plunge the small tails where the passing thread on the other frame crossed over the curved inner frame.
In this case, I used a needle to plunge, but in several instances, I found it easier to use a plunging lasso. You can read about how to make your own plunging lasso here, and how to use it.
When plunging in a space like this, there’s a bit of displacement that might go on with the gold threads in the surrounding area. That’s what a mellore is for. A mellore is a goldwork tool that is very useful for nudging goldwork threads back into place and smoothing them out again. You can read all about what you can do with a mellore and whether or not it’s absolutely necessary here.
Once all the goldwork in a given area is finished, I go back over the area, using the mellore to re-situate threads that may have been displaced by plunging and pulling and whatnot.
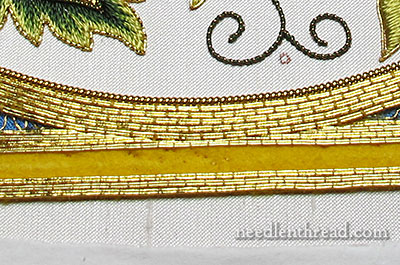
Here’s the area where the two frames meet, with the outer frame still incomplete.
And here’s another photo (in bad lighting!) with both the frames finished.
The last steps of the project will be worked in this order:
First, I’ll outline the inner frame all around, including where it meets the outer frame.
Then, I’ll outline the outside of the outer frame.
Then, I’ll outline the inside of the outer frame, tackling the edges of the corners at the same time. This is the only tricky part left.
And finally, I’ll finish the corner treatments after all the gold is on. The corners will not be just red like you see now – there’s a little decoration going in there.
Luckily, those frame outlines are all relatively large goldwork threads that go on fairly quickly, so I’ll have a finish for you pretty soon!
I can’t wait to finish the Mission Rose. I have The Itch to move on to other projects and I need to get ‘er done! My final plan for the Mission Rose, for all those who have asked, is to frame and hang it. Believe it or not, I don’t have any of my own embroidery in my house. So I think I’ll be keeping this one for a change.
Once the Mission Rose if finished, I’ll be moving on to the project I mentioned in this article / book review, which will be geared towards beginners and beyond. I have all kinds of ideas floating around in my head for it, and I’m looking forward to working those out with you!

