I finished the Mission Rose! But as usual, not exactly when I thought I would.
Last night at 5:30, I put the last stitches in. And then I sat back and breathed a big sigh of relief.
And then I realized it was dark. And too late to take good photos.
Today, I’ll show you how I treated the corners on the piece and added the last goldwork thread to outline the inner part of the outer frame. And Monday, I’ll show you the complete finished piece, good photos or not!
First, let’s talk about the corners.
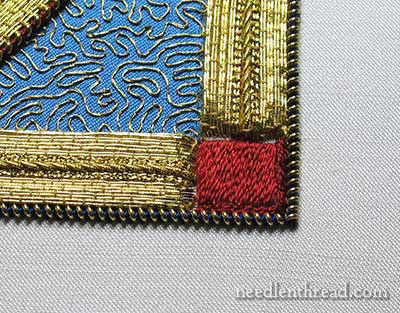
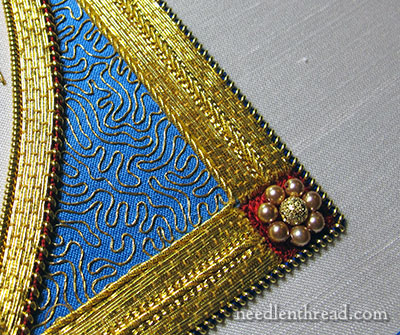
We already saw that I filled the corner areas with silk, in long and short stitch, in red.
Once the goldwork outer frame was completely finished, I went back to the corners, and, using two strands of Soie de Paris in the darkest red on the rose (4624), I stitched a narrow slanting satin stitch frame around the red long and short stitch in the corners.
The purpose of this was to completely fill in the corner area with red, and to give the corners a little bit of a shadow to them, so that the red background looks like it is sunk in a little bit. The dark red ended up looking like a mitered frame all around the brighter red. And that was fine.
A stem stitch outline in a dark color will often produce the same result – adding a little shadow inside an area – but the stem stitch added too much texture, so I worked in satin stitch instead, keeping the stitches as flat as possible.
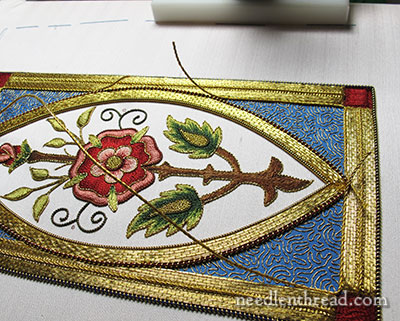
Once the corners were completely filled in – and you can see the effect of the shadow a little better in the photo above – I outlined the inner edge of the outer frame using the same #2 gold twist that I used down the middle of the outer frame.
In the photo above, the twist is sewn down, but the ends are waiting to be plunged to the back.
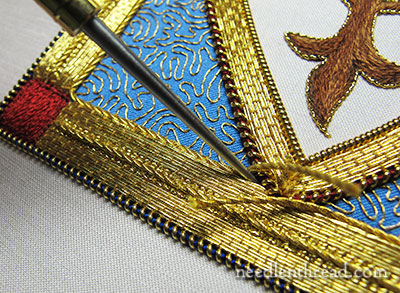
The gold twist is quite a heavy goldwork thread. It isn’t huge, but it isn’t small, either. Picture three gold passing threads (about size 5) twisted together, and you’ll have a good idea of the thickness of the thread.
So, to make the plunging easier, and to keep me from pulling any of the other goldwork threads out of place or out of shape too much, I used a stiletto (it’s actually my favorite laying tool, which has a very sharp tip) to create a large enough hole for the twist to pass through relatively easily.
Heck, there was nothing easy about it, even with the hole! I used a plunging lasso, and still managed to break the eye of a hefty chenille needle at one point.
After much growling, grunting, and gnashing of teeth, I finally managed to get all the ends plunged without upsetting the surrounding gold threads.
(Who said needlework is a gentle art?)
And then, back to the corners!
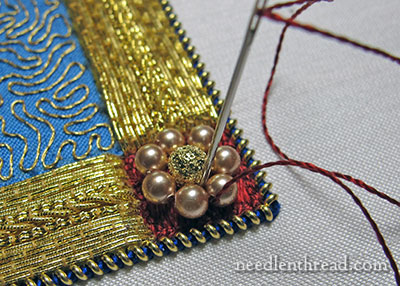
For the corners, I decided to create the little corner flowers on the original pattern with beads.
For the center of the flowers, I bought these 4mm gold-plated brass stardust beads from Fire Mountain Gems.
I wanted gold centers, and I wanted the gold to echo the chip work gold in the middle of the rose. Smooth round gold beads wouldn’t do it. And so I searched high and low (and bought several different kinds of beads), and finally settled on these.
For the bead petals, I used 3mm round pearls that are a rosy pink. These are called “cream rose” on the website, but the color on the website and the color in person are quite different.
I ordered a whole slew of colors – from white to cream to pink and so on, hoping for a color that would work well with the background fabric of the Mission Rose. This color was perfect. It’s a slightly darker shade of the background pink.
To attach the beads, the gold bead was placed first in the center of the square corner, and then, using red silk to match the background, I strung seven of the small 3mm pearl beads onto the silk, taking the silk to the back of the fabric so that a loop of beads was formed around the gold bead, and then I went back with the silk and couched the silk thread between each bead to fix the whole flower in place.
So there you have the corner treatment of the Mission Rose!
On Monday, I’ll show you the finished Mission Rose, along with a comparison and some final notes on embroidery projects and designs.
If you’d like to see the Mission Rose project develop step-by-step, feel free to visit the Mission Rose Project Index, where all the articles relating to this project are listed in chronological order.

