Today, let’s chat a bit about ground fabric for this Secret Garden Embroidery Project.
We’ll look at my choices for ground fabrics, why I chose them, how I prepare them, and how I’m transferring the design.
First off, I should fill you in on my broader plan here for the Secret Garden Hummingbirds.
I’m setting up three versions of this project, with one possible fourth “excerpt” version that, if it pans out, will figure into the picture a little later in the year.
One Embroidery Design, Three Approaches
My plan:
Secret Garden 101 for Beginners (and beyond, if you want): I’ll be using DMC threads and basic surface embroidery stitches to work the project.
Secret Garden 201 for Advanced Beginners, Intermediate Stitchers, and Beyond: I’ll be using silks, working surface embroidery stitches that are perhaps a little more advanced, and developing the design a different way.
Secret Garden 301 in Whitework, for Advanced Beginners, Intermediate, and Beyond: In this approach, I’ll be using whitework techniques to develop the design.
If I do a 401, it will be for intermediate stitchers, and it will involve an excerpt of the design, developed with metal threads and some silk. But that won’t happen until later, since it’s an excerpt.
Ground Fabric
There are two types of ground fabric I’ll be using – but they’re both white linen.
Choosing a good ground fabric is really important, with any embroidery project. The final outcome of your project will depend greatly on the materials you chose to work on.
I’ve said it before, I’ll say it again: linen is a very forgiving fabric! It is excellent for surface embroidery, because it is strong, resilient, and it holds up to “reverse stitching” (i.e. picking out mistakes).
On top of all that, linen is a beautiful fabric.
If you’re going to use linen, you’ll want a linen that is made for surface embroidery (which is not the same thing as linen for cross stitch, and not the same thing as clothing linen from the fabric store). The linen threads need to fill the weave. The fabric should have a good, smooth hand (or surface feel), without rough slubs and without threads that vary frequently in size. And, finally, in the case of this project, it should be translucent enough that you can see through it for tracing.
Linen Choices
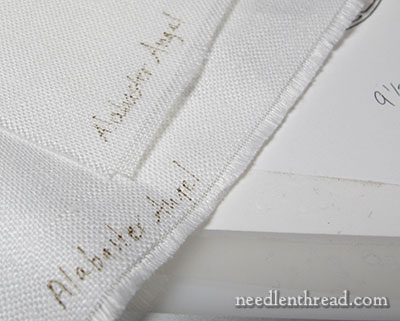
My go-to linens for hand embroidery are usually those made by Legacy, because their linen is made from the ground up for hand embroidery. It is beautiful linen, resilient, strong, and wonderful to work with. For this project, I’m using Alabaster Angel and Shadow Work Linen, both by Legacy. I’ll be using the shadow work linen for the whitework version, and Alabaster Angel for the others. You can both linens through Hedgehog Handworks online. A quarter yard will give you plenty of fabric for the project, plus left overs.
Alba Maxima by Legacy is another good choice for a ground fabric for this project, but it is not as easy to see through when tracing the design. You can still see through it, if you have a good light behind your design, or you can use another method of transfer.
Other Fabrics
For those following along with the project, if you choose to use another fabric (such as cotton), it should be a high quality, firmly woven cotton with a high thread count. You can also use silk or other ground fabrics, but keep in mind that some of the methods of fabric preparation and design transfer (and perhaps even stitching) may change, depending on the ground fabric you choose.
Fabric Size for Project
The design size is 9.5″ round. The standard when setting up an embroidery project is to make sure that you have at least an extra three inches all around the design for hoping or framing up, and for finishing purposes. You can figure that you’ll need at least a 15.5″ square of fabric for this project. I cut mine 16″ square.
Fabric Preparation
Proper Prior Preparation Prevents Poor Performance. Prepare your fabric!!
First thing: cut it along the thread. Make sure when you cut out your 16″ square of fabric, you cut along the thread of the fabric in both directions. This can be kind of difficult – make sure you have good lighting and use magnification if necessary. Cutting along the thread of the fabric ensures that your fabric is on the grain, and that there’s not a lot of waste.
Then, rinse your cut fabric piece out, and pre-shrink it (assuming you’re using linen or cotton). Put a kettle on or bowl about 4 cups of water. In the meantime, place the fabric in a clean bowl in the sink, and run the hottest possible tap water on it. Swish it around so the water absorbs into the fabric. Leave it for a few minutes. Swish it around. Dump the water, and run the coldest possible water on it. Swish it around, squeeze it up gently, and get the water through the fabric. Then dump the cold water, and pour your boiling water on the fabric and swish it around. Let it sit a few minutes – around 10 minutes – and then dump the hot water and fill the bowl with the coldest possible tap water again. This hot-cold-hot-cold method will get most of the shrink out of your fabric and all of the sizing.
Roll the fabric in a towel (the linen should feel extremely stiff at this point), and press the towel to release the excess water. Let it sit for a few minutes (about 30-ish) and then unroll it. It should still be slightly damp. Iron it on a clean ironing board horizontally and vertically, flipping the piece and turning it now and then, using a light hand. Do not hold the iron in one place ever, and do not iron on the bias (diagonally across the fabric). Eventually, the fabric will be mostly dry, though you may have some ripples on the edge. Lay the piece aside to let it dry completely, and then run a hot dry iron just around the edges, to make sure the ripples are gone. When you’re finished, you’ll have a gorgeous piece of flat, smooth linen, ready to go.
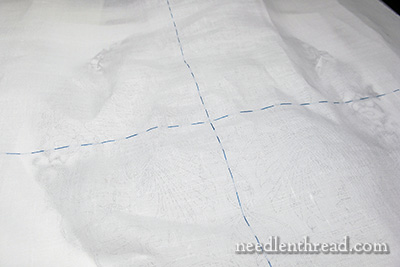
I often baste the center of my linen, to make sure that I square it up correctly over the design when transferring by tracing. You don’t have to do this, but I find it’s helpful for centering the design.
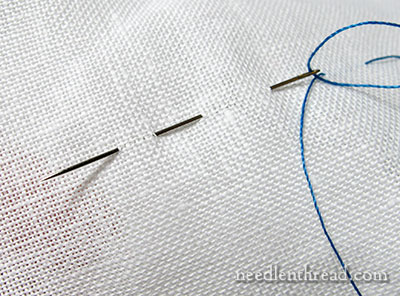
To baste the center, just fold your linen in half and finger press just on the edge of the center on two adjacent sides. Then follow the grain of the fabric (following one fabric thread) down each center, basting with long running stitches. They don’t have to be super regular – just enough to mark the center.
After you’ve basted (if you baste), if your fabric is wrinkled, give it another once-over with the iron.
Transferring the Design
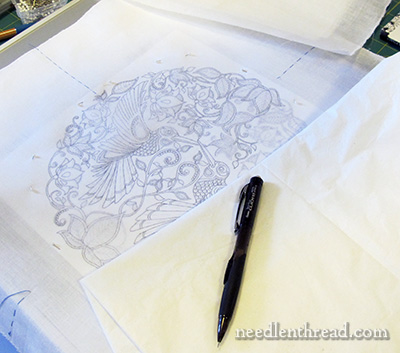
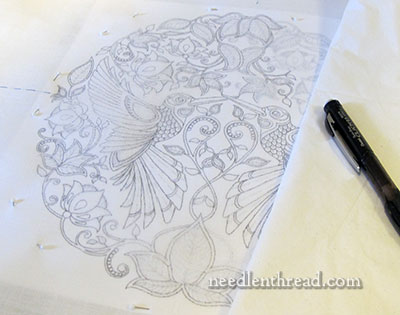
I’m tracing the design on my ground fabric, using my LightPad, which makes tracing super easy. You can also use a sunny window, but be forewarned! The design is complex and it takes a while to trace!
I’m using a very fine permanent pen to trace the design for the non-whitework versions. You can use a micron pen in black or brown or sepia for this part. The Sakura Micron Pens come in a size .20 mm (the cap has 005 on the top of it), and this is ideal for a fine line.
I’m actually using a different pen which is unfortunately discontinued. It’s a permanent writing pen by Martha Stewart. It’s a .5 mm tip archival pen, in a color called “moonstone” – if you have one, it works great. If you don’t have one, I don’t think you’ll be able to find one anymore. They have the 1.2 mm tips in the marker set, but they aren’t the same pens at all.
Another option: spray starch your fabric and use a fine mechanical pencil.
For the whitework version, I spray starched my Shadow Work linen fairly heavily and ironed it again, and I’m tracing the design with a .5 lead mechanical pencil, using a very light hand. The spray starch coats the fabric and will help release the pencil marks when it is washed at the end. You can do the same thing with the non-whitework versions, too. Just make sure that, for your project, you’re using embroidery threads that are colorfast and won’t run when washed.
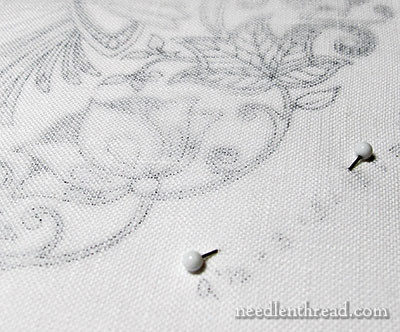
When you have your supplies lined up and your fabric prepared and you’re ready to trace, tape your design firmly to your light box, window, or other surface (some folks use glass topped coffee tables, and put a light underneath the glass…), and then situate your fabric over the pattern, so that it is centered. Then, pin the fabric carefully to the pattern. Pin all around the pattern, pushing the pins into the fabric and paper, but not out again. Two pins facing each other (shown above), spaced equally in eight spots around the design will do it.
It’s very important to pin the fabric to the pattern securely, with the pattern in a fixed place. Because the design is so complex, you may have to break off in the middle of the transfer process, and you don’t want the fabric to shift.
I use a piece of tissue paper to cover the area of the fabric where I’m not tracing, where my arm might rest, and to cover any area that’s already been traced, where my arm might rest.
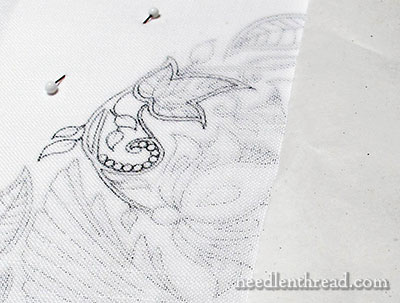
Finally, when tracing the design, only trace the details you definitely need. For example, on the area above (you can see the tissue paper to the right in the photo, and a little traced area to the left), I did not trace the design lines inside the leaves, because I can eyeball that as I stitch.
You don’t have to trace the tiny little dashes and dots inside larger elements, either.
You don’t even have to trace all the double lines on the vines if you don’t want to – it depends on how you plan to interpret those when you stitch them.
Other Design Transfer Options
Because this design is so complex, I find tracing the best option. There are, however, other options. You can find a whole list ofdesign transfer methods here. How you choose to transfer the design is really up to you! Use your own favorite, tried-and-true method if it works best for you.
Just remember to take your time with the transfer of the design! With a design like this, which is relatively large and involved, it’s helpful to do the design transfer when you have few distractions, and if you need to, take a break part way through.
Lots of involved information here, but it always pays off in the long-run to start a project off on the right foot, and if you’re following on this project (or starting a different project altogether!), hopefully, this information will come in handy.
Any questions, comments, suggestions? Have your say below!
For more information on this project, can find all articles relating to the Secret Garden Embroidery Project in this Index, arranged chronologically as the project develops.

