After comparing several different types of cotton embroidery threads to use in the Secret Garden Hummingbirds embroidery project, I finally came to a painful conclusion.
Why painful? Because I was convinced that I would use a combination of floche and coton a broder. I love working with with those threads. And I didn’t want to not work with them.
And, to tell you the truth, the whole project would be much easier with those threads (more on that, later).
But you know what? DMC stranded cotton – which is the most widely available embroidery thread, at least here in the States and I think in many other countries as well – is a good choice, too, and for good reasons. So that’s what I’m going with.
Keep in mind that this is my choice, but it may not be yours. If you want to use a different thread, go for it!

This is the main reason for my decision. I have the complete set of DMC stranded cotton floss, and then some. And when I laid out all my green floche and all my green coton a broder, I realized just how limited I would be limited in shades of green.
If you’ve taken a really good look at the design, you know that vines and leaves make up a good bit of the picture.
I wanted at least two color values of green that had a range of shades available and that didn’t clash. With floche and coton a broder, I didn’t have as broad a base to choose from.
Reasons, in a Nutshell
My reasons for choosing the stranded cotton over floche or coton a broder, in a nutshell:
1. Available color range
2. Wide availability of the thread
3. Ability to mix colors and shades in the needle
Why I liked floche & coton a broder:
1. Both threads cover faster
2. Both threads are beautiful, more “unique”
3. I love stitching with them – they feel good!
I thought the pros for the stranded cotton outweighed the pros for floche and coton a broder.

Once I decided on the stranded cotton, I had to narrow down my initial color choices. This doesn’t mean that my color choices are absolute at this point. But I needed some colors to start with.
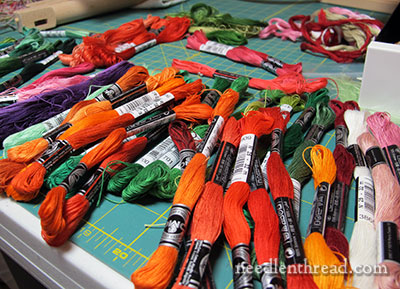
Because I want a springy, bright piece of embroidery (I’m desperate for spring right now, and the design lends itself to vivid colors), I chose a range of greens that are grassy and bright (on the left), and a range of greens that are a little more subdued, but not too subdued (on the right). They’re not the same types of greens, obviously, but they can work together without clashing.
I think.
Again, the choices aren’t absolute yet – but this gives me somewhere to start.

Then I thought in terms of the flowers in the design. There are 8 flowers, and I don’t want them all to be the same color scheme, so I settled on a red-to-coral range (I always prefer red-to-coral as opposed to red-to-pink, but that’s just me) and a smaller purple range.
I also selected a range of yellows that work together and that work with the rest of the colors.
You’ll notice a couple browns in there. I wanted a twiggy brown and a dark brown, just in case. I’m not sure I’ll use the dark brown, but it may come in handy. And at the top of the photo above, those are “extras” that work with each color family, in case I want to go deeper or lighter with any of them.
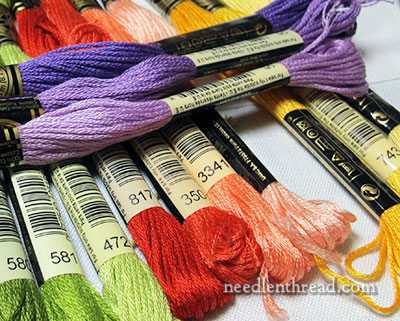
You can see some of the thread numbers in the photo above, but I’m not really ready to give you a list of the thread numbers I’m using, yet. Why not? Because I may change the colors. And if you are following along with every minute detail, then you may end up buying threads you don’t need.
I’ll mention the colors I’m using as I go through the project.
These colors may not work for you, anyway. I find that color on a project like this is a Truly Personal Thing. For example, I have a huge aversion to mauve-y pinks and plums, unless they are part of a needlepainting piece and play the shadows. As a dominant color in a piece of embroidery, they wouldn’t be a choice for me. But other people love them.
Pick Colors You Love!
Pick colors you’ll enjoy using! This is more important than you might think.
We’ve all experienced the initial excitement of beginning a project, right? You’re all keyed up. It’s always on your mind. You’re always thinking ahead to which technique or stitch will work where. You find yourself planning your days and weekends around time to stitch. You’ve got your threads together – you’ve got your favorite scissors out – you’ve picked out movies to watch, music or books to listen to while you work – you’ve put everything together and you’re rip-roarin-ready-to-go!
Housework, laundry, cooking – you’ve secretly written those off, at least for a while. You’ve decided where you can take shortcuts in your homework (tsk, tsk), you’ve cut back on social plans. You’ve minimized everything, because you’re really eager to get going on this beautiful, new, exciting, project!
It’s Thee Project. The One Project You’ve Always Wanted to Do!
Oh, the buzz of starting a new project!
But then…
But then…
But then you get about one third of the way through that Wonderful Project, and you lose a little of that steam. The edge is off your excitement. In fact, the project is looking a little bigger than you initially thought. It’s a little more complicated. You’ve been looking at it for a long time, after all. And now you’re starting to feel guilty that you don’t love it quite as much as you did. You don’t plan your days around it anymore. You find other things to do on the weekend. Finally, you start finding excuses not to work on it.
And then… the Shelf.
Sound familiar?
We are Much Less Likely to go that route if we choose colors that we love. Sure, it’s not always color that does a project in, but color can do a project in. We can get bored with colors pretty quickly. So pick colors that you love.
Write It Down!
When you pick your colors, write them down.

I have a small notebook I keep project notes in, where I write down all kinds of things about the project. For this particular project, I’ve got lists of pros and cons for the different threads, written down as they occurred to me. I have lists of the colors I’m using and their description. Some of the colors have remarks next to them or question marks if I’m unsure of them.
I keep notes of anything that I might want to know later about the project, from ground fabrics to threads to stitch choices to needle sizes, because I can’t rely on remembering the details, especially if I change my mind as I go.
Even if you don’t keep a thorough list of project details, at least write down your thread numbers with a color description. You never know when you’ll lose that number tag!

So here are my initial starting colors.
I’m rip-roarin’-ready-to-go!
In fact, I’ve already started. But more on that, later…
If you want to follow along with the Secret Garden Hummingbirds Project, you can find a list of all the articles relating to the development of this project in the Secret Garden Hummingbirds project index.

