You know when we start discussing frames and hoops for an embroidery project, the actual stitching part is getting pretty close!
I thought I’d take a short break from the thread discussions we’ve been having to tell you about my framing choices for the Secret Garden project and to make some suggestions for frames or hoops.
Please, please, please keep in mind that I’m just discussing what I’m doing, or what I would do, if I weren’t doing what I’m doing (?!).
If you already have a favorite frame or hoop method for your embroidery projects, feel free to ignore me completely.
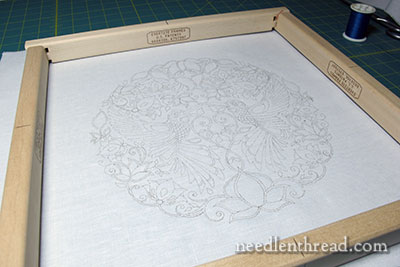
For Secret Garden version 101 (I always laugh when I type that – it seems so silly, but it helps keep things straight), I’m using Evertite stretcher bar frames.
You can read all about Evertite frames and how to use them (and what their advantages are) in this article that shows you the Evertite frames up close.
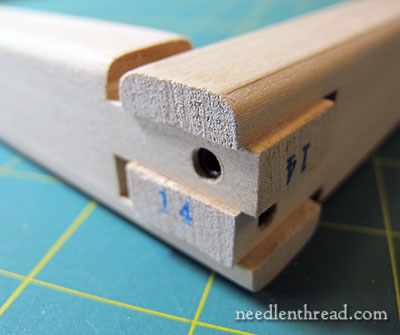
If you’re fabric is 15.5″ – 16″ square, the 14″ stretcher bars will work perfectly.
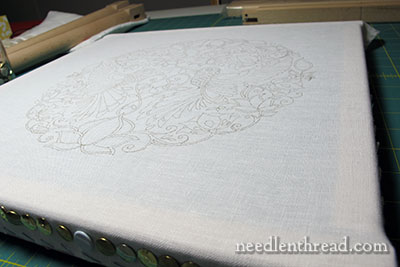
So, here’s the first version of the Secret Garden project, framed up and ready to stitch! It’s nice and taut, a perfect surface for surface embroidery.
You might be wondering why I didn’t use a Millenium frame for this project. I really love the Millenium frames, which I’ve reviewed here. But I don’t have the right sized side bars for this particular piece of fabric. It’ll work for one of the other versions of the project.
And what about hoops?
You can certainly use a hoop for this project. Because of the size of the project, practically any hoop that will work well for the project will need to be shifted around as the embroidery fills in.
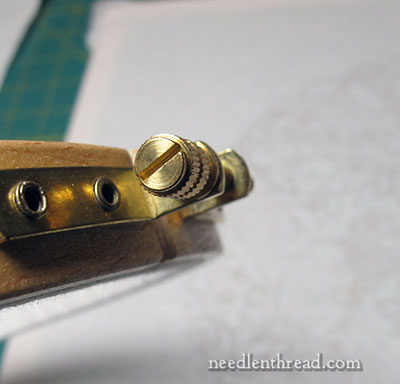
My suggestion for hoops is that you use a good quality wooden hoop, with good hardware that will allow you to tighten the hoop using a screw driver. Hardwicke Manor hoops are my go-to embroidery hoops, and you can find them through various needlework shops – Hedgehog Handworks and Needle in a Haystack come immediately to mind, since I’ve bought mine from both places.
If you can invest in a good hoop, it will last you a long time and serve you well!
Hoop Size
When talking about hoop size, I know there’s a lot of personal preference involved. But if you’re using a medium weight linen, normally, a thicker hoop will work better for you than a thin hoop. A 5/8″ thick hoop works well with the linen I’m using.
No matter what size hoop you use on this particular project (as far as diameter goes), you will most likely have to move the hoop around to work the whole project. You could use a huge 15″ hoop (hoops this large are usually sold for quilting), but hoops this large are problematic with surface embroidery.
For one thing, unless you have a hoop-holding stand or some sensible arrangement for propping the hoop up as you work, your hoop-holding hand will get tired of holding a hoop that size.
For another thing, the larger the hoop, the more difficult it is to maintain drum-tight tension.
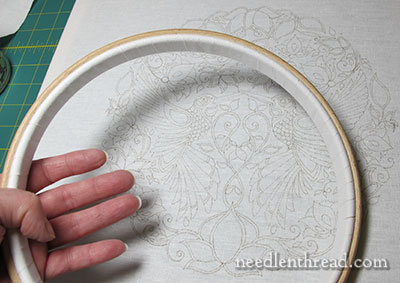
For diameter, I’d suggest nothing larger than 9″, and if you do decide to go with a hoop that large (9″), it really needs to be at least 5/8″ thick to hold the fabric well.
If I’m working with a 9″ hoop, I always work with it in a stand, so that both of my hands are free when stitching. You can see in the photo above that my fingers don’t reach even nearly to the middle of the 9″ hoop when I’m holding it. (This may differ for you – I have short fingers.) If I’m going to hand-hold a hoop, I have to be able to reach the middle of the hoop with the fingers on my holding hand, just in case I need those fingers while I’m stitching (to make French knots, for example).
If you’re holding the hoop in one hand and stitching with the other, I think even the 9″ hoop will prove heavy and cumbersome over time. So you might want to go with something smaller, like a 6″ hoop, which means you have to move it around even more often.

No matter what size hoop you use, if you’re going to use a hoop, bind at least the inner ring with twill tape. You can find a tutorial for binding the inner ring of a hoop here.
This extra step, even though it takes time, will pay off in the long run! The bound inner hoop will help maintain good tension on your fabric and will also help protect your fabric.
For further fabric and stitch protection, it is helpful to hoop your fabric with a layer of plain muslin (calico) over it, with both fabrics in the hoop, and then to cut out a circle from the muslin to reveal your stitching area. The layer of muslin also helps with tension, but more importantly at this point, it helps protect your ground fabric from dirt and oil when handling the hoop.
You can then move that layer of cut muslin around with your hoop when you move it.
Always remove your work from the hoop when you’re taking a long break from stitching. This will decrease the chances of hoop rings on your fabric.
Frame vs. Hoop
At this point, I probably don’t have to mention the pros and cons of frames vs. hoops. But just a few thoughts, if you’re oscillating between the two choices.
Pros of a frame:
1. With a frame, you decrease the likelihood of having to clean the project at the end.
2. With a frame, you have the whole exposed area of the project before you.
3. With the right kind of frame, you only have to frame it up once, and you can maintain perfect drum-tight tension through the whole project.
4. With a frame, you do not have to worry about hoop rings.
5. With a frame, even if you don’t have a stand to hold it, it’s easier to prop your work on a table so that both hands are free for stitching.
Pros of a hoop:
1. With a hoop, your embroidery work is more portable.
2. Hoops are more widely available and generally more affordable.
3. Hoops take less time to set up (but you have to set them up every time you stitch…)
A Few More Fabric / Frame Points for Consideration
Setting up your fabric on a frame or in a hoop is a Very Important Step, and it’s important to do it right from the beginning. Making mistakes here can lead to puckering fabric or misshapen embroidery.
If you’re working on a frame, line up the grain of the fabric with the sides of the frame, so that when you frame the fabric up, it is perfectly square on the frame and not at all askew on the (diagonal) bias.
If you’re working with a hoop, make sure you tension your fabric evenly all around the hoop. Avoid pulling the fabric in one area more than others.
If you are planning on working this project on a different ground fabric, be careful in choosing your ground fabric! Use a natural fiber – linen or cotton (or silk, if you want to get fancy). Polyesters, polyester blends, and even linen / cotton blends are not the best choices, as they usually have some give or stretch to them, which can also lead to puckering or misshapen finished work.
If you believe your fabric is too light to support your stitching, you can always line it with a cotton muslin (if you’re using a white ground fabric, make sure it’s white cotton) or with another piece of light linen.
Fusible Interfacing?
A couple readers asked me earlier this week if they should use an iron-on stabilizer to decrease the chance of puckering and to ask for recommendations for fusible interfacings to use behind this project.
If I could kneel down and plead before you right now, I would – I’d clasp my hands, I’d well up a goodly amount of tears in my eyes, and I’d say in my most pathetic of begging voices, “Please. Please. Pleeeeease don’t use a fusible interfacing behind your work!”
The best thing for a beginner to do to decrease the chance of puckering is to set up the project correctly from the beginning. If you need another layer of something behind your ground fabric to support your stitches, use a plain cotton fabric or another layer of light linen. (This isn’t necessary at all with the linens I’ve recommended for this project.)
Here are the primary reasons I would not use a fusible interfacing behind my embroidery:
1. If, at the end of my project or some time down the road, I need to wash my work, fusible interfacings can (and often do) bubble and separate from the fabric.
2. Fusible interfacings can be affected by climate change, high humidity, sunlight and heat, etc. and can bubble, become brittle, or even discolor with long exposure.
3. Fusible interfacings are more than just the fiber they’re made out of – they’re also the glue. Repeated embroidery through most fusible interfacings is more difficult (it’s more difficult to pass a needle through a layer of fabric, a layer of glue, and a layer of interfacing). Yes, fusible interfacings are often used in machine embroidery – but the machine, not my fingers, is pushing the needle through the fabric.
4. Fusible interfacings cause more wear and tear on embroidery threads, so I’d have to work with shorter lengths and change them more often.
Having seen and experienced all of the above, I don’t think they are worth it. There’s no really good reason to use a fusible interfacing behind surface hand embroidery – better, instead, to learn to set up your projects correctly and to establish a good tension on your stitches through practice, than to mess with fusibles.
Caveat: In crazy quilting I know certain types of fusibles – like Mistyfuse – are used quite a bit. And in certain types of appliqué, fusibles come in handy. But for surface embroidery projects that are meant to be more along the lines of “art” (framed and hung, finished into pillows, stitched on table linens, etc.), please give fusible interfacings a miss. At best, they’re a crutch, and only for embroidery that isn’t necessarily meant to survive the test of time.
Concerning wash-away stabilizers like Transfer-eze and Solvy’s printable fabri-solvy – these can be handy for projects like dish towels and the like. I use them for that and for teaching children to stitch. I wouldn’t use them for a project like this. But I’m not the Embroidery Police. I’m not going to tell you not to, if you’re determined to use them.
Still, I’m sending out massive waves of encouragement to you, topped with a good dose of persuasiveness and a large dash of pleading, to do the project without using these artificial interfacings and stabilizers. The more you practice embroidery, the better you will get at it (it’s a foregone conclusion, if you are diligent), and the less you’ll feel inclined to turn to stabilizers and the like in hopes of making your work look better.
Questions? Comments? Input? Troubles? Confusion? Beratings? I’m all ears! Feel free to leave a comment below!
If you’d like to follow along with the Secret Garden project or catch up on the backstory behind this project and see how it is developing, you’ll find all the articles relating to it arranged chronologically in the Secret Garden Hummingbirds index.

