Remember last week when we looked at an unconventional use for the telescopic magnet – using it, extended, as a thread rack?
I mentioned that I wanted to come up with a dowel system to use as a kind of thread rack while working.
Many readers suggested swinging towel bars, which would probably work great if you wanted to permanently mount them somewhere or onto some kind of rig that would be semi-portable or moveable. It’s certainly a possibility. I could see replacing the mounting system with a very strong magnet, for example, and putting a set of swinging towel bars on the side of my thread storage cabinets that support my work table.
A couple readers picked up exactly what I had in mind, though, and made the suggestion in their comments for what I was using.
And it is this:
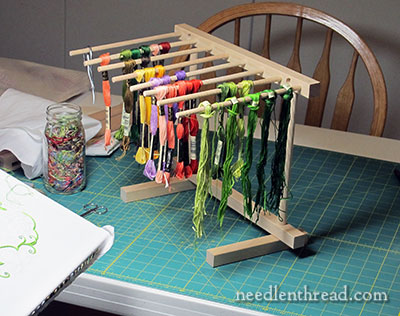
It’s a pasta drying rack. I’ve repurposed it and adopted it for my workroom, where it’s going to get a lot more use than it ever got in the kitchen.
I made homemade pasta once. I ended up using a broomstick propped between two chairs to dry the noodles. The rack was completely superfluous.
The rack works great as am embroidery thread rack. Better, I think, than as a pasta rack (but don’t tell Them I said that).
It’s a convenient size for the top of the table (if you don’t have a work table that you sit next to, you might find it too awkward – it needs a flat surface). It’s collapsible, so I can put it away when I’m not using it. And it offers plenty of space for arranging threads in different color families and groups.
There are some caveats, though! And some decided advantages. Let’s chat it all up, shall we?

If you’re going to use a pasta drying rack for this type of job, the obvious point: if it’s been used for pasta before, you’ll need to do some careful cleaning.
The dowels will also benefit from a quick swipe all around with a fine sand paper. These weren’t made to hold embroidery thread, after all, and they aren’t smooth as glass. You probably won’t get them smooth as glass – this particular rack has little grooved dowels – but you do want to remove any significant roughness to the wood that might snag your threads.
It doesn’t take any time at all to sand them – just fold the fine sand paper around each dowel and run the dowel lightly through it a few times.
On the rack I have, when I assembled it, some of the dowels seemed loose. I turned them around and stuck the other end into the hole and twisted the dowel and they tightened up just fine.

Using pre-cut threads is mandatory, if you want to conveniently be able to remove the threads from the dowels.
In the photo above, the greens are prepared for use on the Secret Garden project. I haven’t prepared the other skeins yet. I slid them onto the dowels as skeins, and you can see them in the background. You can’t conveniently use full skeins on this set up, though, because if you wanted a skein on the back of the dowel, you’d have to remove all the skeins in front of it to get to it.
So you do have to work with prepared and cut threads for this to be a convenient set-up. And that’s fine, because that’s how I like to work when I know I’ll be using a lot of thread. It’s more efficient to pre-cut your threads and have them ready to go.

Another convenient point about using pre-cut threads that are hitched on a dowel or bar (or a thread card): you don’t have to “strip” or separate the individual threads from the larger group of six every time you need a new thread.
Instead, you can slip your needle’s eye under one tiny strand (even though it’s still comfortably “in” with the group), and pull just the one strand out. This is an efficient way of stripping your threads.

To set up my threads on this rack, I cut the threads into 18″ lengths. You can go longer or shorter, depending on what you’re comfortable with and the type of thread you’re using. With floss, I find an 18″ length is perfect. I know some folks stitch with much longer lengths because they don’t like to change threads too often, but I find 18″ keeps the threads looking fresh and eliminates frustrations from knotting and so forth.
When I remove the tags from the skein, I keep the one with the number on it and snip off just the number. This makes a short little sleeve. I fold the cut threads in half and push the folded end into this little number sleeve.
If you write down your color numbers ahead of time and a short description of the color, keeping the number tag isn’t essential, but I do it anyway. It doesn’t really take any extra time and it can allay confusion down the road.

Then I hitch the floss onto the dowels, by taking the tail of the floss through the loop made by the fold. I keep the number sleeve above the hitch, as you can see in the photo above.

A marvelous advantage of this little dowel rack – I can hitch up unused individual threads, too, so that they don’t get accidentally allocated to the orts jar, or stuck on my clothes, or brushed onto the floor.
Another nice feature: I can move dowels that have thread on them already. If I want to move a dowel full of threads to the end position, I can. The threads are easy to access from the tops of the dowels, so it isn’t necessary to move them, but if you wanted one particular dowel full of thread in front of you on the end of the rack, you can pull the dowel out and trade locations easily. You don’t have to re-hitch all the threads.
Same Thing, Only Different
You might have noticed by now that the rack is really just a more “permanent” (even though it’s collapsible and storable) thread organizing fixture for when you’re working on a project. It is not a long-term storage solution.
You can accomplish the same type of organization (in a way) with thread cards which you can make with a large hold punch and some card stock, or with handy thread organizers such as these thread drops, which I love, especially for projects that travel.
The real difference that I’m finding with the rack is that the threads are kept a lot neater, since they are hanging and they are spaced out. They don’t tangle up with each other inside a bag – they just hang neatly on the rack.
Another thing I’ve noticed – I’m more prone to save thread and to hang usable threads back up on the rack.
Where to Find
If you have a worktable, the re-purposed pasta rack makes a great embroidery thread rack, if you keep in mind the points above. I’m really happy with it! I’ve been using it since I started the Secret Garden project, and I can see myself using it for future projects quite often.
There are many, many configurations of pasta drying racks out there, and many different types that look like this one I’m using. In particular, I’m using this: Fante’s Cousin Emily’s Pasta Drying Rack, because that’s what I had.
You can check specialty kitchen stores for them, if you want a new snazzy one, but I think you’d be paying too much for the materials and workmanship (or lack thereof) in these. It just depends. This isn’t something I’d spend a lot of money on, personally.
You could also make your own, if you’re handy with a saw and a drill. It’s not complicated – just dowels and 1″x1″ bars. And you could even snazz it up and configure it your own way. It could be kind of fun!
But if you make a snazzy one and market it and make millions on it, remember me, ok?

