Starting and Traveling. Are we talking about cars here, or embroidery?
My knowledge of cars being somewhat limited (does it start? do I like the color? this is where the gas goes…), I promise we’re talking about hand embroidery.
And not only are we talking about hand embroidery, but we’re talking about ways to make hand embroidery more efficient.
We all know that handwork is not the most time efficient way of decorating fabric. In the past hundred plus years, we’ve developed machines that can adorn fabric a whole lot faster than the hand-weilded needle. Yet there are some things we can do to make our hand embroidery more time efficient.
Today, we’ll talk about two ways that will clip a little bit of time and trouble off your stitching sessions: starting threads and traveling threads.
Starting Embroidery Threads
I’ve covered starting and ending threads before here on Needle ‘n Thread. This is a refresher, with a few extra considerations.
The easiest and most secure way to start a new embroidery thread, especially when you’re working with a hoop or frame mounted on a stand, is to use a waste knot and a few tiny backstitches to secure your thread.
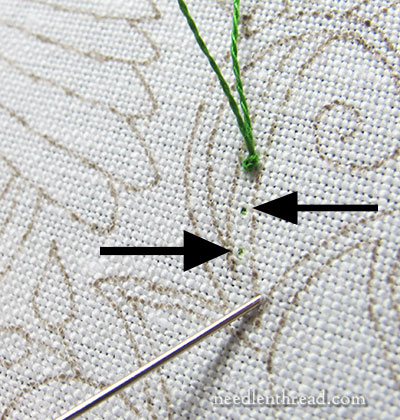
A waste knot is simply a knot at the end of your thread that you’ll clip off later. You take your needle and thread down into the fabric, leaving the knot on top. Then, you stitch a few tiny backstitches to secure the thread and snip the knot. The photo above shows the waste knot on the front of the fabric, and the arrows point to two tiny backstitches or anchor stitches taken towards the direction of my starting point, which is where the needle is sticking out of the fabric.
If you’re working line stitches along your design line as opposed to filling an area with stitching, just make the stitches right on the line, working them towards your starting point where you’ll begin embroidering the line.
If you’re working in an area that will be filled with stitching, you can make the anchoring backstitches within a short distance of your starting point, anywhere within the design lines where your filling will cover them.
Once you have two or three tiny backstitches worked, you can cut the knot right next to the surface of the fabric. I like to pull up on the knot a bit and snip the thread right at the fabric surface, so any excess thread sinks behind the fabric.
How does this save you time?
It saves you time because you don’t have to turn your work over to run the new thread under the stitches on the back of the work. Every start (if possible) is on the top of your work and is covered by other stitching.
This is, in fact, a neater way to start your work, too. It helps minimize bulk areas on the back where the new thread is anchored by whipping it around the backs of stitches.
You can end your threads the same way, with tiny backstitches, bringing the needle eventually to the front after the last tiny backstitch, and clipping the thread next to the fabric. As long as you do this in an area that will be covered with stitching, it will never be noticed.
Sometimes, though, you’ll have to end threads by whipping the backs of the stitches on the back of the fabric, or running the thread under a stitched area on the back, but if only doing this occasionally, it won’t take as much time to start and end your threads.
Traveling Your Threads
“Traveling” a thread on the back of the fabric is taking a still-usable thread along a certain path, in order to get you to a new starting position.
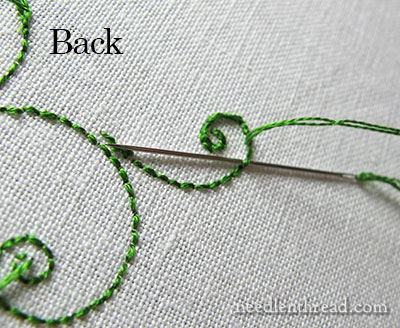
Imagine that you just started a new thread. It’s about 18″ long, and you have a short 1″ line or curl to stitch (like in the photo above).
Below that little curl, a couple inches away from where it ended, you plan to start up another line of stitching.
Instead of carrying your thread across the back of your work for a couple inches to get to your new starting point and leaving the thread in a loose, long stitch on the back, and instead of ending the thread and starting a new one, “travel” the thread by whipping the backs of the stitches on the back of the fabric until you get to your new starting point.
If you get to an area that has no stitches to use as a path, turn the work over…
…and work on the front.
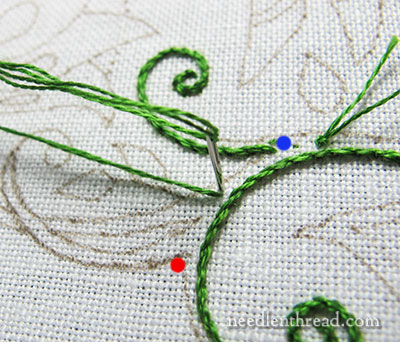
In the photo above, the blue dot indicates where I stopped traveling the thread along the back of that curl. I was aiming for the red dot for my new starting point. I could continue traveling the thread underneath that other stem stitch line on the right, or, from the front of the fabric, I can take a couple little backstitches as steps towards the new starting point, as long as I do it in an area that will be covered.
In this way, I avoid leaving long threads crossing the back of my work.
You might be thinking that it’s a waste of thread to “travel” on the back of your fabric this way. If you’re only going a short distance (usually no more than a couple inches, give or take), it’s not! You’d end up using just as much thread or more by ending the thread and then starting it again in a new area.
By “traveling” your thread in one of the two ways mentioned above (whip stitching the backs of stitches or stepping to your new starting point with tiny backstitches), you will save the time it would take to end a thread and start a new one.
You’ll also save time by reducing a possible frustration factor. Long stitches across the back of your work can lead to knotting or tangling that you might not see right away. Eliminating long stitches across the back of your work will reduce this possibility and save you the time of having to fix a mess on the back of your fabric.
Traveling your threads has the added advantage of keeping the back of your work nice and neat. Threads stretched hither and yon across the back of your work can make it messy.
So, those are two tips worth trying the next time you take up your surface embroidery.
There’s another tip that fits into the category of time-efficient stitching, but it’s such an important tip, that I want to devote a whole article to it. So we’ll see that a bit later.
Questions? Comments? Suggestions? Input? Have your say below!
This post is part of the series on the Secret Garden Hummingbirds embroidery project. If you’d like to see what that project is all about, or pick up some more needlework tips along the way, you can follow the whole project from its beginnings by visiting the Secret Garden Project Index.

