Yesterday, we talked about some hints to increase stitching efficiency.
We discussed how starting threads from the front of the fabric and traveling threads along a stitched path on the back of the fabric can help save a little time during embroidery sessions.
Today, we’re going to look at one more habit that helps increase stitching efficiency. It’s called “parking” your embroidery threads.
Parking a thread is simply bringing the thread to the front of your work where you can see it, but away from your stitching area, and leaving it there until you either need it again or are going to end it.
Especially if you’re working with multiple colors or shades and you’re planning to return to a thread you’ve already used (but not used up), parking your threads can save you time. You can pick up a parked thread and use it in the same area later, if you need that color again. You don’t have to end the color and then later, start it all over again.
Parking can also save you time because you aren’t ending threads every few minutes. Instead, you’ll end them all at once, when you’re finished with the section you’re working on.
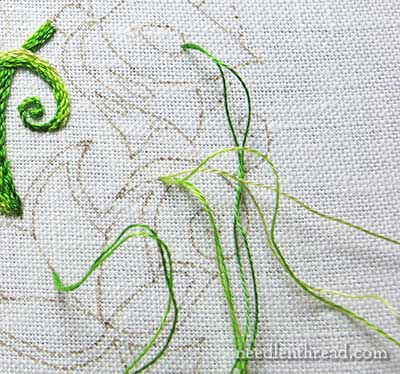
If you’re working on a small project and your thread will reach outside the perimeter of the design, you can park your threads there.
If you’re stitching on a larger project and your threads won’t reach to the design perimeter, it’s best to bring parked threads to the front of the fabric in an area where you’ll later be stitching so that you don’t make random holes that won’t be covered in your ground fabric. Just make sure that you bring the parked thread to the surface away from your present stitching direction.
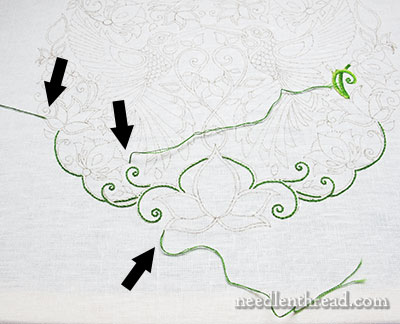
In the photo above, the arrows point to various parked threads off the sides of the path I was stitching.
The Important Point
I was working with a gal once and we were shading with several colors. I explained to her that she didn’t have to end each thread right away – she could park them and end them later, and that way, she could continue to use them.
She was adamantly against the practice. Why? Because she had learned it before, and it caused entanglements and a huge mess on the back of her fabric every time she did it.
So I asked her to show me how she learned to park her threads.
She agreed. She took her last stitch with a particular thread.
With her thread still at the back of her fabric, she brought it around to the front edge of the top of her frame, and stuck the needle in the fabric, leaving the majority of the thread hanging on the back of the fabric and also leaving her last stitch rather loose, because the thread was never pulled taut anywhere.
Do you see the problem?
It’s very important that the parked threads are brought completely to the front of the fabric and pulled taut, so that there are no stray, sagging threads on the back of the fabric. With the parked threads on the front of the fabric, you can see easily where the threads are and you don’t have to worry that they’re hanging free on the back somewhere, waiting to entangle themselves with your working thread. Also, by pulling the thread taut to the front, your last stitch will be locked in, not just floating in place.
Some folks like to use a magnetic needle minder on their projects, and park their threads – still threaded in the needle – by bringing them to the front and resting the needle on the magnet. That way, if the thread can be used again in that area, you don’t even have to thread the needle.
While it can sometimes look like a confusing array of annoying threads on the front of the fabric, as long as you’re parking them out of your immediate stitching area, you can smooth them down to the surface of your work to keep them from flying about. Most threads will stick to the ground fabric if you smooth them down on top of it, out of your way.
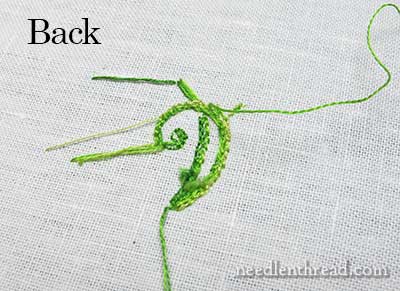
Once you’ve finished stitching in an area where you’ve parked your threads, you can flip your frame or hoop and end all the threads at once.
In the photo above, you can see several threads coming off the stitched area. These are the parked threads. Now, I’ll pull them to the back and end them off.
You can also end your threads the same way you started them, with a few tiny backstitches in an area that will be covered with stitching, and you can do this entirely from the front of the fabric, saving you from having to flip your frame.
However, in this particular project, the stitched areas are rather narrow, and I don’t want to fill them with a lot of crowded little backstitches for starting and ending threads.
Instead, I’m starting all my threads on the front in the manner we discussed yesterday (the waste knot and backstitches), but I’m ending the majority of them on the back by weaving them or whipping them under the backs of the stitches and trimming them.
In the photo above, you can see that all those ends are now secured and trimmed away, leaving the back neat and tidy.
So now we’ve seen three ways to increase stitching efficiency: starting threads, traveling threads, and parking threads.
Each of these tips can help increase your actual stitching time during any given session. And anything that can give us a little more time to stitch is a good thing, right?
Questions, comments, suggestions? Have your say below!
This post is part of the series on the Secret Garden Hummingbirds embroidery project. If you’d like to see what that project is all about, or pick up some more needlework tips along the way, you can follow the whole project from its beginnings by visiting the Secret Garden Project Index.

