I’ve had a few questions this past week about stem stitch filling in general, mostly in conjunction with the Secret Garden embroidery project.
So today, I want to show you some close ups of stem stitch filling underway and go over a few tips about how to successfully fill an area with the stem stitch.
The stem stitch is a really versatile stitch, so whether you’re working the Secret Garden project or not, hopefully, you’ll find these tips useful for other surface embroidery projects as well.
First of all, concerning stitch length, your stitch length will vary when working the stem stitch filling, depending on a number of factors.
For those who are worried about being super-duper precise with an exactly consistent stitch length when working the stem stitch and the stem stitch filling, please don’t obsess over stitch length!
Your stitch length may change (or be different from mine) based on several factors:
1. Stitch length varies depending on the thread you’re using. Different threads require different stitch lengths. This is perhaps best explained by referring you back to this comparison of different weights of cotton embroidery threads stitched with stem stitch. Thicker threads will require larger stitches, and finer threads will work better with smaller stitches.
2. Stitch length changes, depending on where you’re stitching. When stitching around a curve, smaller, tighter stem stitches will usually take the curve more smoothly than long stem stitches.
3. With stem stitch filling, sometimes, when working a line of stem stitch in the area to be filled, you might have to alter the length of your stitches here and there, to make them fit next to the previous line of stem stitch or to make them work in the particular area that you’re filling.
The upshot: Chances are, on this piece, which features curvy vines and in which thread choice is individual, every stem stitch is not going to be exactly the same length. Don’t obsess over it. Once the stem is filled up, it will look fine.
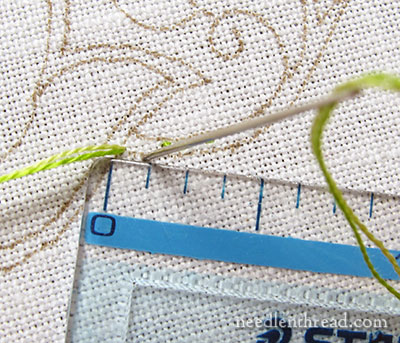
In the photo above, I’m taking my first stitch in a stem stitch line, using two strands of cotton floss in the needle.
You can see that the stitch is less than 1/8″ long, but not as short as 1/16″. My first stitch (and my last) in every line of stem stitch are always a little shorter than the stitches in between. A shorter stitch at the beginning and end keeps the ends of the line a consistent thickness.
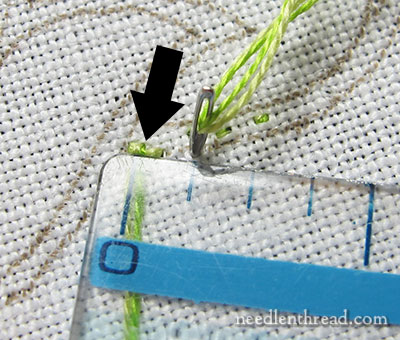
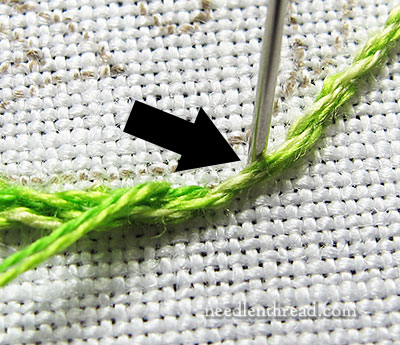
The arrow in the photo above shows where the second stem stitch is beginning in this line of stem stitch. (The working thread is squished behind the ruler.)
The needle is going down into the fabric at about the 1/8″ mark. So, including the overlap of the second stitch with the first stitch, the second stitch ends up being about 1/8″ long, which is slightly longer than the first stitch.
This length will be more or less consistent on straight and gently curved lines, but there will be places where my stem stitches might be a fabric thread longer or shorter, just because I don’t measure every stitch. I try to be consistent, but certainly, there are occasional inconsistencies.
If the line moves into a sharper curve (especially if it moves into a spiral), the stitches will be significantly shorter to take the spiral smoothly.
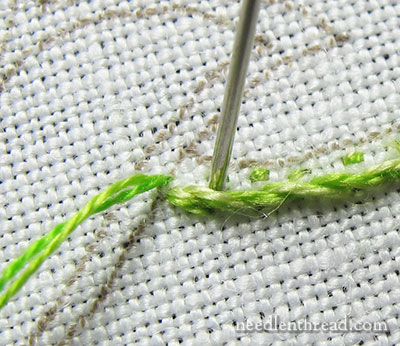
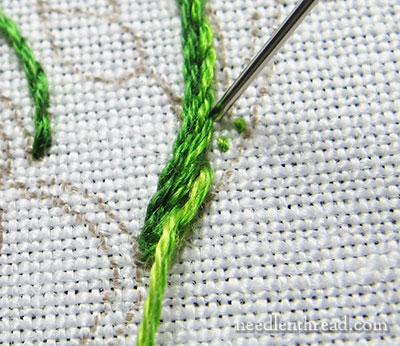
With the first line finished, I changed my thread to the next two shades of green in the needle, and I’m starting the next line of stem stitch filling right next to the first.
You can see that I’ve started on the edge of the vine on the left, and that my first stitch corresponds to the middle of the overlap of the first two stitches on the previous line. This means that my first stitch on this second line is right around or just beyond the end of the first stitch on the first line.
Notice that the needle is right next to the “dip” formed where the second stitch is overlapping (twisting over) the first stitch), and the third is overlapping (underneath) the second stitch.
You might not always be able to end up right in this overlap area. Sometimes, the inner lines of stem stitch will have to be more compact because they’re further to the inside of a curve. Or you might have been slightly inconsistent in your first line of stem stitch, and you’ll find that you can’t accomplish a good length for the stem stitch in a subsequent line, so you have to end the stitch a little farther beyond the dip. That’s all ok – it will work out, once the whole area is filled.
Remember, this is a beginner’s piece. You want to strive to do your best, but you don’t need to make yourself miserable trying to do that, by being too obsessive over the stitch placement and length on the stem stitch filling.
Stem stitch filling is very forgiving, which is why I chose it for the vines!

I’m bringing the needle up for the next stitch (leaving a small loop in the working thread below the needle), just a little more than halfway back, between the beginning and end of the first stitch in this line.
Notice that this second stitch is fairly close to the beginning of the second stitch in the first line, although technically, it’s not quite in the same spot – it’s a little bit forward, just before the spot where the second stitch in the first line is arching out of the overlap.
Notice, too, that the needle is not tucked up right into those first stitches in the first line. Otherwise, you might find yourself going into the same holes as the stitches in the first line, and things would get a little tight in there.
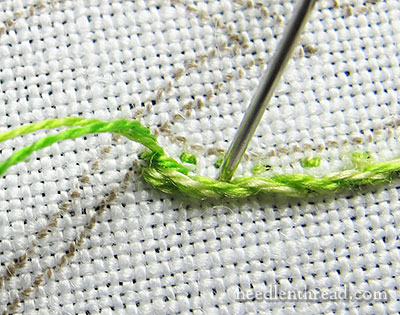
I’m ending this second stitch in the “dip” or overlap area, around the same place where the second stitch in the first line ended, and where the second and third stitches in the first line overlap.
Notice at this point that the second stitch in this second line is quite a bit longer than the first stitch. It doesn’t have to be quite that long – I could have shortened it up and taken it down a little closer to the end of the first stitch – but it “fits” better here, and so the stitch is slightly longer than the other stitches. (And by slightly longer, I mean about a fabric thread longer – not another 1/8″ longer.)
It’s somewhat difficult to see in this spot, but the arrow points to the overlap of the stitches in the previous line. Can you see the darker green next to the lighter green right behind the left of the needle there? That’s where, in the previous line, the beginning of one stitch and the middle of the previous are lying right next to each other on the fabric. It’s not the “dip” between the stitches.
So in this case, this stitch I’m taking here goes just beyond the edge of the overlap, so it isn’t in the “dip” at all.
If I had taken the stitch down into the dip, I must have thought the stitch would have been too short, so I made it a little longer. But even if I had made it shorter, it would still work out ok.
Here’s another spot where I took a really long stitch. It’s kind of an awkward spot, just before where two stems merge, and I needed to get the thread started in this area, but it couldn’t start exactly where the other threads had started at the end of the vine (because I was out of design space there).
So, in this case, I’m practically skipping two stitches in the previous line, to keep this “merging” area smooth and connected. I don’t want it to look like the line breaks off suddenly, but I need the stitch to fit into a rather narrow area, and a longer stitch right there does that better than a shorter one would.
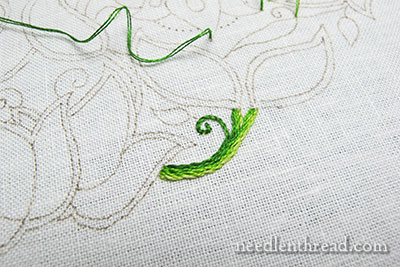
Here’s that vine area finished. It looks a little squat and boxy, because it’s out of context with anything around it and it’s a relatively tiny vine (at the top of the design – I turned the frame upside down to work on that area). Once the leaves around it are worked, it’ll look better!
Stem Stitch Filling Tips, Recapped
1. Don’t worry too much about absolute precision in the length of your stem stitches. Circumstances will cause the stitch length to change now and then.
That being said, try to keep them consistent, or close to consistent, on the straight and very gently curved lines – but you don’t have to obsess over it to the point of measuring your stitches!
2. In your subsequent lines of filling after the first line of stem stitch, there will be times when you have to take longer or shorter stitches, and can’t always begin and end in the same spot relative to the previous line of stem stitch. That’s ok. Chances are, it will work out in the end!
Now, go forth and stitch some stem stitch! And remember that embroidery is supposed to be fun and relaxing. If it’s making you uptight, try to talk yourself into letting go of too much precision.
This doesn’t mean that your work should be sloppy (on the contrary, my hope is that this project will help us all improve our work), but don’t make it more difficult than it is, by being so meticulous that you fail to enjoy it.
Besides, sometimes loosening up a bit can improve the look of your stitches!
So go have fun with it!
If you have any questions, comments, suggestions, tips to share, or whatnot, feel free to leave a comment below.
If you’d like to follow this project from start to finish, you’ll find all articles pertaining to it listed in chronological order on the Secret Garden Embroidery Project Index.

