Today’s mini tutorial on stem stitch curls and spirals was prompted by some questions that have come in recently via email and in the comments on the various articles on stem stitch.
Some of the questions concerned me enough to reschedule today’s planned article. It seems some of you are really struggling with stem stitch on curls and spirals. On top of that, there’s some erroneous information out there about working curls or spirals with stem stitch.
A couple readers mentioned that they have attended classes in which the instructor taught that the working thread is always on the outside of a circle or curl, no matter what direction you’re stitching in, because that’s only way the circle will look smooth and the stitches will hold in place.
Wellllllll…this isn’t exactly true. I thought we better clear that point up, just in case others suffer under the same impression.
So, in this tutorials, I hope to answer questions on working curls in stem stitch without the stitches looking spiky, and I hope to clarify the relationship between the needle and the working thread when working into a curl.
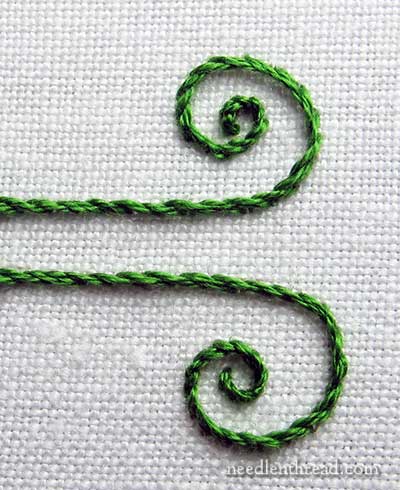
Here are my rather quickly worked spirals that I doodled directly on a scrap of fabric.
When I look at them under the glaring, truthful eye of the camera, I realize they’re not the most beautiful examples of stem stitch in the world. But bear with me, anyway…
Both of those scrolly lines are worked in stem stitch, from left to right. I didn’t turn the hoop at all as I moved forward with my stitching, because I wanted to make sure it was very clear where the working thread ends up in relation to the needle as you go into both the top and the lower curl.
Besides, if you’re working on a frame, you can’t always turn it to follow the movement of your embroidery line.
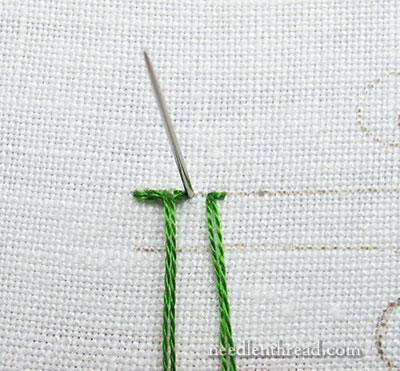
So, here we are, starting the stem stitch line. Notice the working thread is below the needle, because we are working from left to right and we are using s-twisted cotton embroidery floss.
(The whole s-twist, z-twist thing is not relevant at this point, since I’m working with cotton, and all cotton embroidery threads are s-twisted. But you can read about the difference between s-twisted threads and z-twisted threads and see how they affect your embroidery, if you’re curious. Mostly, rayons are always z-twisted, and silks are often z-twisted, but not always. Cottons are always s-twisted.)
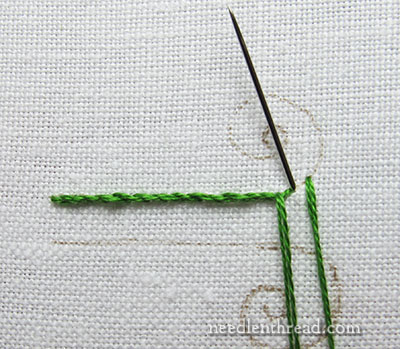
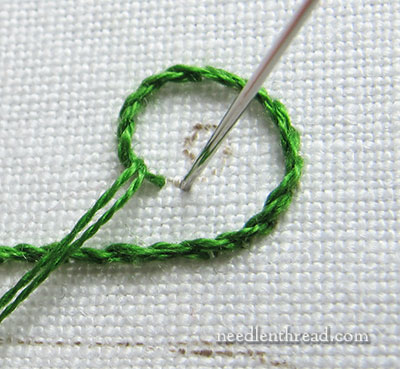
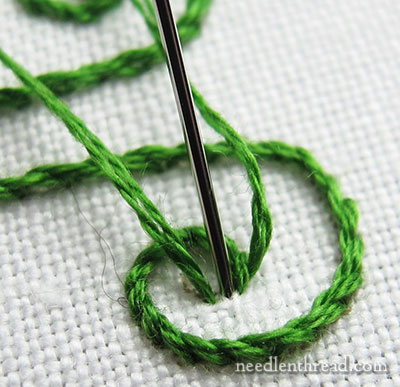
Here we are, traveling along the same line, heading into the upwards curl. Notice the working thread stays in the same place in relation to the needle – it is outside this particular circle, as we work into the circle.

On this upward curl that curls counterclockwise, notice that the the working thread stays to the outside of the curl in relation to the needle, all the way around.
In the photo above, the working thread is above the needle, but that’s because I’m stitching in a different direction at this point. I haven’t changed the relationship between the needle and the working thread at any point in this line and curl. All I’ve changed is the direction in which I’m stitching as I travel around the curl.
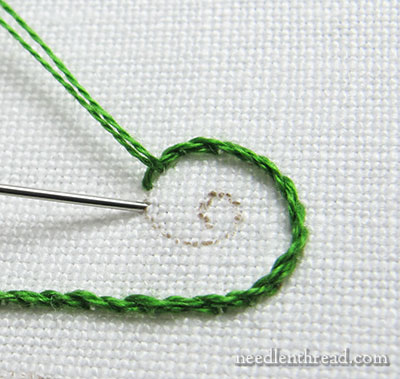
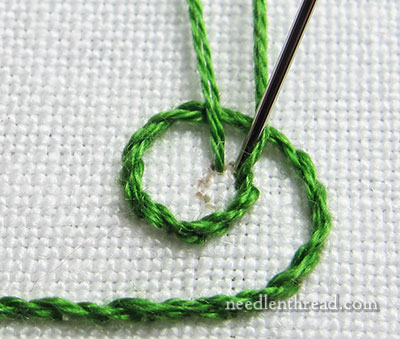
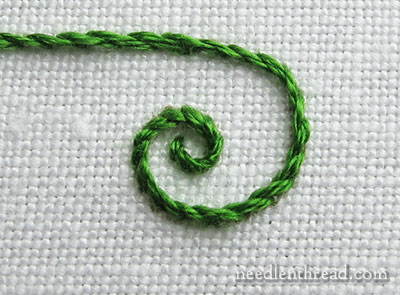
As we work into a tighter curl – as the line starts spiraling in – my stitches are getting smaller.
And as the curl gets progressively tighter, the stitches get progressively smaller.
You don’t want to go from “normal” sized stitches (the stitch length you started with) to tiny stitches in one stitch. Instead, you want to work progressively into the smaller stitches. You know that you’re entering a tight spiral and your stitches will need to be quite small to take the spiral neatly, so start decreasing the size of the stitches as you work into the spiral.
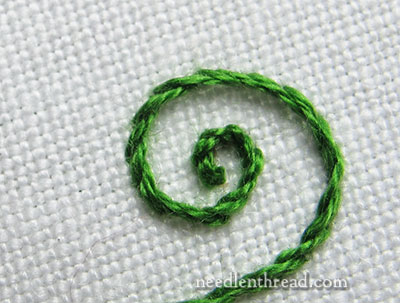
Smaller stitches still! The curl has tightened up so much, that the smaller stitches are necessary in order to keep the integrity of the curl.

At this point, the curl is finished. The last stitch, where the needle goes to the back of the fabric to end off the thread, should be just beyond the end of the previous stitch.
I know a little girl who has a little curl right in the middle of her forehead. When she is good, she is very very good, but when she is bad, she is horrid!
Every time I stitch a curl, that’s what comes to mind. I’m not sure why.
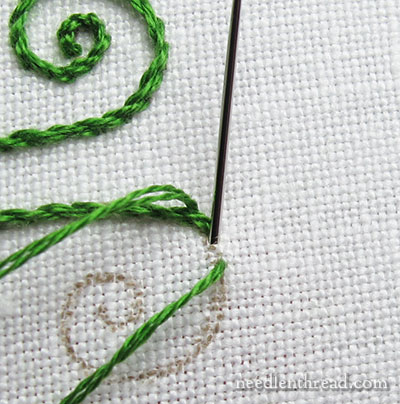
I’m stitching the lower line and curl in the photo above. I started on the far left and the working thread was below my needle with each stem stitch.
And now I’m working into the downward, clockwise curl. Notice that now, the working thread is on the inside of the spiral.
The relationship of the working thread and the needle has not changed.

And it doesn’t really change at all – it’s the direction of stitching that changes. So, as I work into the lower part of this spirally curl, now the working thread is above the needle.
It’s still stem stitch! If you turned the hoop to maintain a left-to-right stitch direction along with the turning of the curl, you would see that the needle is below the working thread.
If you switched right now and put the working thread below the needle, you’d get a slight break in the stitched line, and suddenly, your stitches would blend together into a smoother twist typical of outline stitch and the change would be quite noticeable.
And you can see the decrease in the size of the stitches as I move into the center, tight spiral.
And the second curl is finished.
So, two things to remember when working circles, curls, or spirals with stem stitch:
1. Don’t change the position of the working thread and needle just because you’re going into a curl or spiral. Where the working thread will be in relation to your needle depends upon which direction your design line is traveling in.
2. Work progressively smaller stitches as the spiral gets tighter. In this way, your stem circle will hold and you will avoid the “spikes” that often result from stitches that are too long.
Stab Stitching vs. Sewing
A final note:
When you are working in a hoop or frame, your stem stitch results will be much more pleasing if you stab the stitches rather than sew them.
Stabbing is taking the needle all the way from the front to the back and pulling the thread through.
Sewing is scooping up some fabric to take the stitch, so that you don’t have to take the needle all the way to the back and you can just work the stitches right from the front of the fabric.
But if your fabric is drum tight in a hoop or frame and you’re “sewing” your stitches, you increase your risk of puckering and distorting the fabric, and your stitches rarely come out as nicely.
Also, stabbing instead of sewing the stitches eliminates the lefty-righty confusion often associated with stem stitch. If you’re stabbing, it doesn’t really matter if you’re left-handed or right-handed. You can work the stitch from left to right, either way.
If you do need to work the stem stitch along a right-to-left line, remember that the working thread must be above the needle, for the stem stitch to come out correctly.
Questions? Comments? Suggestions? Have your say below!

